Sewing Fun With Bias Tape Binding by Dori Troutman
I can’t tell you how excited I was to use the Clover Bias Tape Makers. A few years ago I purchased an off brand Bias Tape Maker and it was such a disappointment that I’ve been hesitant to try them again. This experience was so different! This is a game changer for me where making Bias Tape is concerned and I’m so excited.

Clover makes two different types of Bias Tape Makers; with five sizes in each type. In the above photo the top set are the standard Bias Tape Makers (1/4″, 1/2″, 3/4″, 1″, 2″). The bottom set are the Fusible Bias Tape Makers (1/4″, 3/8″, 1/2″, 3/4″, 1″). You can watch the Clover YouTube video here that shows you how to use both types.
Today I’d love to share some of the things that I found useful in using the Tape Makers, as well as a project and a couple gift giving ideas using your very own home made Bias Tape!
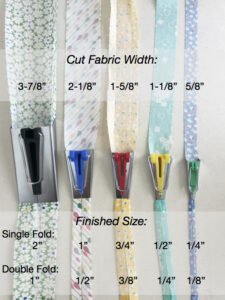
The most important thing to me is the math in choosing which size Tape Maker to use and how wide to cut my fabric. I’ve made this chart to help in quickly knowing what size to cut your fabric and which of the tape makers to use for a certain width Bias Tape. Keep in mind the difference between Single Fold and Double Fold Bias Tape. When your fabric strip comes out of the Tape Maker, it is a Single Fold. In order to make a Double Fold you will fold it over and press it again once you’ve removed it from the Tape Maker.

Something that I found very necessary in making the Bias Tape is a hot iron to press the creases in the fabric as it comes out the end of the Tape Maker. I used the Clover Mini Iron and I was amazed at how hot it got and how well it worked in pressing sharp creases in the fabric. And it made it so much easier than trying to manipulate a large iron with one hand as you are gently guiding the Bias Tape Maker with the other hand.

I’ve never used Fusible Tape Makers before and these were so amazing! Its a really neat concept where the fabric strip runs through the bottom of the Tape Maker, the fusible tape runs through the top and goes into the bottom slot so that the fabric and tape come out together. The Clover Mini Iron worked incredible on this! I haven’t used the Fusible Bias Tape for any projects yet but I’ve been doing some reading about Bias Tape appliqué and I’m super excited to try it out.

I made all kinds of different sizes of both Single Fold and Double Fold Bias Tape and have enjoyed just looking at them the last few days!
I decided these would make such fun stocking stuffers for my sewist friends! What a great little “extra” in a package.

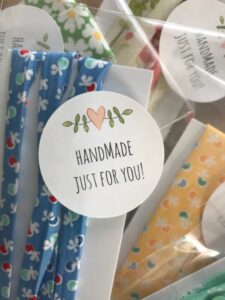
Here’s what I did: After I made the Bias Tape, I wrapped it around some heavy card stock, securing the end with a Clover straight pin, then I placed them in a clear cellophane bag, put a custom made sticker on the bag and they are ready to gift! Talk about easy!
Making a Bunting

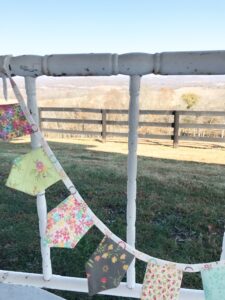
One of my favorite quick home made gifts to make are little Buntings. I’ve made these for years with purchased Bias Tape and am so excited to gift some of these now with home made Bias Tape! Buntings always add a little bright happy sunshine anywhere they are hung; my favorite place where I have a bunting hung is in my kitchen window. I’ve never gifted one that wasn’t enjoyed!
Making a Bunting is a very quick and easy project using home-made Bias Tape and I’m excited to step you through it.

Step 1:
Start with fabric scraps that you can cut 3 inches by 4 inches in size. You will need a minimum of 20 of these.

Step 2:
Cut the corners off the top by using the 45 degree angle on your cutting mat.
Step 3: Pair your fabric into ten sets. Place each set right sides together and sew a 1/4 inch seam around three sides, leaving the long bottom side open for turning.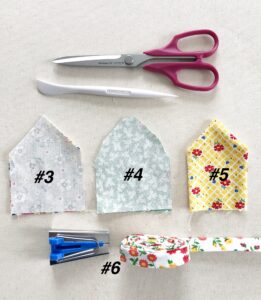
Step 4: Once you have sewn around the three sides, clip all three of the corners, making it less bulky when turning.
Step 5: Turn right sides out, using the sharp end of you Clover Hera Marker for pushing out those points. Be gentle so you don’t poke a hole in the fabric. Iron your bunting flat.
Step 6: Make a 54 inch long piece of single fold Bias Tape using the blue (25 mm) Tape Maker. Once your Bias Tape is removed from the Tape Maker, fold it in half lengthwise and press the entire length forming a 1/2 inch width Double Fold Bias Tape.
The Tape Maker comes with perfect instructions to follow in making your Bias Tape. You can also find many videos online with great visual instructions also. It’s really easy. I promise!
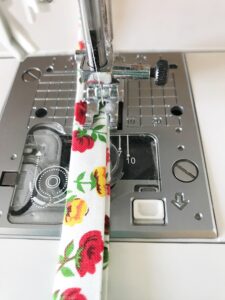
Step 7: Now the fun part of sewing your little buntings into the Bias Tape. Sew along the open edge of the Tape approximately 10 inches, closing up the opening. Stop with your needle down and do not remove the Tape from the machine.
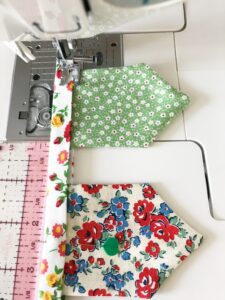
Step 8: Then place the open end of a bunting in the fold of the Bias Tape and sew it in place. Continue in this manner, leaving an inch of space in between each bunting. Sew all the way to the end of the Tape. Trim your ends to match in length, but be sure to leave at least 8 inches so that you have something to tie when hanging your bunting!
These are also very fun to fold into a clear cellophane bag and close with a home made sticker. Such a fun gift to give to someone in need of some “happy” in their day!

You may not think you would have a use for a set of Clover Bias Tape Makers but I can’t tell you how excited I am to have my own set. I’ve found so much joy in thinking of things I can make, and gift, using my own home made Bias Tape!
Happy sewing… and happy Holiday gifting!
~ Dori ~
Find Dori on her Blog | Instagram | Pinterest
Stay connected with Clover on Facebook | Twitter | Instagram | Pinterest | YouTube | Ravelry
[mc4wp_form id=”11289″]