Kenyan Inspired Beaded Bracelet

Designed by Carol C. Porter
Have you heard about our Beading Loom?! If you haven’t here’s a project that gives you an idea of what you can do with it!
Supplies:
- Clover’s Bead Loom (Art No. 9910)
- Clover’s Beading Thread-Brown (Art. No. 9914)
- Miyuki Delica Beads (Cylinder 11/0)
•DB 862
•DB 653 - 2- Round medium Kazuri Beads
- 1- large Kazuri Bead
- 2- Jump rings
- 2- Clam shell bead tips
- 1-Bracelet closure
- Round nose pliers
Technique:
- Continuous Warp
- Decreasing/Increasing
- Unit 1 Beads: 10/Warp: 11
- Unit 2 Beads: 6/Warp: 7
Loom Set Up:
- Set up frame with approximately 2.5” between Warp Guide Beams
- Set Warp Guide Beams with groove set (a) on top.
- Set 1 peg on each end of the Warp Guide Beams
- For unit 1 warp using Method 1: Continuous warp using pegs. Warp loom with 11 threads using brown thread.
- See package instructions for step by step warping.
- Weave design following the bead placement chart. Tie weft thread onto warp thread #5 and begin.
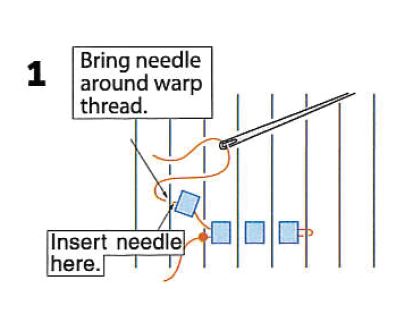
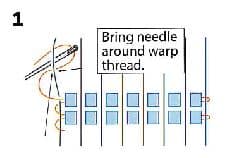
Increasing
- Bring the threaded needle under the warp threads. Pick the number of beads needed for increase. For example, if you plan to increase the row by 1 bead at each end, pick up 1 bead. Press the increase bead(s) against the underside of the warp threads, positioning it between the threads and bring the needle out as shown.
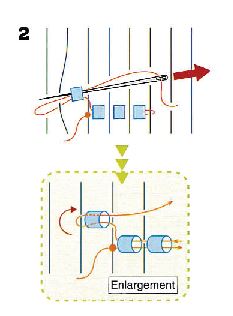
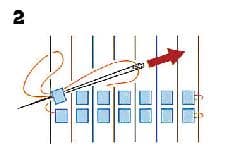
- Pass the needle through !the increase bead(s), eye first. Make sure to pass the needle OVER the warp threads.
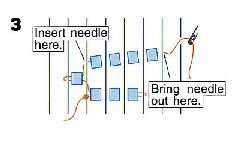
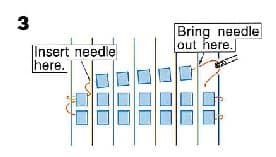
- Insert the needle under the warp threads, pick up the remaining beads needed to complete the row, and position them between the warp threads.
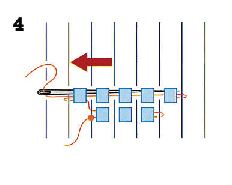
- Working in the opposite direction, pass the needle, eye first, through all the beads in the row, including the increase bead(s). Repeat these steps as necessary for your project, following the Bead Placement Chart.
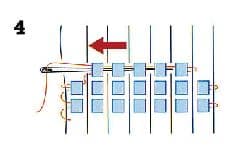
Decreasing
- After completing the row before the decrease, catch the warp thread at the left edge with the needle.
- Pass the needle through the last bead in the row before the decrease, eye first.
- Bring the needle underneath the warp threads, and pass it through the beads of the decrease row. Press the beads up between the warp threads.
- Pass the needle back through the beads of the decrease row, eye first. Repeat these steps as necessary for your project, following the Bead Placement Chart.
Once unit 1 is complete, remove from loom and work in weft threads. Follow same steps to create unit 2.
- Weave design following the bead placement chart. Tie weft thread onto warp thread #3 and begin.
- NOTE: The length of the bracelet can be adjusted by adding or subtracting the number of rows in unit 2**
Finishing
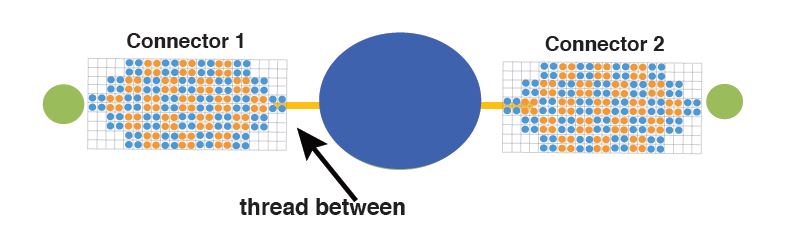
- Join unit pieces to medium and large Kazuri Beads. Run a needle and thread through several rows of beads before the end. From the end pass the needle and thread through the medium bead and continue running the thread through several rows; reverse and go back through the rows in the opposite direction, go back through the med. bead and reverse through the rows to the beginning
thread…clip thread ends. - Attach two bead tips, one on each end; then attach the closure with a jump ring.

Learn how to start your project using our Beading Loom.
For more beading tutorials visit our YouTube Channel.
Tell us what you think on Facebook |Twitter | Instagram | Pinterest.