California Dreaming—Bag Makeover by Nancy Zieman
I’m delighted to be the guest blogger in this third installment of Clover’s Bag Makeovers Series. Throughout the month of May, we’ve been sharing the latest bag making techniques and notions. Plus I’ve been sharing my favorite tips for quick and easy bag-sewing methods along with the inside scoop on how I give my bags the couture-look.
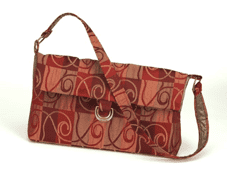
Clover and I introduced the Trace ‘n Create Bag Templates—the California Collection in 2009. With the two templates that are included in the package, there are six style options. The bag featured below is the original Monterey Bag. It’s a classic-size bag with a fold-over top—a great bag to carry everyday.
Makeover features
Since the template’s launch, new products and fabrics have been introduced giving this bag even greater design possibilities.
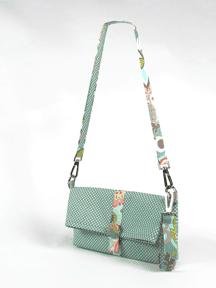
- Updated Fabrics: For this makeover, I’ve selected a teal dot and paisley print cotton from the Verona fabric collection by Riley Blake Designs.
- Wristlet addition: With Clover’s great hardware offerings, it was easy to add a wristlet feature.
- A wrap-around band closure: The Create a Strap is more than a functional addition, it’s also a great accent piece.
California Dreaming Makeover Steps
- Start with Clover’s Trace ‘n Create Bag Templates California Bag Collection: Monterey Bag style. Gather the fabric and notions listed on the package back.
- For additional designer touches, I added one package Clover’s 3/16” Wrap ‘n Fuse Piping, and used two packages Clover Glossy Nickel 1” D-Rings.
- Follow the California Bag Collection instructions and trace, interface and cut out the Monterey Bag style – Style C. The instructions will guide you through the easy steps of bag assembly.
- Give your bag body. Cut a layer of Pellon® Peltex® Ultra Firm Sew-in Stabilizer.
- Use Clover’s Double Sided Basting Tape to “baste” outer fabric to Peltex®.
- When layering the outer fabric to the Peltex®, use Clover’s Wonder Clips to “pin” the layers together. The clips are easy to use yet securely hold multiple layers together.
- The inside scoop for achieving a couture look lies in the bottom. Cut a layer of Clover’s Shape ‘n Create I use Clover’s Double Sided Basting tape to again “baste” the layers together before stitching.
- Create a center accent strap. Press 1” Create-a-Strap to a 2” x 44/45” contrasting paisley fabric strip.
- Following the instructions on the packaging, press along perforated edges.
- Cut a 30” length and center on outer fabric assembly, meeting short end of strip to bag front top. The opposite end of the strip will extend beyond the bag back. (Save the unused strap length to later create the wristlet).
- Use Clover’s Double Sided Basting tape to “baste” the layers together before stitching. Topstitch strip to bag, stopping 3” from top of bag back.
- Press 1” Create-a-Strap to a 2” x 44/45” contrasting paisley fabric strip. Cut two 2-1/2” strap connectors from the strip. Press along perforations and edgestitch. Slide Clover’s 1” D-Rings onto strap connectors and baste along bottom ends.
- Position top edge of strap connectors 4” from top of bag of the bag front. Baste.

- Attach one portion of Clover’s Magnetic Tote Snap Closure 10” below the top edge of center bag front. Place the second portion of the snap 2-1/2” above the top edge of center bag back. Both snaps will be centered on the right side (outer) strap.
- Follow the California Bag Collection instructions to stitch side seams and lower gussets.
- Add a designer touch with contrasting strap lining. Cut 1-1/2” strips, thread them through Clover’s 3/4” Bias Tape Maker, and press. Instant trim to accent your bag straps!
- Follow the California Bag Collection instructions to create a shoulder strap. For this makeover, instead of sewing the straps to the bag, add Clover’s 1” Swivel Latches to the ends of the strap for a detachable option.
- After inserting the lining and basting the layers together, finish the top edge with Clover’s Fuse ‘N Bind Follow the instructions on the Fuse ‘N Bind package and cut a 2” x 30” teal dots fabric strip Press Fuse ‘N Bind to center of strip.
- Stitch binding to top bag edge. Be careful to not catch the back accent strap in stitching.
- Fold accent strap wrong sides together, about 1/2” above snap edge. Accent strap will extend about 1-1/2” beyond bag to edge. Attach zipper foot to machine and topstitch strap to bag. Connect stitching to previous stitches at 3” below back edge.
- Create a wristlet with remaining strap (about 11-12”). Slide Clover’s 1” Swivel Latch onto strap. Stitch ends right sides together using 1/4” seam.
- Turn right sides out. Slide seam to Swivel Latch and topstitch close latch.
- This bag is super-versatile! Wear it as a shoulder bag or a clutch with wristlet!
- For an added designer touch, add a 1-1/2” Covered Button!
I hope you’ve enjoyed reading how to create the California Dreaming Bag! Let me know what tip is your favorite!
Be sure to check out the Town & Country Bag Makeover and the City Bag Makeover.
For all the latest and greatest in sewing, quilting and creating visit my blog, nancyzieman.com/blog http://www.nancyzieman.com/blog/
And connect with me on Facebook
Bye for now,
Nancy Zieman


