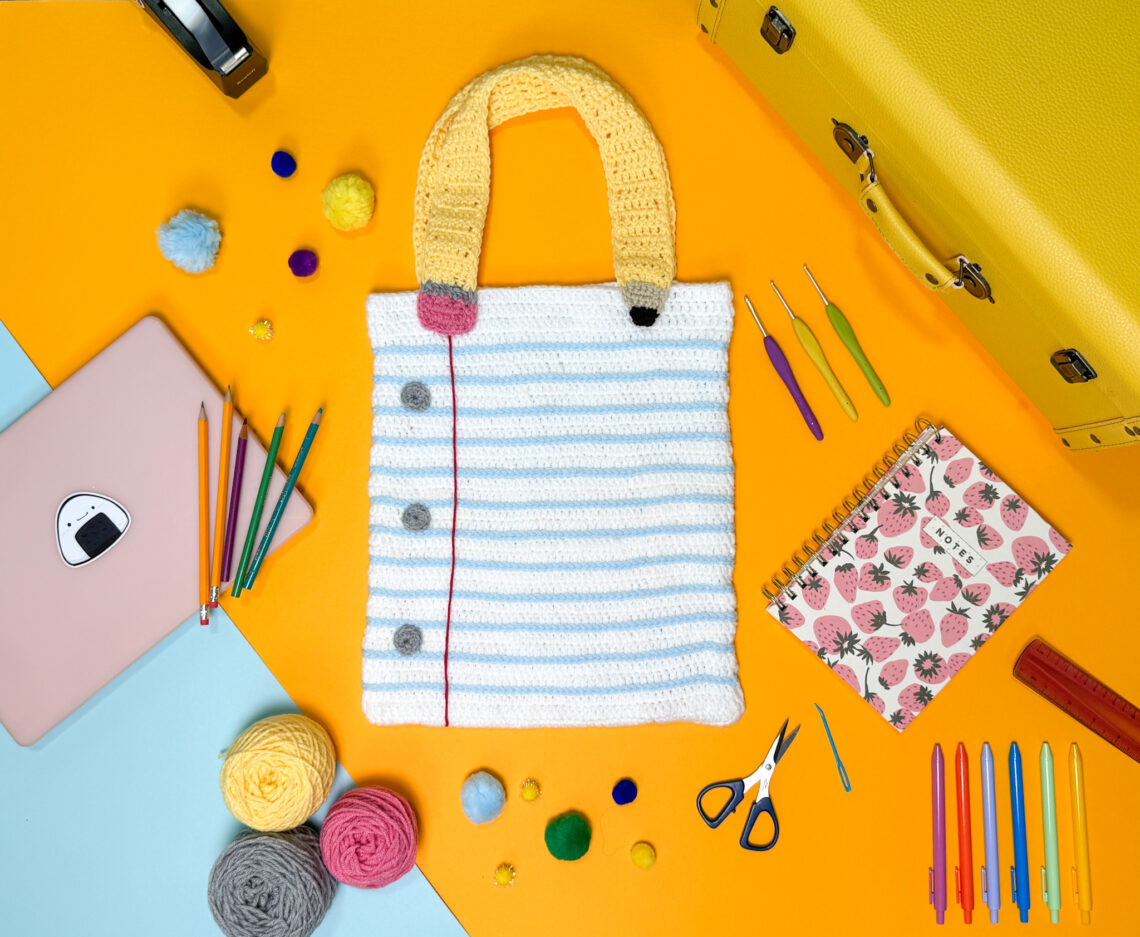
Lined Paper Tote Bag *crochet pattern*
Back-to-school season is already upon us! This lined paper tote is an adorable accessory for our teacher fashionistas. I’m excited to share this pattern with you! -Amy (curiouspapaya)
MATERIALS:
- Clover Amour Crochet Hook (3.25 mm)
- Patchwork Scissors
- Stitch Markers
- Yarn Needle
- UHU glue
- 2 ft x 2 ft of fabric lining (optional)
- sewing thread and a needle
- OR you can use Heat n’ Bond and an iron to secure the liner onto the inside of the tote bag
- #4 medium worsted yarn
-
- 1 skein of White
- 1 skein of Deep Red
- 1 skein of Sky Blue
- 1 skein of Dark Coral (pinkish color)
- 1 skein of Soft Gray
- 1 skein of Varsity Gold (yellowish color)
- 1 skein of Mushroom (tannish color)
- 1 skein of Charcoal Black
-
NOTES:
- The lined-paper tote will be worked in joined rounds and the “ch” counts as the first st. The pencil straps will be worked in rows.
- This pattern is written in US terminology.
- Gauge: 4 in. x 4 in. = 12 rnds (including the blue rows of slst) x 17 sts.
- Difficulty: Intermediate-beginner +
- Measurements: 12 in x 12.5 in (excluding the straps)
ABBREVIATIONS:
- blo: back loops only
- ch: chain
- dc: double crochet
- flo: front loops only
- hdc: half double crochet
- sc: single crochet
- slst: slip stitch
- st(s): stitch(es)
- rnd(s): round(s)
- [#]: stitch count
- (…) x #: repeat instructions the number of times
PATTERN:
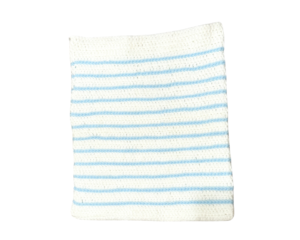
LINED-PAPER TOTE BAG BASE:
Using your Clover Amour Crochet Hook (3.25 mm) and starting in White yarn.
- Note: With the exception of the top and bottom of the lined-paper bag, we will alternate 2 rnds of white and 1 rnd of blue. There will be a total of 12 blue lines. You may modify the size of your tote bag as needed by adjusting the number of chains.
* = slst into the first st to join the rnd
- Round 1: Make a slipknot and ch 52. Working into the 3rd ch from the hook and into the back bumps (optional, this just creates a cleaner look), dc into the next 49 ch. Make 3 dc into the last ch and then turn to work along the underside of the ch. dc into the next 48 ch. Make 2 dc into the last ch, * [102]
- Rounds 2-3 (2 rounds total): ch 2 (remember that the ch at the beginning of the rnd will always count as the first st), dc all around, * in Sky Blue yarn [102]
- Round 4: ch 1, in the flo, slst all around, * in White yarn [102]
- Round 5: ch 2, in the blo, dc all around, * [102]
- Round 6: ch 2, dc all around, * in Sky Blue yarn [102]
Repeat rounds 4-6 10 more times.
- Round 37: ch 1, in the flo, slst all around, * in White yarn and cut the Sky Blue yarn, * [102]
- Round 38: ch 2, in the blo, dc all around, * [102]
- Rounds 39-41 (3 rnds total): ch 2, dc all around, * [102]
Fasten off and leave a short tail for weaving in.
HOLE PUNCHES (make 6):
Using your Clover Amour Crochet Hook (3.25 mm) and Soft Gray yarn.
- Round 1: Make a magic circle and (hdc) x10 [10]
Use the invisible finish and leave a tail for sewing.
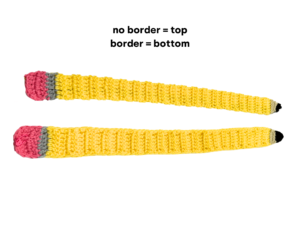
PENCIL STRAPS (make 2):
Using your Clover Amour Hook (3.25 mm) and starting in Dark Coral yarn.
- Note: Be sure to leave long yarn tails before and after each new color. We will be using these to crochet a border around the edges for a cleaner look. In some instances, we will need to weave the yarn tails over to the opposite side of the strap with a darning needle in order to pick up the color.
- Row 1: Leave a long yarn tail for sewing the strap onto the tote before beginning. Make a slipknot and ch 8. Working into the third ch from the hook, dc into the next 6 ch, turn [7]
- Row 2: ch 2 (this counts as the first st), dc down the row, turn [7]
- Row 3: ch 2, dc down the row, change to Soft Gray yarn and fasten off the Dark Coral, leaving a long tail for the border, turn [7]
- Row 4: ch 2, dc down the row, change to Varsity Gold yarn, turn [7]
- Rows 5-42 (38 rows total, modify as needed for desired length): ch 2, dc into the same st, dc into the next 3 sts, (dc-inc, 3 dc) x11, change to Mushroom yarn and fasten off the Varsity Gold yarn, leaving a long tail again, turn [7]
- Row 43: ch 1, sc down the row, turn [7]
- Row 44: do NOT ch 1 (this will make you work into the next st instead of the first st), sc into the next 6 sts, turn [6]
- *Note: By not making a ch 1, this acts as a “decrease” without the need to make a bumpy looking stitch.
- Row 43: do NOT ch 1, sc into the next 5 sts, turn [5]
- Row 44: do NOT ch 1, sc into the next 4 sts, change to Charcoal yarn and fasten off the Mushroom yarn, leaving a long tail (this will be used to sew this end of the strap to the bag), turn [4]
- Row 45: do NOT ch 1, sc into the next 3 sts, turn [3]
- Row 46: do NOT ch 1, sc into the next 2 sts [2]
Fasten off and leave a short tail for weaving in.
CROCHET BORDER AROUND PENCIL STRAPS:
- Step 1: Pickup any of the yarn tails we left for the border and loosely sc around the edges of the strap.
- Step 2: Change colors when needed. If you need to weave over a yarn tail, use a darning needle to do so.
- Step 3: Weave in any leftover ends.
ASSEMBLY:
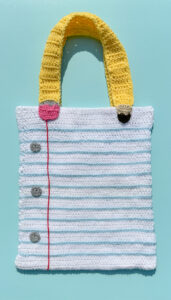
- Holes: Position each of the “holes” onto the left margin of the lined-paper, spacing them out evenly. Follow my picture to be exact! Sew them down. Do the same for the backside of the tote bag.
- Red Margin: Cut ~4 ft. of Dark Red yarn and use fabric glue to secure it next to the holes to create the margin line. Secure the yarn tails onto the inside of the bag with a knot. Again, repeat this for the backside.
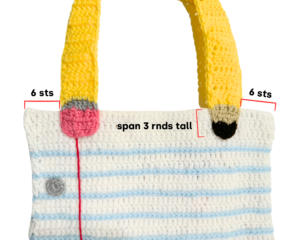
- Pencil Straps: Use the Dark Coral and Mushroom yarn tails to sew the straps onto the tote bag over the top 3 rnds. (this will be covered up if you line the bag). Leave 6 sts on each side of the straps as the image indicates.
- Liner: Flip the tote bag inside out. Measure your fabric liner to fit the bag and secure it on with Heat n’ Bond (you can sew this down instead if you are able to).
You’re finished! We’d love to see your creations over on Instagram. Tag your creations with #cloversquad and #curiouspapaya to share your makes.
If you want to keep up with me, Amy, on social media for other fun projects, follow me on: Instagram
If you want to keep up with all things Clover, follow us on: Facebook | Twitter | Instagram | Pinterest | YouTube | Ravelry

You May Also Like
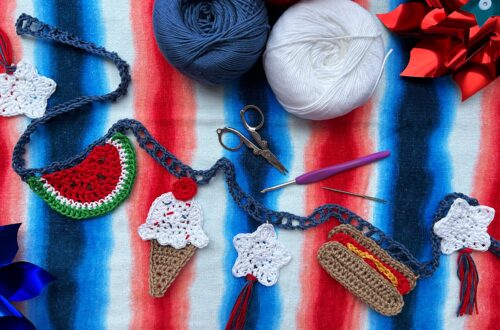
Stars & Stripes Garland!
Be My Valentine Baggie- Knitting Pattern