Giant Mushroom *crochet pattern*
Crochet this huggable mushroom pouf in one cozy evening! I designed this pattern inspired by one of my favorite hotpot ingredients – shiitake mushrooms. I hope the warmth and rich depth of their flavor are captured in this plushie.
– Amy (@curiouspapaya)

MATERIALS:
- Clover Amour Hook (7.0 mm)
- Clover Patchwork Scissors (small)
- Clover Yarn Needle
- Clover Stitch Markers
- fiber fill stuffing
- UHU glue
- #6 super bulky chenille yarn
- 1 skein of dark brown
- 1 skein of cream
- Note: for the exact dimensions, I used the brand Demi Purl yarn
NOTES:
- Please do not copy/redistribute any part of this pattern as your own. This includes reposting/translating without permission. Feel free to sell your finished products in small quantities as long as you give credit to help support my work. Tag your creations with @curiouspapaya so I can feature you!
- This pattern is written in US terminology.
- The whole pattern is worked in a continuous spiral from the bottom to the top.
- I use the “yarn under, yarn over” method of crocheting when using chunky chenille yarn and “yarn under, yarn under” method when using cotton yarn. This creates an X-shaped stitch. Yarning under also creates tighter tension. You may crochet however you would like but note that the gauge may be affected.
- Rather than using the Magic Ring, use the “Ch 2” method when working with chenille yarn. This will prevent the yarn from snagging.
- Difficulty: intermediate-beginner+
- Measurements: 9 in. x 10 in. [~23 cm x ~25 cm] if using the prescribed materials
- Time: ~1.5 hrs
ABBREVIATIONS:
- blo: back loops only
- ch: chain
- dec: (invisible) decrease
- flo: front loops only
- inc: increase
- sc: single crochet
- slst: slip stitch
- st(s): stitch(es)
- [#]: stitch count
- (…) x#: repeat instructions the number of times
MUSHROOM PATTERN:
Note: The mushroom is worked from top down and is no-sew!
In dark brown yarn and a 7 mm Clover Amour hook:
- Round 1: ch 2, work into the second ch from the hook, (sc) x8 [8]
- Follow my support tutorial for this alternative magic circle method.
- Round 2: (inc) x8 [16]
- Round 3: (sc, inc) x8 [24]
- Round 4: (sc, inc, sc) x8 [32]
- Round 5: (3 sc, inc) x8 [40]
- Round 6: (2 sc, inc, 2 sc) x8 [48]
- Round 7: sc all around [48]
- Round 8: (5 sc, inc) x8 [56]
- Round 9: sc all around [56]
- Round 10: (3 sc, inc, 3 sc) x8 [64]
- Round 11: sc all around [64]
- Round 12: (7 sc, inc) x8 [72]
- Round 13: (4 sc, inc, 4 sc) x8 [80]
- Rounds 14-17 (4 rounds total): sc all around [80]
- Round 18: (4 sc, dec, 4 sc) x8 [72]
- Round 19: (7 sc, dec) x8 [64]
- Round 20: (3 sc, dec, 3 sc) x8 [56]
- Round 21: (5 sc, dec) x8 [48]
- Round 22: (blo) – (2 sc, dec, 2 sc) x8 [40]
- Round 23: (3 sc, dec) x8 [32]
- Round 24: (sc, dec, sc) x8 [24]
Stuff well. Be sure to fill out the edge of the mushroom well!
- Round 25: (sc, dec) x8 [16]
- Round 26: (dec) x8 [8]
Fasten off and leave a short tail for closing up the piece. Stuff one last time using tweezers to get into the narrow opening.
Use the Clover Darning Needle and weave through the flo. Pull the hole closed.
Join cream yarn into one of the remaining loops from round 22.

*Note: The following rounds will be labeled with “*” to differentiate them from the earlier rounds.
*Tip: Instead of directly crocheting the mushroom stem from round 22, we closed up the top cap first to secure the stuffing in place. Otherwise, the stuffing may move around and become misshapen over time.
- Round 23*: (in the remaining loops) sc all around [48]
- Round 24*: sc all around [48]
- Round 25*: (7 sc, inc) x6 [54]
- Round 26*: sc all around [54]
- Round 27*: (4 sc, inc, 4 sc) x6 [60]
- Rounds 28-29* (2 rounds total): sc all around [60]
- Round 30*: (4 sc, dec, 4 sc) x6 [54]
- Round 31*: (7 sc, dec) x6 [48]
- Round 32*: (3 sc, dec, 3 sc) x6 [42]
- Round 33*: (5 sc, dec) x6 [36]
- Round 34*: (2 sc, dec, 2 sc) x6 [30]
- Round 35*: (3 sc, dec) x6 [24]
- Round 36*: (sc, dec, sc) x6 [18]
- Round 37*: (sc, dec) x6 [12]
Stuff well.
- Round 38*: (dec) x6 [6]
Fasten off and leave a short tail for closing up the piece. Stuff one last time using tweezers to get into the narrow opening.
Use the Clover Darning Needle and weave through the flo. Pull the hole closed.
FINISHING TOUCHES:
- Step 1: Cut 30 in. [~76 cm] of cream yarn.
- Step 2: Use the Clover Darning Needle and weave into the side of the mushroom cap. Leave a 3 in. tail for securing into a knot at the end.
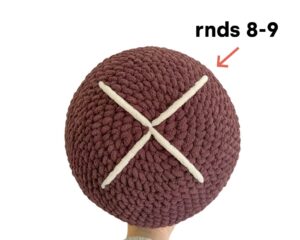
- Step 3: Embroider a line across the top of the mushroom cap between rnds 8-9.
- Step 4: Weave out to a perpendicular spot on the mushroom cap and embroider another line to create a “X” shape.
- Step 5: Weave over where the lines intersect to secure them in place and weave into the center of the cap.
- Step 6: Weave back out where you entered in from and secure the yarn tails into a knot.
- Step 7: Bury any remaining tails.
OPTIONAL:
- Fill the base of the mushroom with weighted pellets to make a weighted plushie.
- Make my Giant No-Sew Avocado and Giant Tomato plushies to complete your produce poufs!
You’re finished! We hope you celebrate national crochet month with this new project. Tag your creations with @cloverusa and @curiouspapaya to share your makes 🙂

If you want to keep up with me, Amy, on social media for other fun projects, follow me on: Instagram
If you want to keep up with all things Clover, follow us on: Facebook | Twitter | Instagram | Pinterest | YouTube | Ravelry