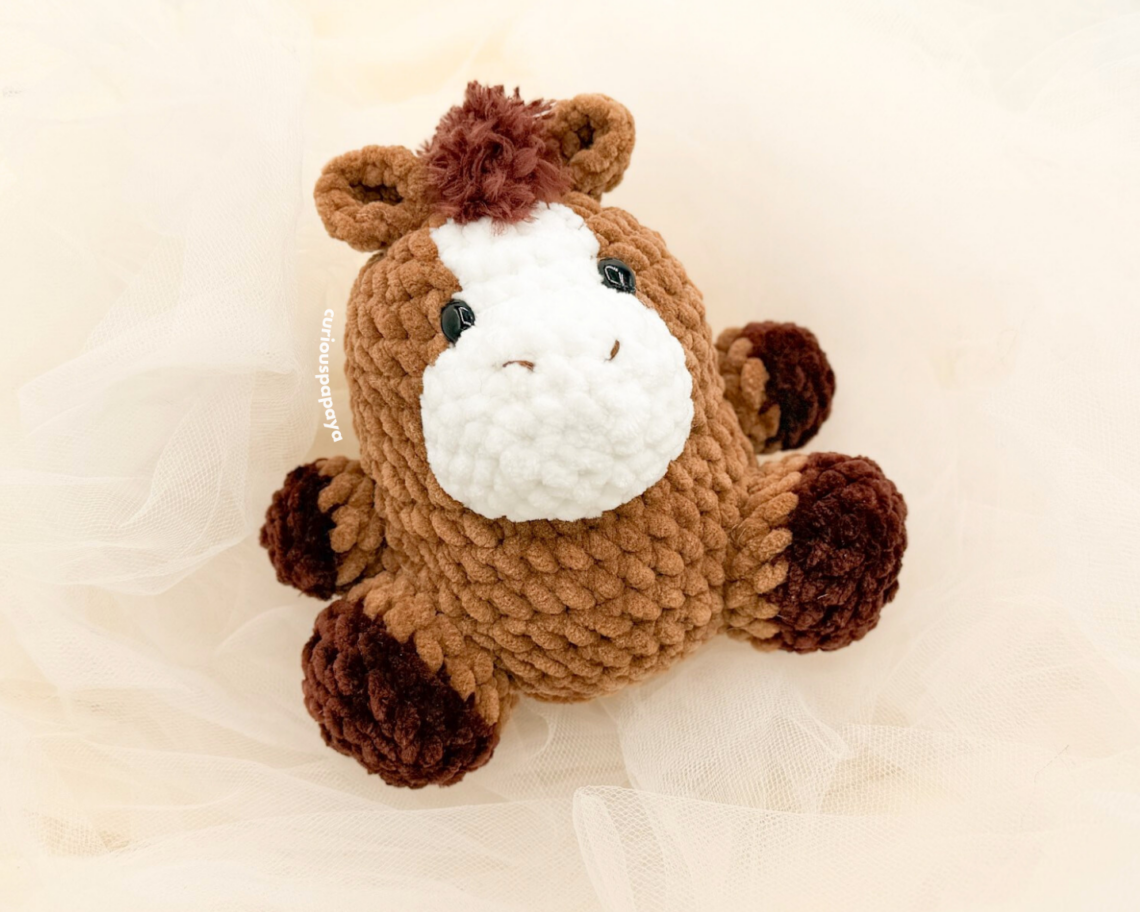
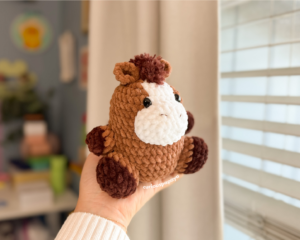
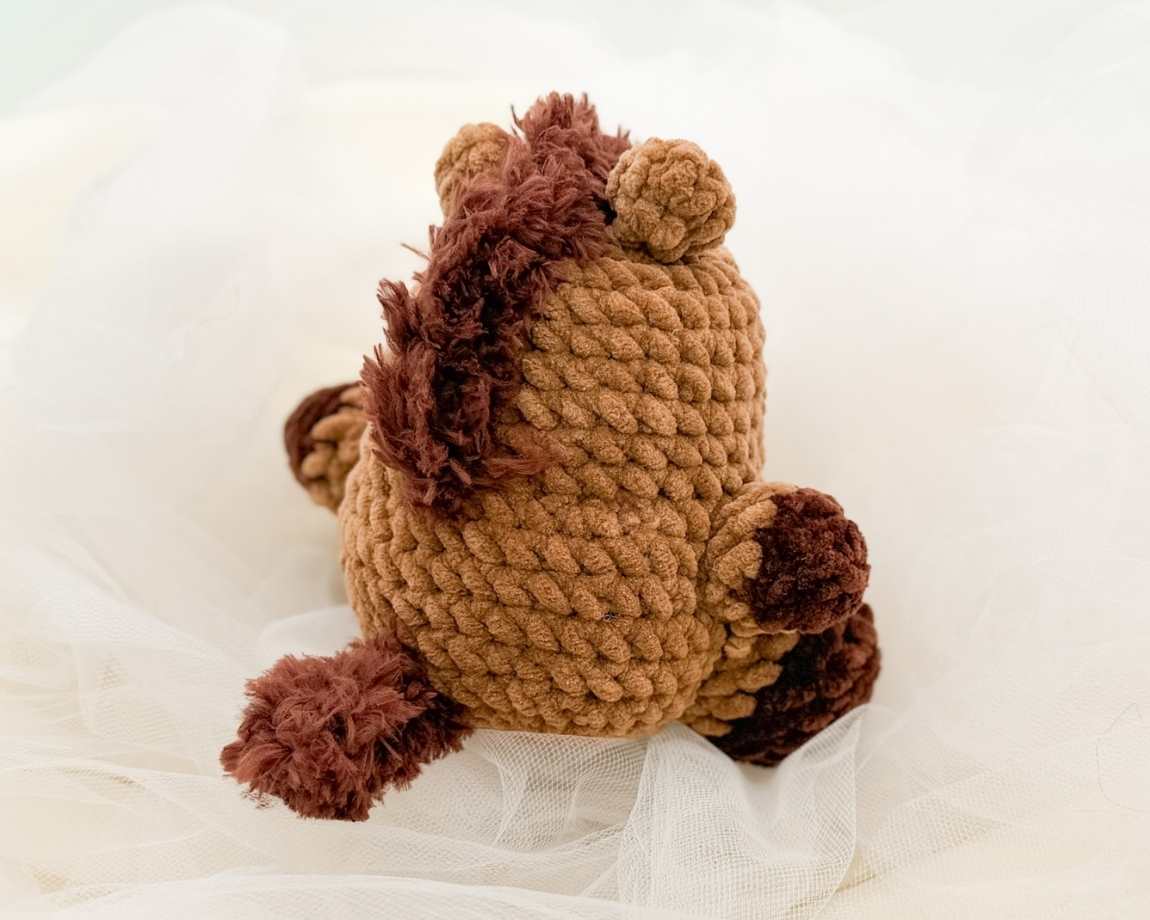
Lunar New Year Horse *crochet pattern*
The year of 2026 celebrates the Horse in the Chinese zodiac! The start of Lunar New Year corresponds with the lunisolar calendar, putting it at February 17th – however, countries who celebrate often begin weeks before the official date. It is believed that the year of the Horse will bring dynamic, passionate, and fast-moving energy. Bold transformation and innovation are invited. In honor of celebrating, let’s make this an action-driven year! – Amy (@curiouspapaya)
MATERIALS:
- Clover Amour Hook (4.5 mm)
- Clover Patchwork Scissors
- Clover Yarn Needle
- Clover Stitch Markers
- two 10 mm x 8mm oval safety eyes
- #6 super bulky chenille yarn
- light brown
- white
- dark brown
- #6 super bulky fluffy yarn
- dark brown
- dark brown embroidery thread
NOTES:
- Please do not copy/redistribute any part of this pattern as your own. This includes reposting/translating without permission. Feel free to sell your finished products in small quantities as long as you give credit to help support my work. Tag your creations with @curiouspapaya so I can feature you!
- This pattern is written in US terminology.
- The whole pattern is worked in a continuous spiral. The snout is the only part that is worked in an oval spiral.
- I use the “yarn under, yarn over” method of crocheting when using chunky chenille yarn. This creates a pretty, slanted X-shaped stitch. Yarning under also creates tighter tension. You may crochet however you’d like but note that the gauge may be affected.
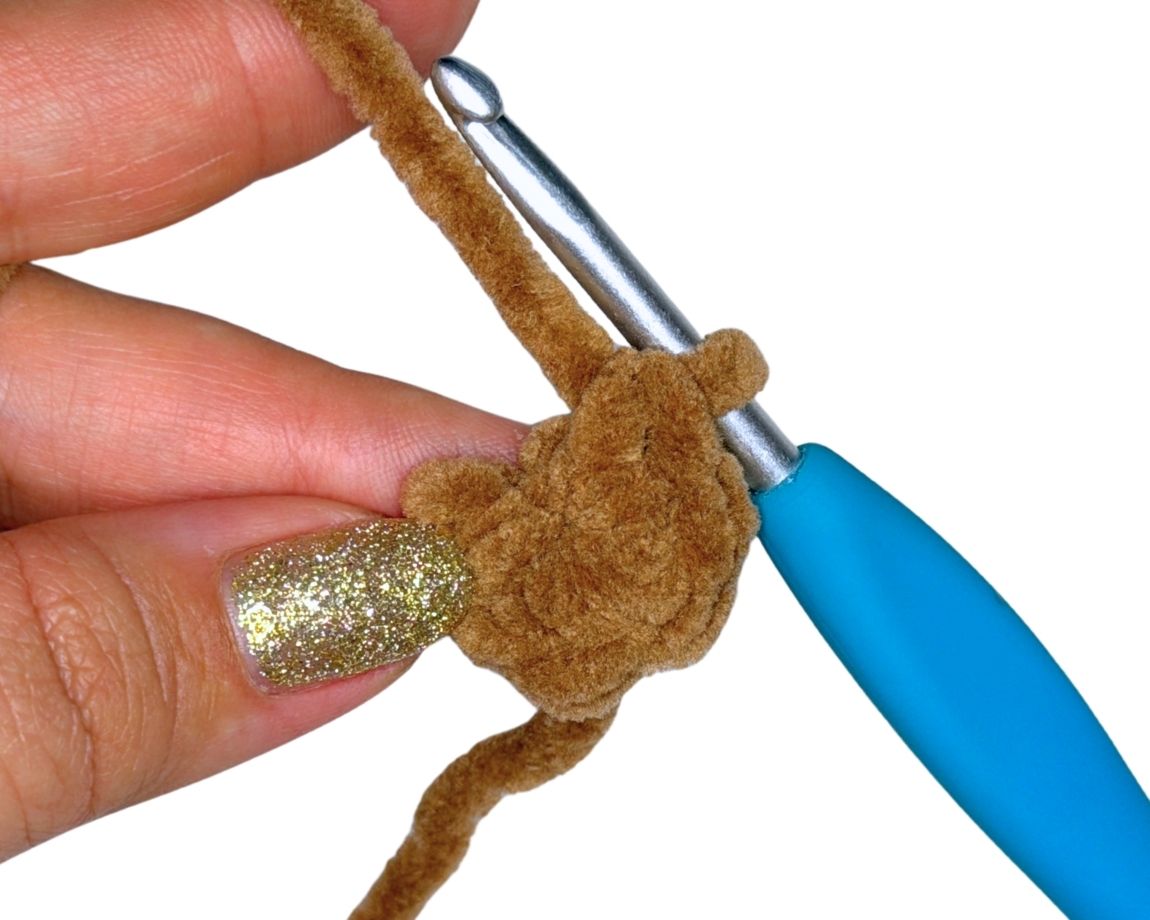
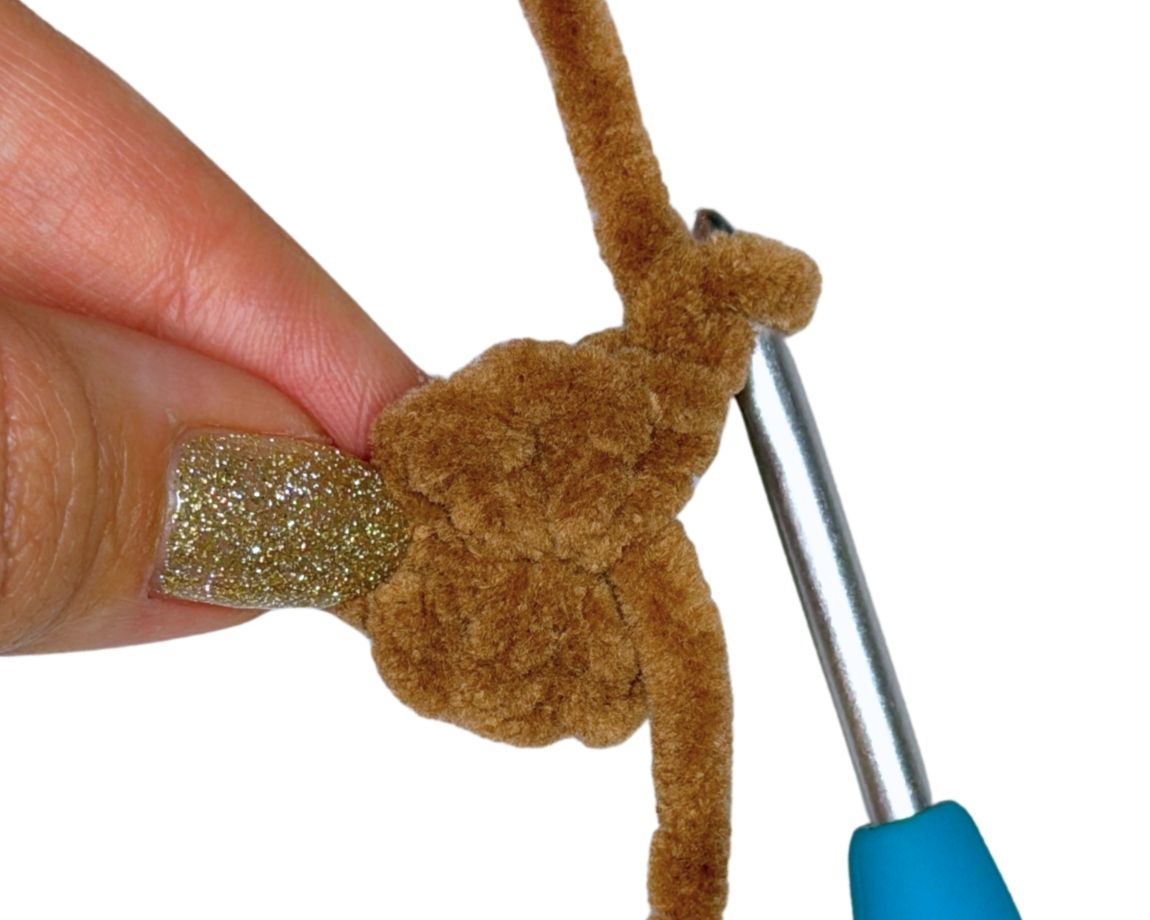
- Rather than using the Magic Ring, use the “Ch 2” method when working with this type of chenille yarn. This will prevent the yarn from snagging.
- Difficulty: intermediate+ due to working with an oval spiral, surface crocheting, and color changes.
- Measurements: 6 in. x 4 in. [~15 cm x ~10 cm] if using the prescribed materials
ABBREVIATIONS:
- blo: back loops only
- ch: chain
- dc: double crochet
- flo: front loops only
- dc: double crochet
- dec: regular decrease (be sure to not use the invisible decrease as we normally do for amigurumi)
- inc: increase
- sc: single crochet
- slst: slip stitch
- st(s): stitch(es)
- rnd(s): round(s)
- [#]: stitch count
- (…) x #: repeat instructions the number of times
HORSE PATTERN:
HEAD AND BODY:
Starting with Light Brown colored yarn and a 4.5 mm Clover Amour hook:
- Round 1: ch 2, work into the second ch from the hook, (sc) x8 [8]
- Round 2: (light brown) 3 inc, (white) 2 inc, (light brown) 3 inc [16]
- Round 3: (light brown) (sc, inc) x3, (white) (sc, inc) x2, (light brown) (sc, inc) x3 [24]
- Round 4: (light brown) (2 sc, inc) x3, sc (white) sc, inc, 3 sc, (light brown) sc into the same st to make an inc, (2 sc, inc) x3 [32]
- Round 5: (light brown) 13 sc, (white) 6 sc, (light brown) 13 sc [32]
Insert the safety eyes between rnds 5-6 centered with the White patch, 7 sts apart.
Cut the White yarn and continue the rest of the body in Light Brown yarn.
- Rounds 6-10 (5 rnds total): sc all around [32]
Continue onto the body.
- Round 11: (flo) – (3 sc, inc) x8 [40]
- Rounds 12-16 (5 rnds total): sc all around [40]
- Round 17: (3 sc, dec) x8 [32]
- Round 18: (2 sc, dec) x8 [24]
Stuff the head and body firmly.
- Round 19: (sc, dec) x8 [16]
- Round 20: (dec) x8 [8]
Fasten off and leave a tail for sewing. Stuff one last time.
Use the Clover Darning Needle and weave through the flo. Pull the hole closed and bury the yarn tail.
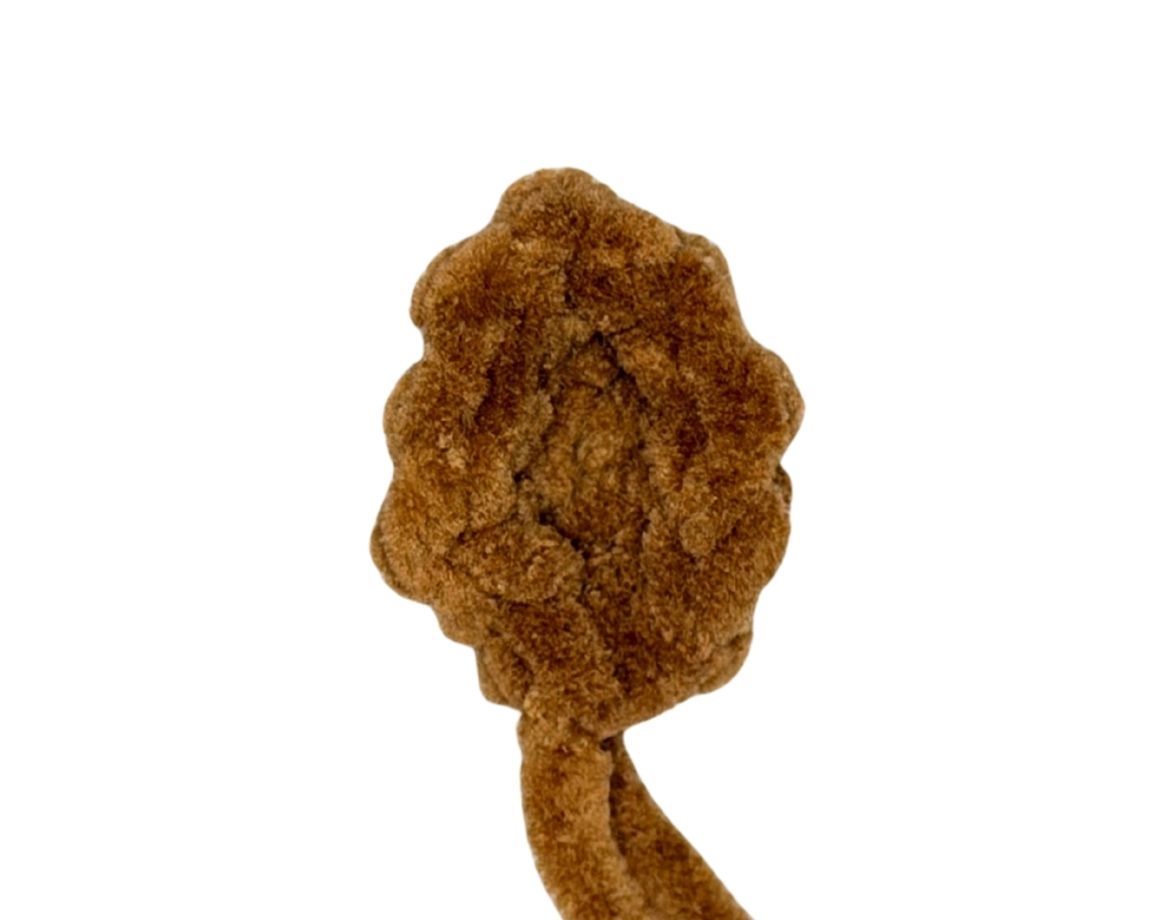
SNOUT:
Use White yarn and a 4.5 mm Clover Amour Hook:
- Round 1: ch 5, work into the second ch from the hook, sc into the next 3 sts, make 3 sc into the next st, turn and work along the bottom of the chain, sc into the next 2 sts, inc into last st, slst into the first st of the rnd. [10]
*Note: The new rnd starts after the slst.
- Round 2: 2 sc, 3 inc x2 [16]
- Round 3: 2 sc, [sc, inc] x3, repeat [22]
- Round 4: sc all around [22]
Fasten off and leave a tail for sewing. We will stuff the piece later.

EARS (make 2):
Use Light Brown yarn and a 4.5 mm Clover Amour Hook:
*Note: The ears are made in a semi-circle shape and then sewn for shaping.
- Round 1: ch 2, work into the second ch from the hook, (sc) x6 [6]
ch 1, turn your piece as you would when working in rows.
- Round 2: (sc, inc) x3 [9]
slst into the first st of the rnd (where the img indicates) to create the shaping.
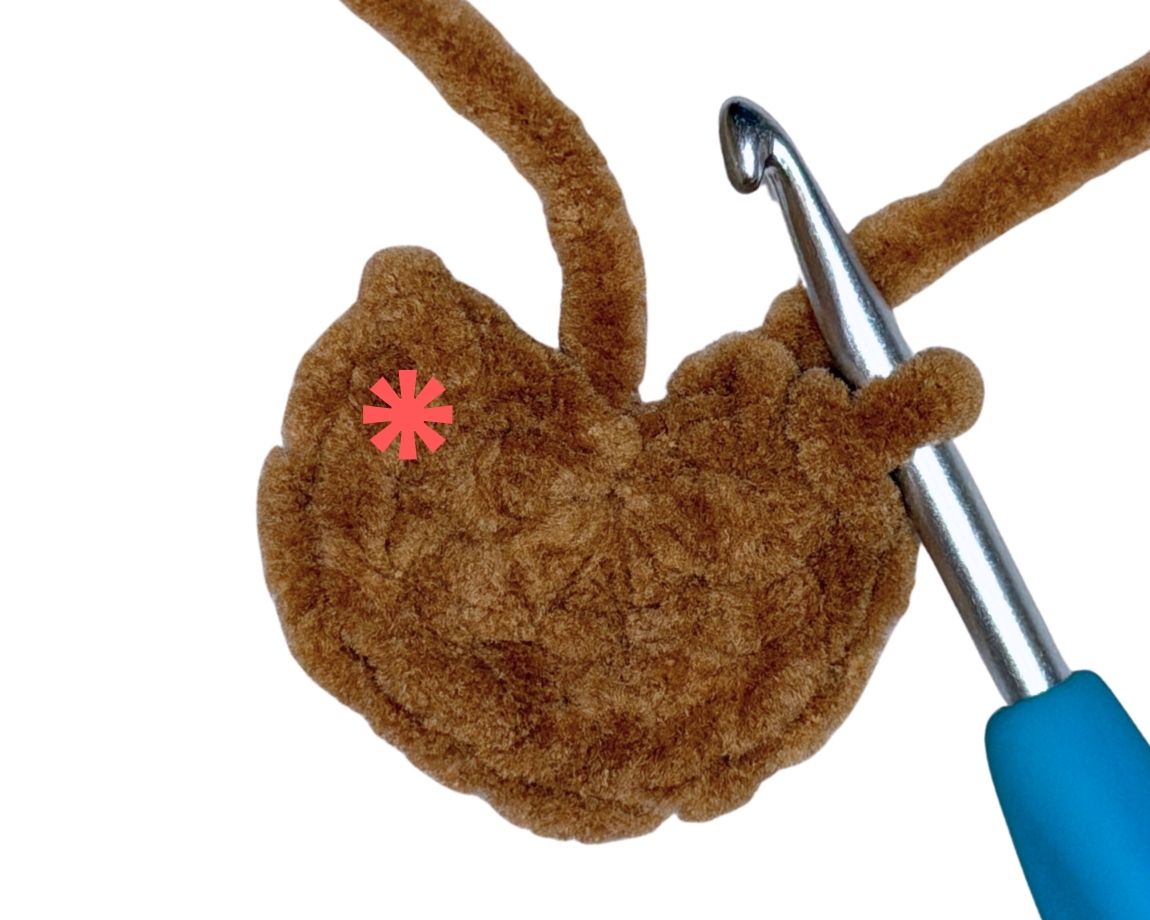

Fasten off and leave a tail for sewing.
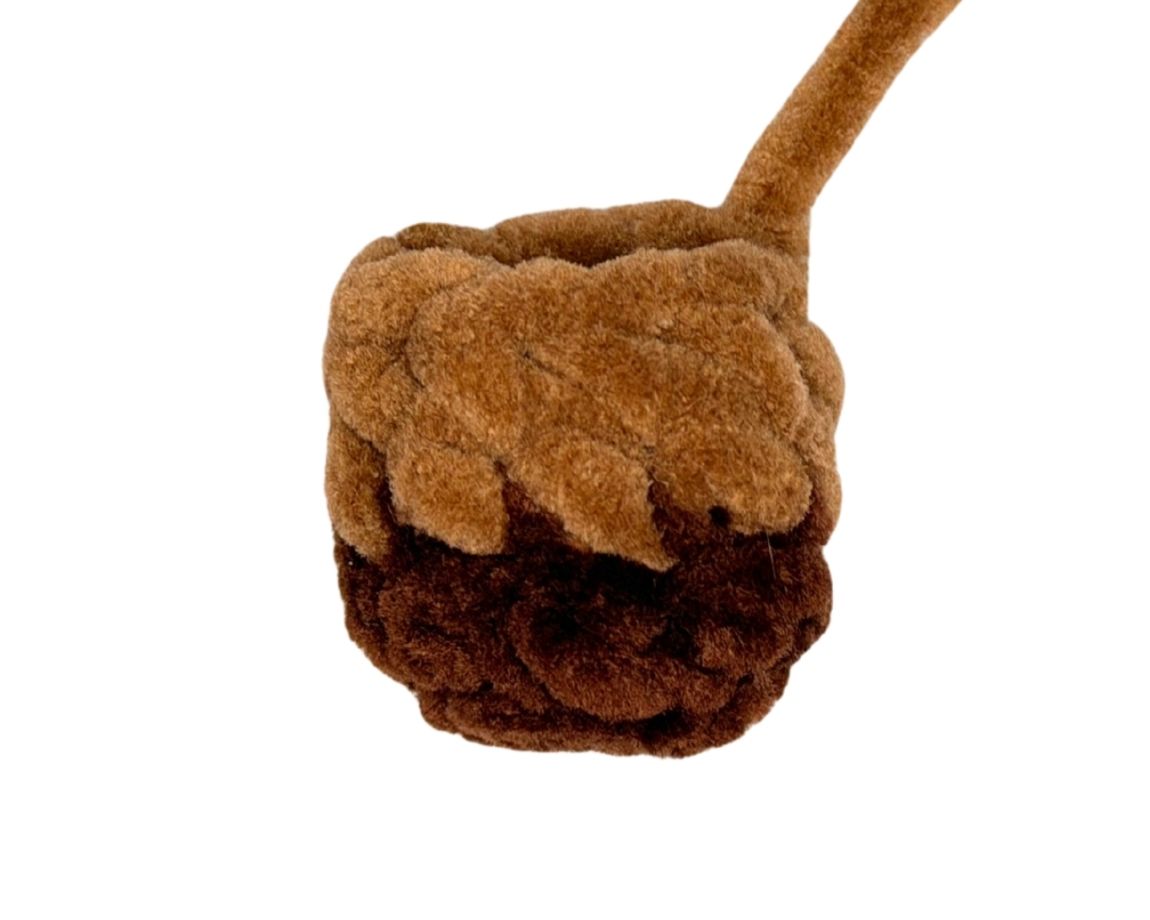
FRONT LEGS:
Start with Dark Brown yarn and a 4.5 mm Clover Amour Hook; make two:
- Round 1: ch 2, work into the second ch from the hook, (sc) x8, slst as the last st [9]
*Note: The last st is a slst which will alleviate the jog when working in a continuous spiral.
- Round 2: (blo) – 8 sc, slst as the last st [9]
Change to Light Brown yarn and cut the Dark Brown yarn.
- Round 3: (blo) – sc all around [9]
- Round 4: sc all around [9]
Fasten off and leave a tail for sewing. Lightly stuff.
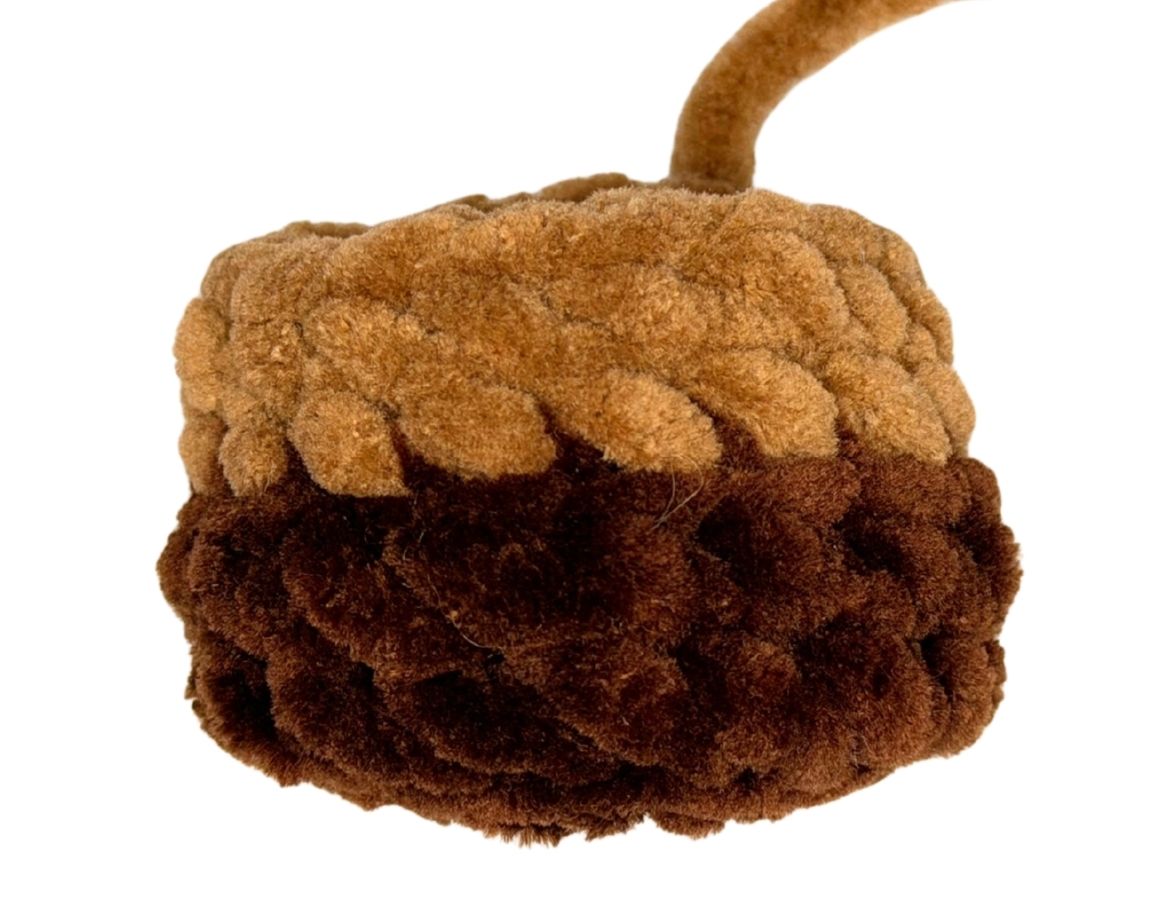
BACK LEGS:
Start in Dark Brown yarn and a 4.5 mm Clover Amour Hook; make two:
- Round 1: ch 2, work into the second ch from the hook, (sc) x8 [8]
- Round 2: (inc) x7, sc, slst into the last st (together, the last two sts will make up the last inc) [16]
- Round 3: (blo) – sc all around [16]
Change to Light Brown yarn and cut the Dark Brown yarn.
- Round 4: (blo) – sc all around [9]
- Round 5: sc all around [9]
Fasten off and leave a tail for sewing. Lightly stuff.
ASSEMBLY:
*Note: To sew parts on symmetrically, use Clover sewing pins to mark the “line of symmetry” down the horse’s body.
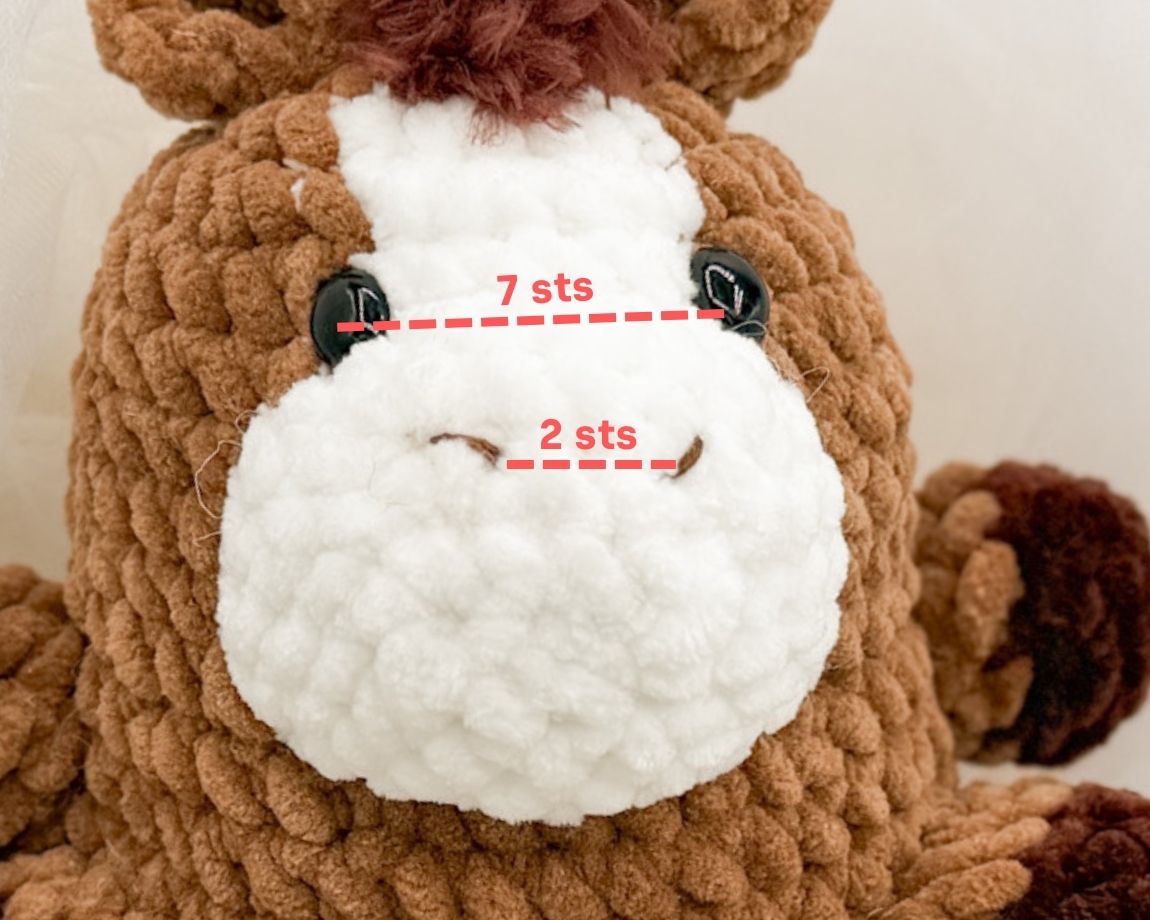
- Nostrils: Cut 8 inches of Dark Brown embroidery thread. Weave into the side of the snout and leave a 3 inch tail. Create each nostril as a diagonal line 1 st wide and 2 sts apart. Weave back out where you came in from and secure the tail ends into a knot before burying them.
- Ears: Sew each ear between rnds 2-3, in line with the eyes.
*Note: For the limbs, position the color change facing down so they are not visible.
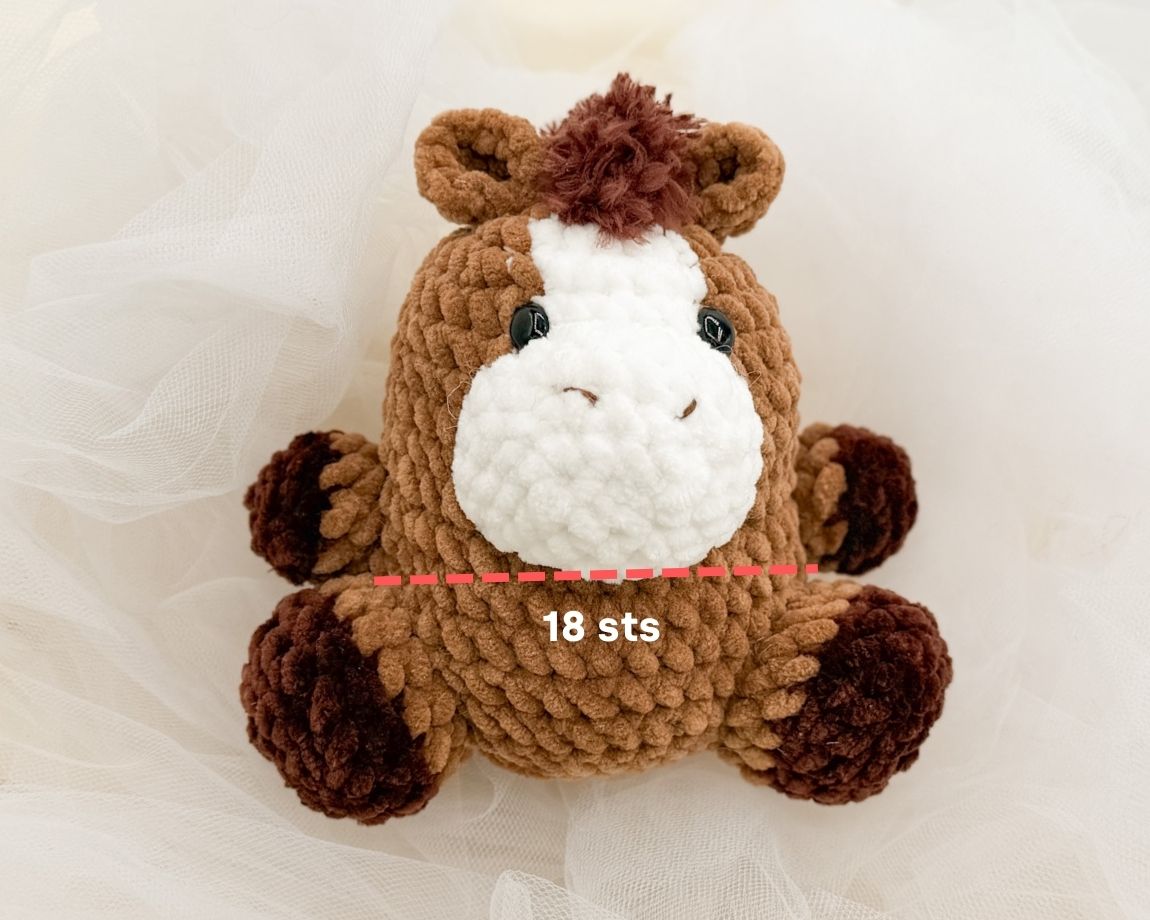
- Front Legs: Sew each front leg on spanning rnds 11-13, 18 sts apart.
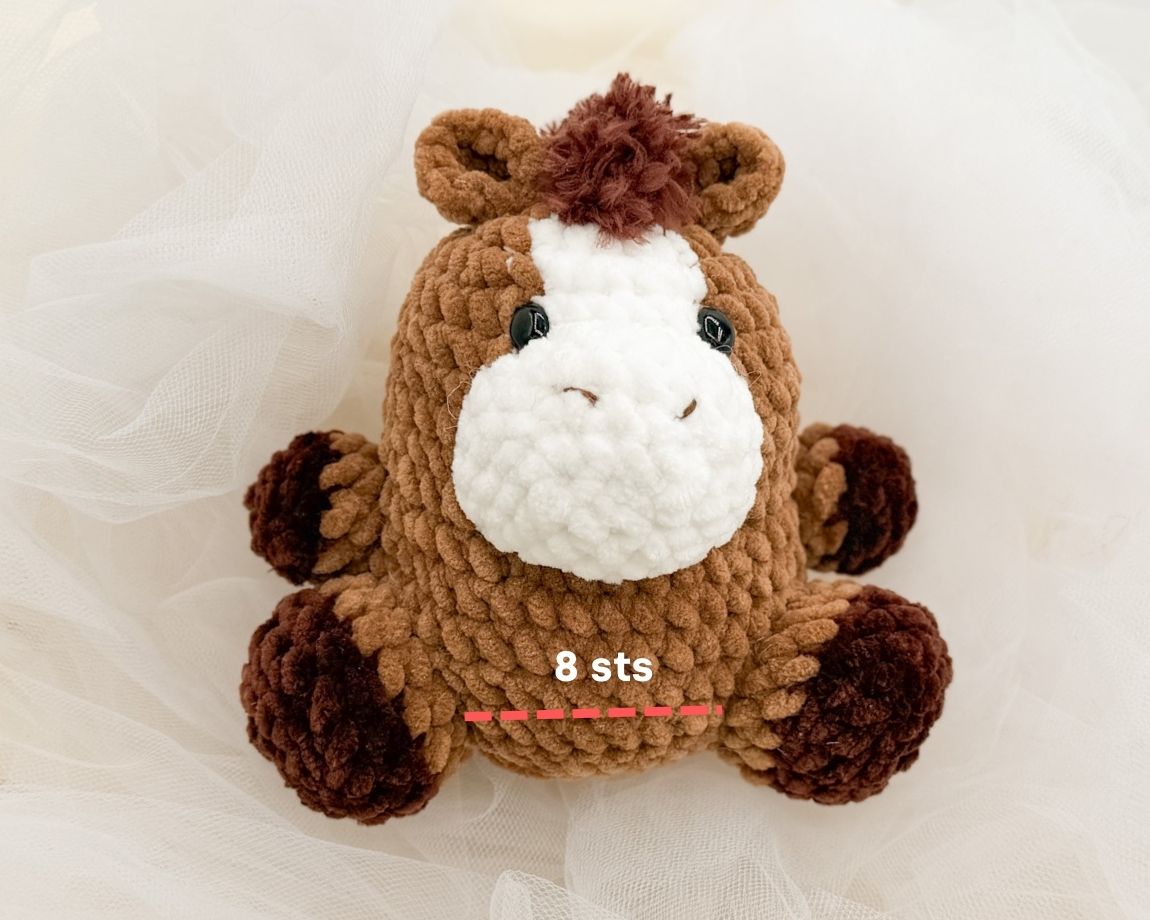
- Back Legs: Sew each back leg on spanning rnds 13-17, 8 sts apart.
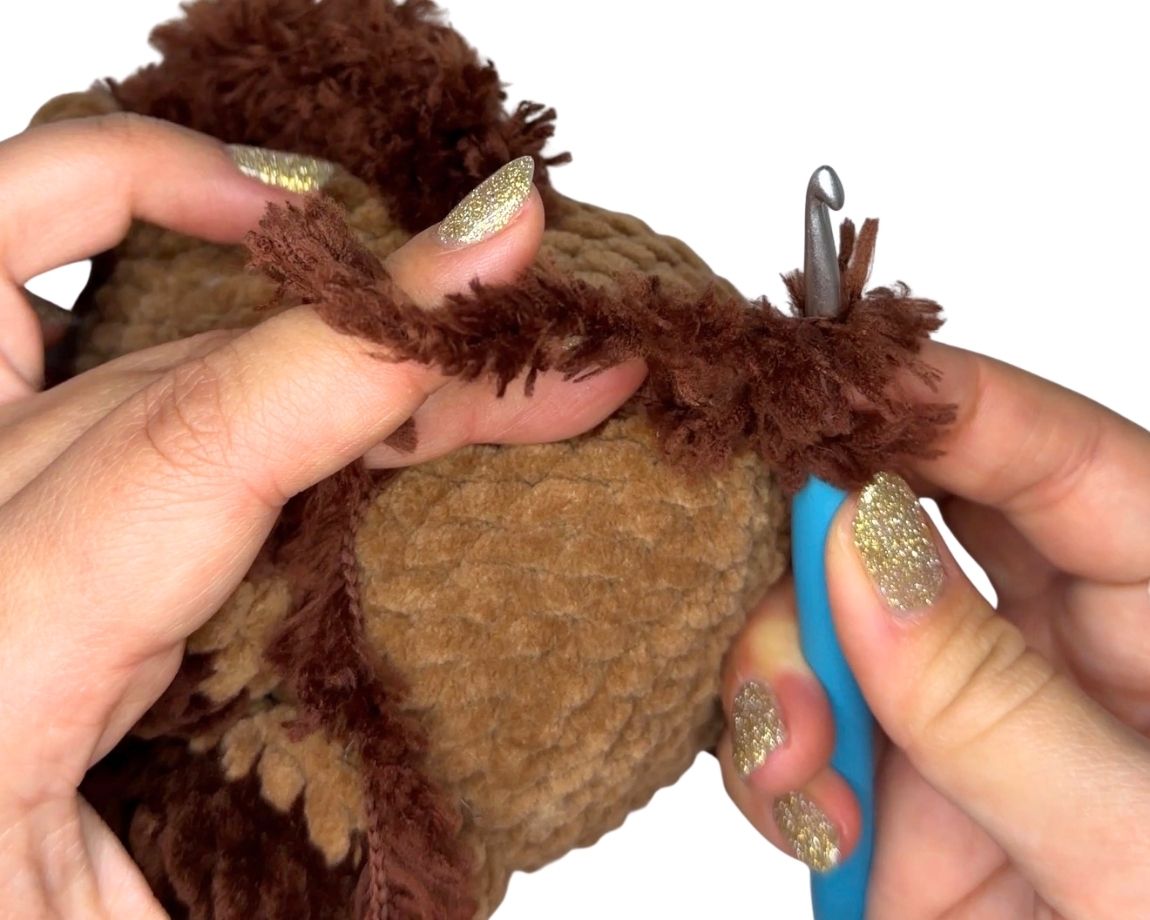
FINISHING TOUCHES:
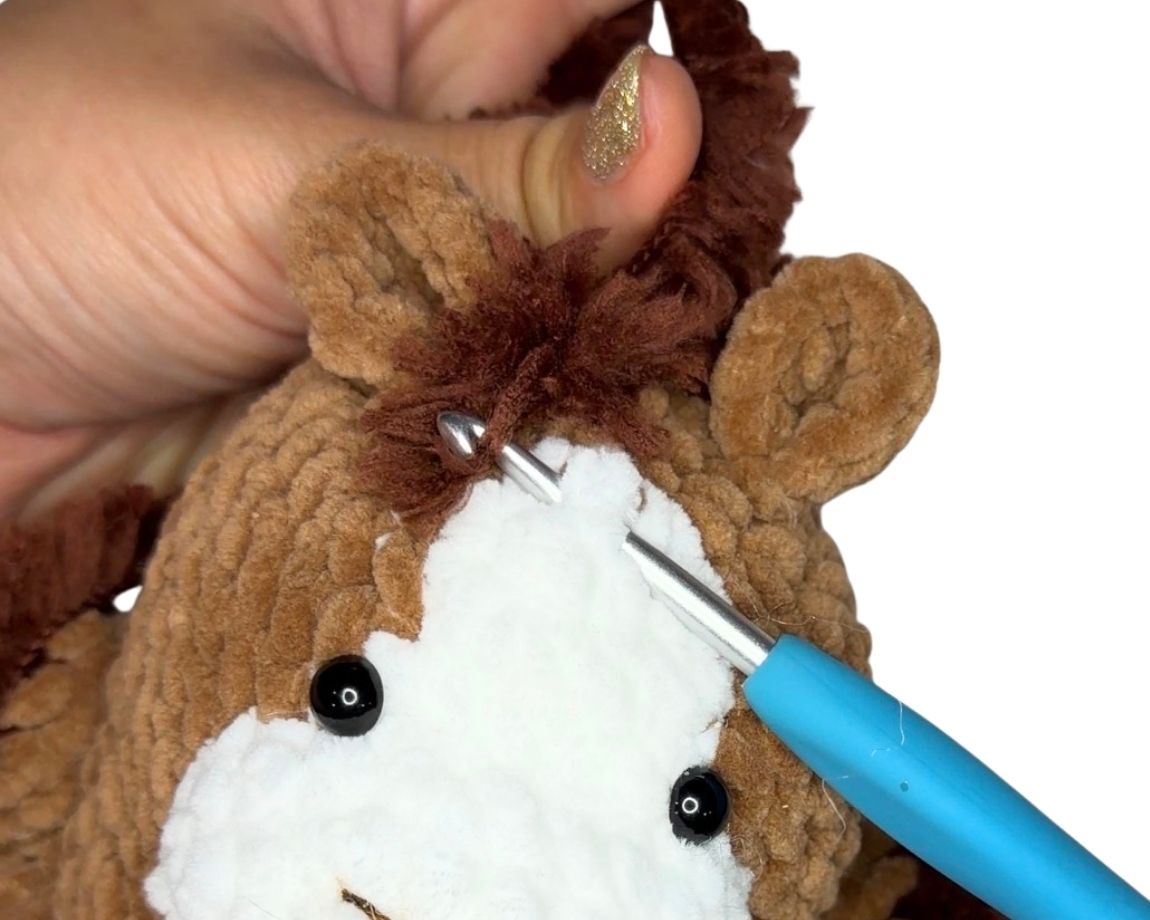
- Mane: We will surface crochet (video for the technique tutorial) the mane and tail.
-
- Step 1: Place a Clover sewing pin between rnds 2-3 on the forehead area. This is where the mane will start.
- Step 2: Place another Clover sewing pin between rnds 10-11 on the back of the horse’s head. This is where the mane will end.
- Step 3: Join fluffy Dark Brown yarn where the first sewing pin is and ch 2 (this will be the first dc).
- Step 4: Surface double crochet down the head to the sewing pin marking the end of the mane.
- Step 5: Secure remaining yarn tails into a knot before weaving them in.
- Tail: Join fluffy Brown yarn between rnds 16-17, centered on the back of the body. ch 7, work into the second ch from the hook and dc down the ch. Weave in remaining ends.
You’re finished! Wishing you all a healthy Lunar New Year. Tag your creations with @cloversquad and @curiouspapaya to share your makes 🙂
If you want to keep up with me, Amy, on social media for other fun projects, follow me on: Instagram
If you want to keep up with all things Clover, follow us on: Facebook | Twitter | Instagram | Pinterest | YouTube | Ravelry