Crab Amigurumi Crochet Pattern
Hello! I’m Amanda, the crochet designer behind Loops and Love Crochet. I am so excited to be back on the Clover blog to share my latest design, an amigurumi crab!
The inspiration for this design came while on a recent vacation in Maui. This crab amigurumi is the newest design in my Amigurumi Ocean Friends collection on my blog. You can find the whole collection here! You’ll find a colorful sea turtle, whale, a pair of seahorses, and more!
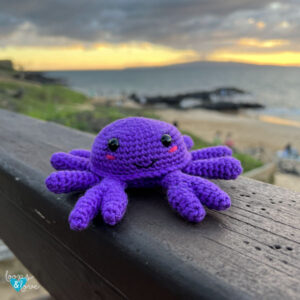
Let’s get started on this project. I hope you enjoy making your adorable little crab!
Keep on reading for the crab amigurumi crochet pattern below. If you’d like the inexpensive, printable PDF version, you can grab it in my Etsy or Ravelry shops.
Let’s get started on this project! I hope you enjoy making your adorable little crab!
Materials:
- Clover Amour US Size E/3.5mm crochet hook- Art No. 1043/E
- Worsted-weight (#4) yarn – Any worsted-weight yarn can be used for this project. I used WeCrochet Brava yarn in the Freesia colorway for the purple crab and Marina for the teal colored one. I also used a very small amount of Rouge for the pink cheeks. You’ll need approx. 90yds for this project.
- Safety eyes – 9 mm size safety eyes
- Stuffing – any fiber based stuffing
- Yarn needle – bent yarn needles are great for weaving in ends and sewing on parts.
- Embroidery Thread (optional) – a small amount of black for the eyelashes and mouth.
Stitches Used:
- Ch – chain
- Sl St – slip stitch
- SC – single crochet
- INV DEC – invisible single crochet decrease (INV DEC video tutorial HERE).
Gauge
- 2”x2” = approx. 7 rows of 10 SC stitches
Finished Size
- Finished crab measures approximately 5-6 inches wide, when measuring across the center from the tip of one leg, across the body, to the tip of the other leg.
Important Notes:
- Worked in rounds – This pattern is worked in continuous rounds, which means that you will not be joining the last stitch of the round with the first one. Instead, you’ll need to keep track of where each round started and how many stitches you have made because after each round you’ll continue right on to the stitches of the next round (with no join). It is useful to use a stitch marker (or a piece of yarn) to mark the start or end of each round.
- Magic Circle – Make a circle with your yarn, insert crochet hook into circle and draw up a loop. Chain one and then start making the stitches of round 1 into the ring. This video tutorial will show you the magic circle and working the first rounds of stitches.
The Pattern
Top of Body:
Round 1: Magic circle, ch 1, make 6 SC stitches into ring (6)
Round 2: 2 SC in each stitch around (12)
Round 3: *2 SC in first stitch, SC in next st, repeat from * around (18)
Round 4: *2 SC in first stitch, SC in next 2, repeat from * around (24)
Round 5: *2 SC in first stitch, SC in next 3, repeat from * around (30)
Round 6: *2 SC in first stitch, SC in next 4, repeat from * around (36)
Round 7: *2 SC in first stitch, SC in next 5, repeat from * around (42)
Round 8: *2 SC in first stitch, SC in next 6, repeat from * around (48)
Rounds 9-13: SC in each stitch around (48) Fasten off, weave in ends.
*Insert safety eyes between rounds 8 and 9 approximately 7 stitches apart. If you are adding eyelashes, it is easier to stitch them on now before securing the eyes in place.
First, place the eyes in the stitches where you’d like them (not securing the backs yet), then remove the eyes and stitch on the eyelashes. Then place the eyes back in and secure the backs tightly.
Next, stitch on the mouth and cheeks (optional). To form the mouth, use your black yarn or embroidery thread and yarn needle, make two stitches forming a “V” in the center of the crabs “face, one round up from the bottom edge. To form the cheeks, using a piece of pink yarn and your yarn needle, make a small horizontal stitch below each eye towards the outside of the face.
Weave in or tie off all ends from the eyelashes, mouth, and cheeks. These ends can be hidden inside the crab, but be sure to tie off any loose ones to make sure they’re secure.
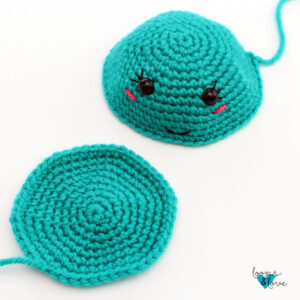
Bottom of Body:
Round 1: Magic circle, ch 1, make 6 SC stitches into ring (6)
Round 2: 2 SC in each stitch around (12)
Round 3: *2 SC in first stitch, SC in next st, repeat from * around (18)
Round 4: *2 SC in first stitch, SC in next 2, repeat from * around (24)
Round 5: *2 SC in first stitch, SC in next 3, repeat from * around (30)
Round 6: *2 SC in first stitch, SC in next 4, repeat from * around (36)
Round 7: *2 SC in first stitch, SC in next 5, repeat from * around (42)
Round 8: *2 SC in first stitch, SC in next 6, repeat from * around (48)
Round 9: SC in each stitch around (48)
Fasten off, weave ends.
Claws (make 2):
To form each pincher claw, make two claw pieces and then attach them together.
Small Claw Piece
Round 1: Magic circle, ch 1, make 4 SC stitches into ring (4)
Round 2: *2 SC in first stitch, SC in next st, repeat from * around (6)
Round 3: SC in each stitch around (6)
Round 4: *2 SC in first stitch, SC in next 2, repeat from * around (8)
Round 5: SC in each stitch around (8)
Fasten off and cut yarn (leaving a tail). Stuff the claw piece. You may need a pencil, chopstick, or stuffing stick to get the stuffing into the claw piece. Follow instructions below to make the larger claw piece.
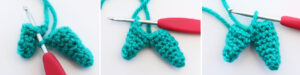
Large Claw Piece
Round 1: Magic circle, ch 1, make 4 SC stitches into ring (4)
Round 2: *2 SC in first stitch, SC in next st, repeat from * around (6)
Round 3: SC in each stitch around (6)
Round 4: *2 SC in first stitch, SC in next 2, repeat from * around (8)
Rounds 5-7: SC in each stitch around (8)
Do not fasten off after finishing the larger claw piece. Stuff the large claw piece. Then continue to round 8 to join the small and large claw pieces together.
Round 8: Join the claw pieces with a SC in the next stitch on the smaller claw piece (the stitch after where you fastened off) then continue working SC stitches all the way around the smaller claw. When you are around all 8 stitches of the small claw piece, continue to SC in each of the 8 stitches around the large claw piece. You will now have worked one full round around both claw pieces. (16)
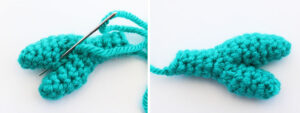
Round 9: INV DEC around (8)
Rounds 10-13: SC in each stitch around (8)
Fasten off. Cut your yarn, leaving a long enough tail for sewing. Stuff the claw two thirds of the way up and then sew the top closed with your yarn needle by laying the claw flat and passing your yarn needle through both layers of stitches at the top of the claw. Work back and forth through the stitches (whip stitch) until the top of the claw is closed, leaving the tail for sewing to body.
Next, sew the claw into more of a closed position to give more of a pincher look. Using your yarn needle and a piece of yarn, sew in and out of the stitches along the inside of the claw and pull tight to bring the claw pieces closer together. Then weave in the ends (except for the one at the end for sewing onto the body).
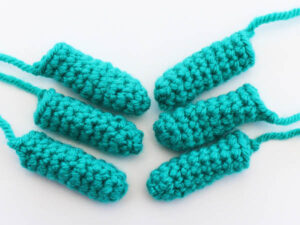
Legs (make 6):
Round 1: Magic circle, ch 1, make 6 SC stitches into ring (6)
Round 2: *2 SC in first stitch, SC in next 2 sts, repeat from * around (8)
Rounds 3-10: SC in each stitch around (8)
Fasten off and cut your yarn, leaving a tail for sewing. Repeat for all 6 legs.
Stuff the legs about two thirds of the way up. Then, using your yarn needle, sew the tops of the legs closed by laying each leg flat and passing your yarn needle through the tops of the stitches (whip stitch).
Assembly Instructions
- Join the Top and Bottom Body Pieces
Place the top and bottom of the body pieces together and line up the stitches. Keep the “right side” of the stitches facing outwards for the bottom of the body. This will be the bottom of the crab.
Make a slip knot with your yarn. With the bottom of the body facing up, insert your hook through a stitch, passing through both body layers. Place the slip knot on your hook, pull it through the stitches and make a slip stitch. SC in the same stitch and in each stitch around, making sure to pass through both the top and bottom layers of the body and keep the stitches lined up.
When you are about two thirds of the way around, start adding stuffing to the body. Continue working SC stitches around and stuffing the body as you go, making sure you have added enough stuffing before the opening gets too small. Join to first SC with a slip stitch. Fasten off, cut yarn, and weave in ends.

- Sew Legs and Claws onto the Crab
All the legs and claws are sewn onto the underside of the crab’s body towards the outer edge, just under the ridge formed from joining the body pieces together. Sewing them under the ridge helps hide any stitches from sewing the legs/claws on and allows the crab to sit flat.
Roughly line up where you’d like the legs and claws to be. I kept the claws towards the front and below the eyes, and then spread the legs evenly on the sides. You can pin your legs and claws in place before sewing, or just line up each piece as you go.
Use your yarn needle and the yarn tail to attach each leg and claw to the body, one-by-one, sewing in and out of each stitch and passing through a stitch on the body of the crab. I placed most of the stitches on the underside of the crab, and then made a few in through the top, passing the yarn needle behind the stitches forming the ridge from joining the body pieces together. This keeps the stitches invisible on the front/top of the crab, but also secures each leg/claw to the edge of the body. When each claw is sewn on, weave in ends inside the body and cut yarn.

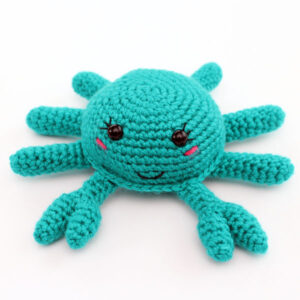
You’re all finished making your adorable crab! Enjoy making more in all different colors! If your crab needs a friend or two, check out the other Amigurumi Ocean Friends that can keep him company!
If you are sharing your project on Instagram, I’d love to see it! Please tag @loopsandlovecrochet when posting your photos.
If you’re looking for more crochet patterns, tutorials, and inspiration, be sure to follow me at these links: Blog | Instagram| Facebook | Etsy | Ravelry | YouTube | Newsletter