Crochet Penguin Ornament + Gift Card Holder
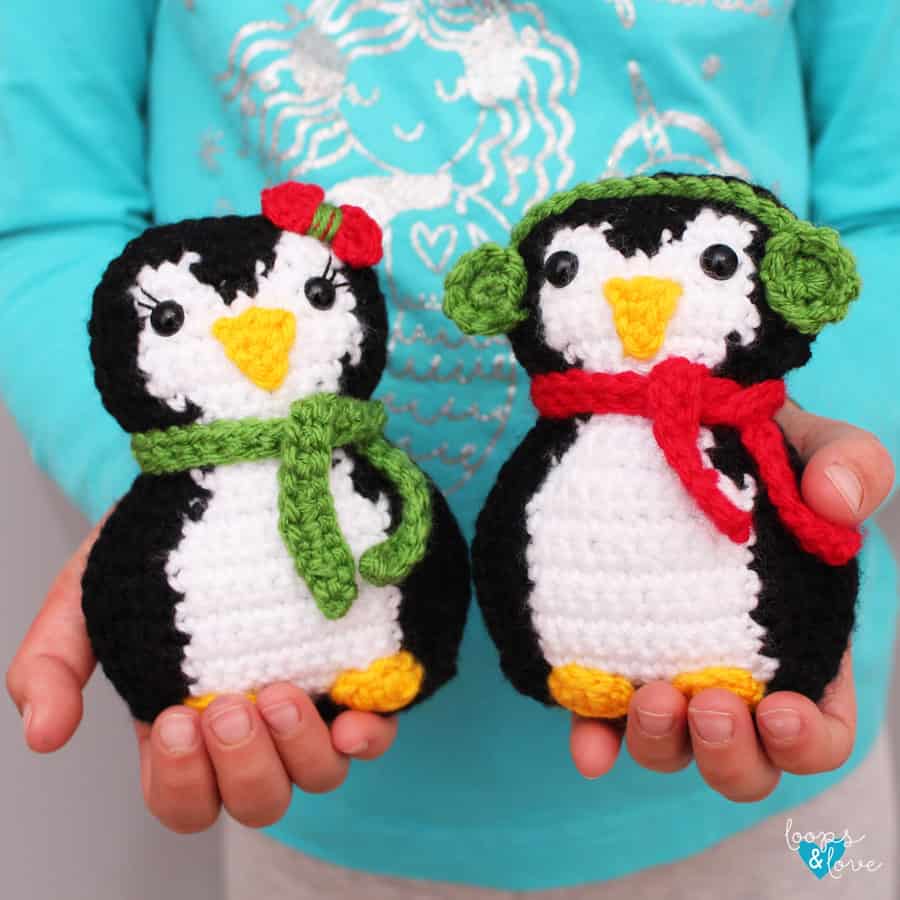
Hello! I’m Amanda from Loops and Love Crochet I am so excited to be sharing my latest design with you today! This Ragdoll Penguin pattern is such a fun project that works up quickly and turns out super cute. I’ve also included options to personalize your penguin with accessories, make it into an ornament, and even add a little pocket on the back for a gift card or small treat!

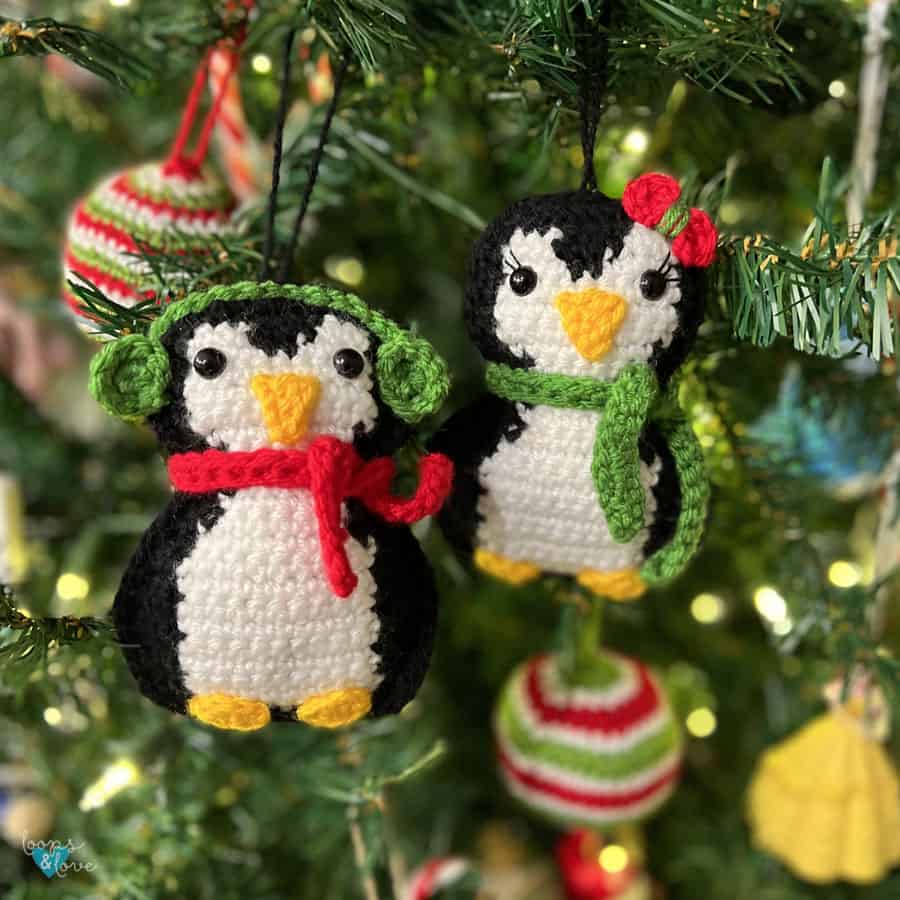
These penguins are perfect to work up gifts for everyone on your list, or you can make them for your own holiday tree as well! I hope you enjoy working up your penguins!
Keep on reading for the Ragdoll Penguin pattern below, or if you’d like the inexpensive, printable PDF version, you can grab it in my Etsy or Ravelry shops.
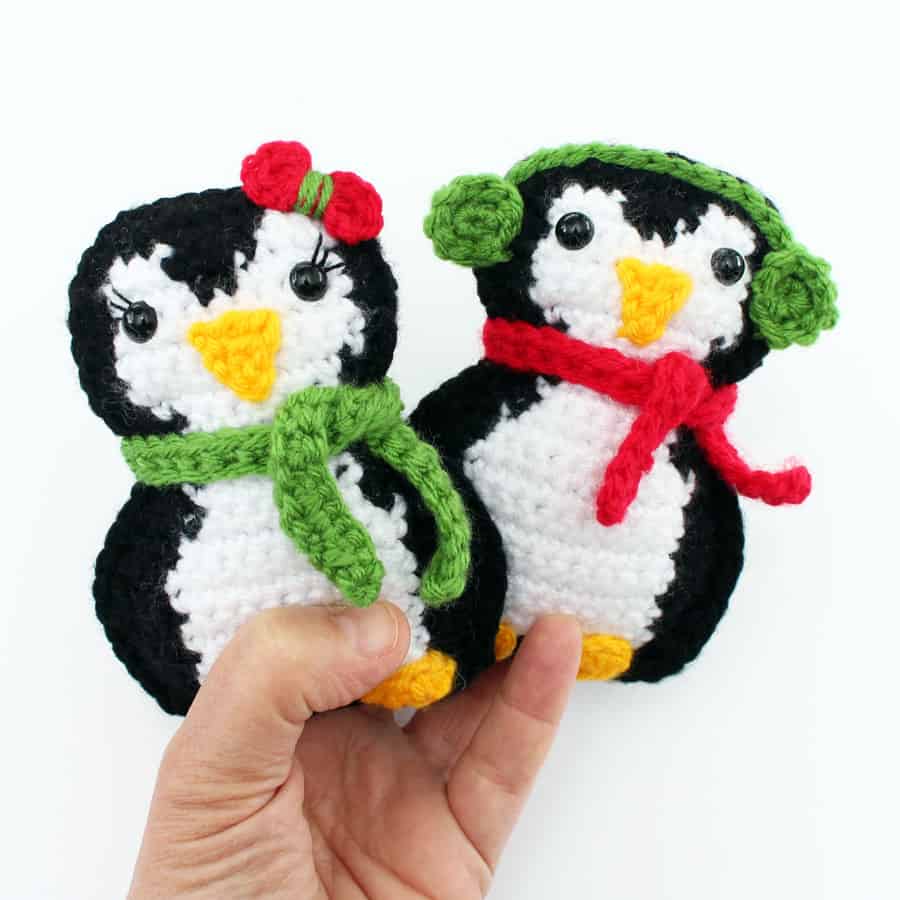
After I made my penguins, I thought it would really fun to personalize them with earmuffs, a scarf, and a bow! You can decide on how to personalize your penguin in your color choices and the accessories you decide to embellish it with as well.
The Ragdoll Penguin crochet pattern is an intermediate-beginner project. If you’d like a visual on how it works up or need a little help or extra explanation along the way, I have also made a video tutorial to go along with some parts of the pattern.
You can find the video on my YouTube Channel here!
Let’s get started on this project! I hope you enjoy making your Ragdoll Penguin today!
Materials
- Amour Crochet Hook E (3.5mm) – Art. No 1043/E
- Worsted-weight (#4) yarn – Any worsted-weight yarn can be used for this project, cotton or acrylic. I used WeCrochet Brava yarn in Black, White, Red, Canary, and Peapod. Each penguin requires approx. 65yds of black yarn, 7yds of white, and just a tiny amount of the yellow, red, and green colors.
- Safety eyes – 8mm size safety eyes
- Stuffing – any fiber based stuffing
- Yarn needle – bent yarn needles are great for weaving in ends and sewing on parts.
- Embroidery Thread (optional) – a small amount of black for eyelashes
Stitches Used:
- Ch – chain
- Sl St – slip stitch
- SC – single crochet
- DC – double crochet
- INC – single crochet increase – work 2 SC stitches into the same stitch.
- DEC – single crochet decrease – work a SC decrease over the next 2 stitches. Insert hook into the first stitch, pull up a loop, insert hook into next stitch, pull up a loop, yarn over and pull through all three loops on hook.
Gauge/Finished Size:
- Gauge is not imperative for your penguin to turn out.
- When finished, your penguin will measure approximately 5” tall.
Important Notes:
- Color Changes – You will be changing colors between black and white often when working the front panel of the penguin. To change colors, complete the last SC in the first color up until the last yarn over. Yarn over with the new color and pull through last step of the SC stitch.
- Intarsia Crochet Tips – For the front panel of the penguin, you will be using the intarsia crochet technique. When you change colors, you will not be carrying the unused colors along under your stitches. Instead, you’ll be dropping the color that you are finished with (leaving it attached) and picking up the next color, pulling it over to where you are working the stitches. There will be a right side (RS) and wrong side (WS) of this panel. You’ll see the color changes and the yarn traveling over on the wrong side (back of the panel, which will be inside the penguin when it’s finished), but it will not be visible on the front. You’ll need to make sure you are only dropping your yarn onto the wrong side (back) of the project so it’s not visible on the right side (front). All ODD numbered rows will have the right side of the project facing you, EVEN numbered rows will have the wrong side facing you. The back panel of the penguin is only made in black yarn so both sides of the panel will be the same (no RS and WS).
- Front/Back Panel – For the front and back panel, all stitches are single crochet (SC) and at the end of each row, you’ll chain 1 and turn. The written instructions for the front and back panel will only tell you the number and color of each stitch. For example, “Binc, B, W3,” means that you’ll make a SC increase in black, followed by a SC in black, and then 3 SC in white.
- Video Tutorial – I made a video tutorial to show you how to join the penguin panels together and add the feet, bow, earmuffs, scarf, and pocket on the back. You can find the video here on my YouTube channel.
The Pattern
B = Black yarn W = White yarn
*Remember that all stitches are SC and to chain 1 and turn at the end of each row.
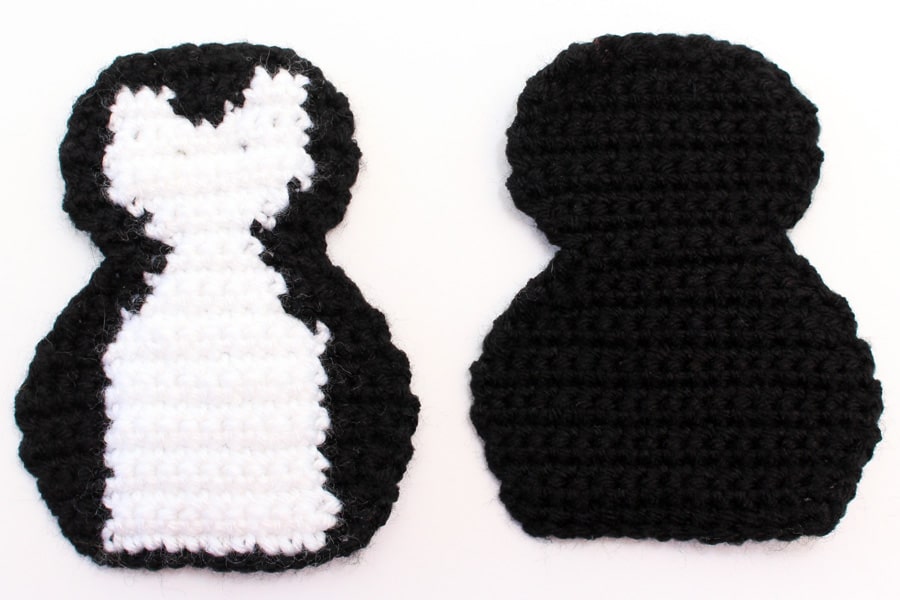
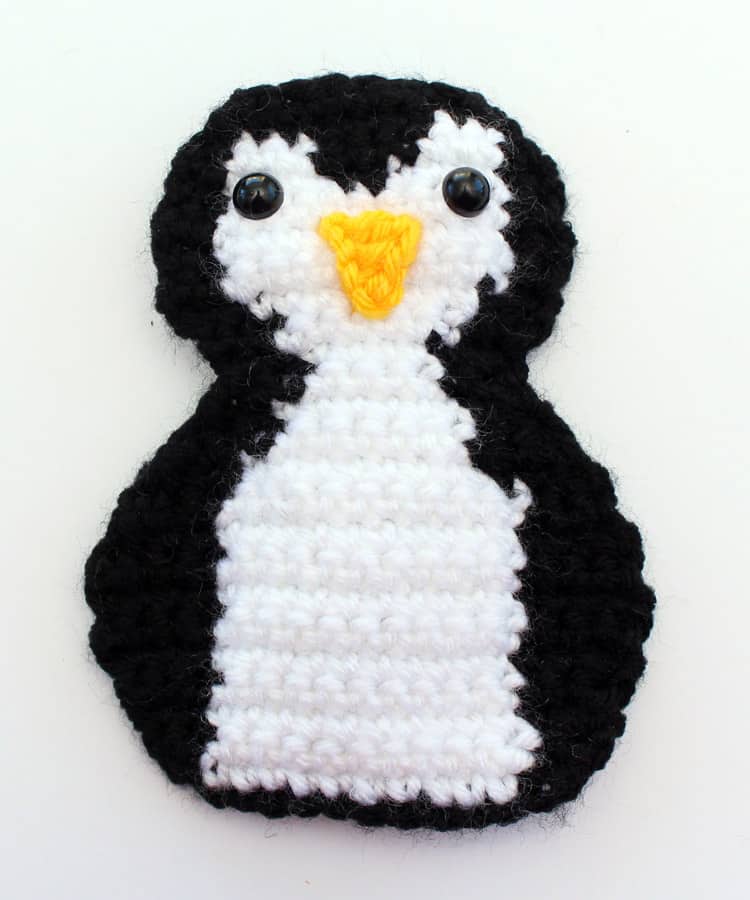
Front Panel
Row 1 (RS): B ch13, Binc in 2nd chain from hook, W10, Binc (14)
Row 2 (WS): B2, W10, B2 (14)
Row 3 (RS): Binc, B, W10, B, Binc (16)
Row 4 (WS): B3, W10, B3 (16)
Row 5 (RS): Binc, B2, W10, B2, Binc (18)
Row 6 (WS): B4, W10, B4 (18)
Row 7 (RS): B4, W10, B4 (18)
Row 8 (WS): B4, W10, B4 (18)
Row 9 (RS): Bdec, B2, W10, B2, Bdec (16)
Row 10 (WS): B3, W10, B3 (16)
Row 11 (RS): Bdec, B2, W8, B2, Bdec (14)
Row 12 (WS): Bdec, B2, W6, B2, Bdec (12)
Row 13 (RS): Bdec, B, W6, B, Bdec (10)
Row 14 (WS): Bdec, B, W4, B, Bdec (8)
Row 15 (RS): Binc, B, W4, B, Binc (10)
Row 16 (WS): Binc, B, W6, B, Binc (12)
Row 17 (RS): Binc, B, W8, B, Binc (14)
Row 18 (WS): B2, W10, B2 (14)
Row 19 (RS): B2, W10, B2 (14)
Row 20 (WS): B2, W10, B2 (14)
Row 21 (RS): B2, W4, B2, W4, B2 (14)
Row 22 (WS): Bdec, W3, B4, W3, Bdec (12)
Row 23 (RS): Bdec, B8, Bdec (10)
Row 24 (WS): Bdec, Bdec, B2, Bdec, Bdec (6)
Fasten off, cut yarn. Weave in all ends.
Back Panel
*Only black will be used for this panel. Both sides will be the same so a right side and a wrong side are not needed.
Row 1: B ch13, Binc in 2nd chain from hook, B10, Binc (14)
Row 2: B14 (14)
Row 3: Binc, B12, Binc (16)
Row 4: B16 (16)
Row 5: Binc, B14, Binc (18)
Row 6: B18 (18)
Row 7: B18 (18)
Row 8: B18 (18)
Row 9: Bdec, B14, Bdec (16)
Row 10: B16 (16)
Row 11: Bdec, B12, Bdec (14)
Row 12: Bdec, B10, Bdec (12)
Row 13: Bdec, B8, Bdec (10)
Row 14: Bdec, B6, Bdec (8)
Row 15: Binc, B6, Binc (10)
Row 16: Binc, B8, Binc (12)
Row 17: Binc, B10, Binc (14)
Row 18: B14 (14)
Row 19: B14 (14)
Row 20: B14 (14)
Row 21: B14 (14)
Row 22: Bdec, B10, Bdec (12)
Row 23: Bdec, B8, Bdec (10)
Row 24: Bdec, Bdec, B2, Bdec, Bdec (6)
Fasten off, cut yarn, weave in ends.
Next, we will add the eyes and the beak to the front panel of your penguin.
Eyes
If you are using safety eyes, insert two 8mm eyes between rows 20 and 21. They will be in the white section on the penguin’s face, with a stitch of white on the outer edge of each side. If you are having trouble finding rows 20 and 21, they are the 4th and 5th row down from the top of your penguin.
Beak
Ch 4, sl st in 2nd ch from hook. SC in next st, DC in last. Fasten off and cut yarn, leaving a tail for sewing onto the penguin.
Pass both of the yarn tails to the back of the penguin panel. Use one of the yarn tails to sew the beak by passing in and out of the stitches around the sides and top of the beak. Secure both ends on the back of the panel by knotting them together or weaving them in. The top of the beak will line up approximately in the same row as the bottom of the safety eyes.
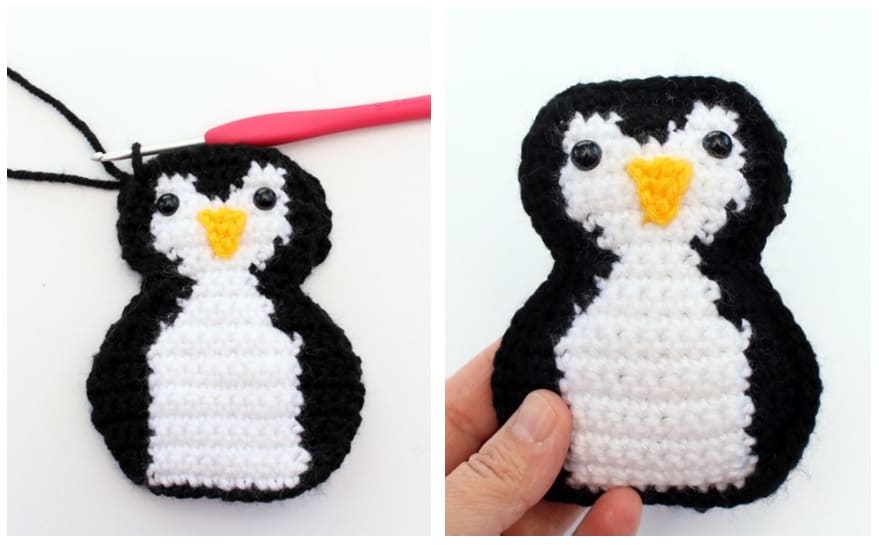
Joining the Penguin Panels
Lay the top panel of the penguin on top of the bottom panel, lining up each of the edges. Make a slip knot with your black yarn. Choose a stitch on the penguin to start (in the picture below, I started on one side of the penguin’s head). With the front of the penguin facing you, insert your crochet hook through the chosen stitch, passing through the same stitch on both panels. Place the slip knot on your hook and pull it through to the front of your project, chain 1, and SC in the same stitch and in each stitch around the outside of the penguin, travelling down the side, around the bottom, and then back up the other side. Place 2 SC stitches in the corner stitches at the bottom left and right of the penguin to prevent the edges from curling there.
When you are about 2/3 of the way around, start adding stuffing to the inside. Stuff the body section first when you are finished crocheting around it. Then slowly stuff the head as you continue to work the SC stitches around. Make sure you have added enough stuffing before the opening gets too small. Join with a slip stitch to the top of the first SC stitch. Fasten off and cut yarn. Pull both yarn tails tight (one from the start and one from the end) and weave them in.
Next, make the feet and sew them on.
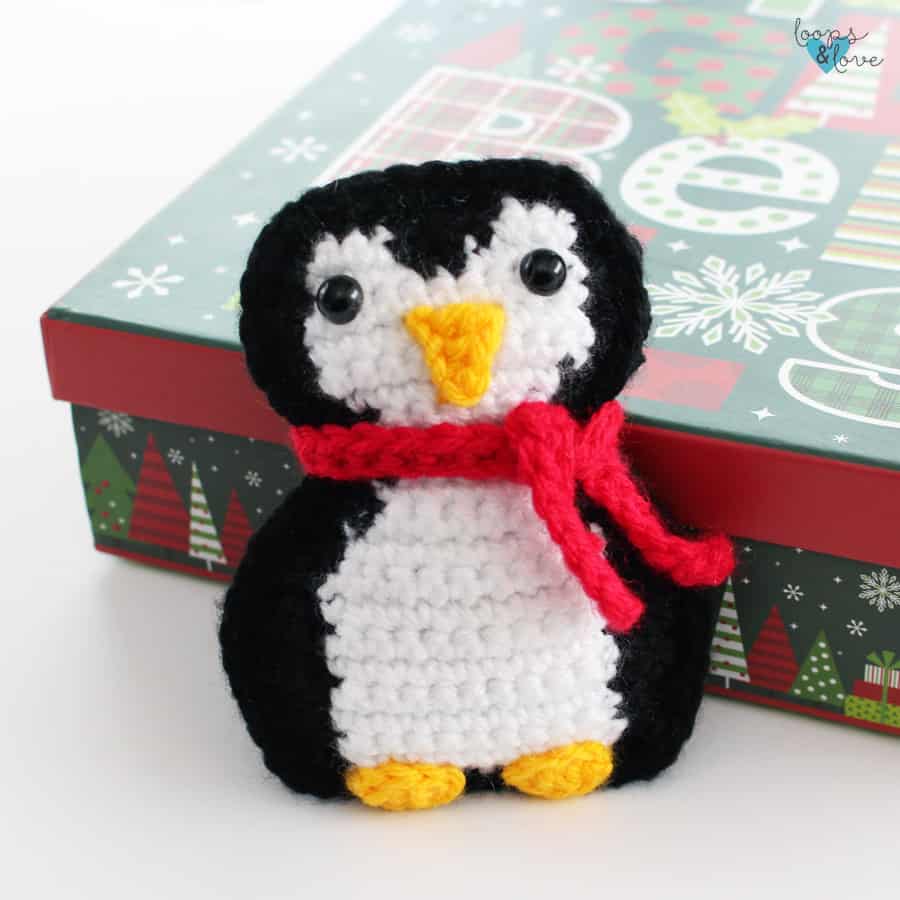
Feet (make 2)
In yellow yarn, ch 5, DC in 3rd ch from hook, DC next st, [DC, sl st] in last. Fasten off. Leaving a tail to sew onto your penguin.
Sew the feet at the bottom of the penguin’s body, lined up with the outside of the white section on either side, leaving a couple white stitches showing in the center. Make sure to pass the yarn through the inside of the penguin so the yellow stitches aren’t showing on the back of the body. Weave in ends, hiding them inside the penguin.
Personalize your Penguin!
You are now finished making your penguin. Next, you can choose which accessories you’d like to add to him/her. You’ll find instructions below for adding a scarf, bow, and earmuffs to your penguin. After that, you’ll have the option to add a little pocket on the back of your penguin for a gift card or small treat.
Scarf
To make the scarf, make a chain long enough to go around the penguin’s neck with a little extra to tie it. SC in 2nd chain from hook and in each stitch across. Fasten off, cut yarn. Weave in both yarn tails.
For the penguin in the photo, a chain of 40 was a good length, but yours may vary depending on tension and the size of your penguin. SC in 2nd chain from hook and in each stitch across. Fasten off, cut yarn. Weave in both yarn tails.
Bow
Magic circle, chain 2. Work 2 double crochet stitches into the ring, chain 2 and make a slip stitch to the center of the ring. Chain 2 again, make 2 double crochet stitches into the ring, chain 2, slip stitch to center ring again. Pull the magic circle tight. Wrap the yarn ends around the middle of the bow a few times. If you want the center of the bow to be a different color, as shown, you can weave in the ends of the first color and wrap around the bow in the new color. Sew in all ends except one for sewing the bow onto the penguin.
You can find a written tutorial with a video on my blog for making the bows (Easy Crochet Bows Tutorial here). Note that the bow in this pattern is the smaller sized bow.
Earmuffs
Circle Pieces – make 2 (one for each ear)
Round 1: Magic circle, work 6 SC into ring (6)
Round 2: *2 SC in first stitch, SC in next st, repeat from * once more (9)
Fasten off. Make sure the center ring is pulled tight. Weave in one yarn tail and leave one for sewing the circle onto the penguin. Repeat the instructions above to make the second circle.
Using your yarn needle, sew the circles to the penguin’s head, one on each side at about the height of the eyes and nose. If you’d like to have the stitches less visible on the back of the penguin, pass your yarn under the black stitches on the back each time you pass through a stitch on the earmuff circle. You will see some stitches on the back when you make the band that joins the circles together, so try not to worry too much about hiding your stitches, but you can keep them tidy on the back by making smaller stitches and passing under the black stitches instead of over the top of them.
The circles on each side of the penguin’s head will be joined using the surface slip stitch technique. This step is shown in the video tutorial for this pattern on my YouTube channel here.
Using the same color as the earmuff circles, make a slip knot with the yarn. With the front of the penguin facing you, insert your hook into one of the black stitches under the earmuff circle on the right side of the penguin (left side if you are left-handed). Place the slip knot on your hook and pull it through to the front of your project (the yarn will remain behind your project). Insert your hook into the next stitch above where you started, yarn over and pull up a loop through the stitch you passed through, create a slip stitch by passing the loop through the one already on your hook, then insert your hook into the next stitch. Repeat the surface slip stitches for each stitch around the top of the penguin’s head until you get to the other earmuff circle. Make sure you get all the way behind the second earmuff circle before you fasten off and pull through your yarn. Weave in both yarn tails, pulling them tight first (one at the start and one at the end).
Gift Card or Treat Pocket
If you’d like to make a pocket on the back for a gift card or small candy cane or treat, follow the instructions below.

Row 1: In black yarn, ch 13, SC in 2nd ch from hook and in each st across (12)
Rows 2-11: SC in each st across (12)
Fasten off. Weave in ends. Leave a tail for sewing onto back of penguin.
Position the pocket on the back of the penguin, with the bottom of the pocket lined up one row up from the bottom of your penguin. Use your yarn needle to sew the pocket onto the back by passing your yarn needle and yarn in and out of each stitch around the pocket, passing through the stitches on the back of the penguin. Keep the stitches to the back panel only, being careful not to sew right through to the front of the penguin. Start at one of the top corners, then sew down one side of the pocket, across the bottom, and up the other side before weaving in the yarn tail. Remember to leave the top of the pocket open for the gift card or treat.
Penguin Ornament
If you are making this penguin as an ornament for a Christmas tree, you can add a loop of yarn to the top for hanging. Attach a piece of yarn or string (approximately 6 inches long) through the top of your penguin to make it into a hanging ornament.
I hope you have enjoyed this crochet pattern and will make many more of these cute penguins! If you are sharing on Instagram, I’d love to see your project! Please tag @loopsandlovecrochet when you post your photos!
If you’re looking for more crochet patterns, tutorials, and inspiration, be sure to follow me at these links: Blog | Instagram| Facebook | Etsy | Ravelry | YouTube | Newsletter