Weaving Sticks Hip Bag
 We joke about it, but truth be told… we love bags. Bags in all sizes, shapes, and colors adorn our home on hooks, in closets, and hanging on doorknobs just waiting for their turn to be called into use on a trip to the grocery store or an outing downtown.
Plus, bags are a great way to play with textiles and construction techniques without committing to a huge amount of time. Just a few hours and you have something functional and FAB! So, when Clover asked us if we had any ideas for a project using their Weaving Sticks, we immediately went to a bag. Not just any bag, a hip bag… or a HIP hip bag. Okay… we’ll stop with the puns… for now…
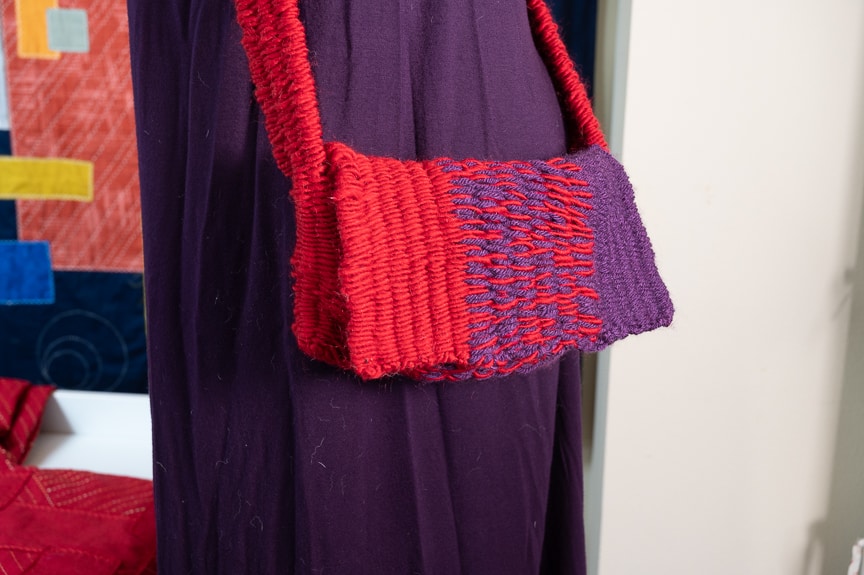
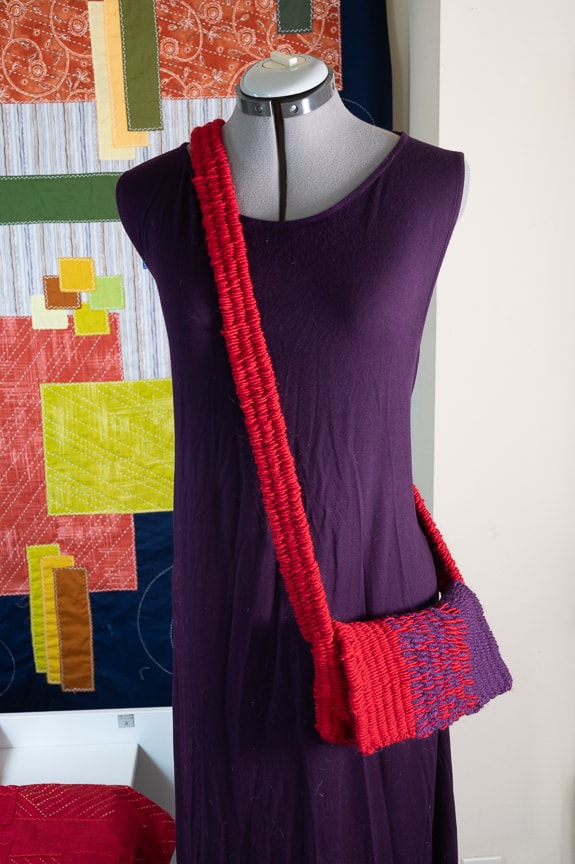
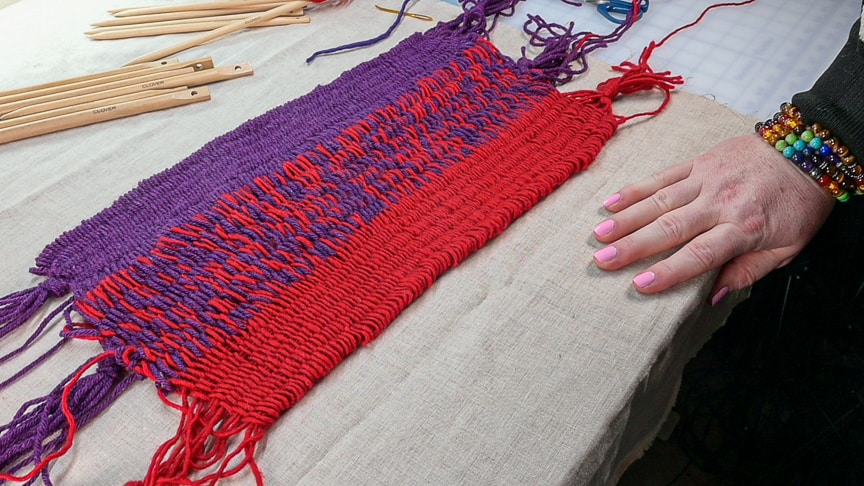
The fabric created by the Weaving Sticks reminded us of textiles we’ve seen from the late 60’s and early 70’s (a favorite fashion time of ours). So, we put our heads together and designed an easy to make shoulder bag that sits nicely on your hip while at the same time looking… hip! This hip bag is the perfect size for chucking in a mobile device, some sunscreen, and whatever bobs and bits you might need for a casual day. To make it even more user friendly, we included a lining in our project that you can add for a little more stability to your fabric. Don’t be shy about using yarn and fabric strips that are odds and ends of projects or even make fabric strips from that top that has seen better days. We loved the added interest of finished textile from combining strips using both sizes of the Weaving Sticks, but you can mix and match or just use your favorite size. Once you have the basic technique down, there really isn’t any limit to the textiles you can make with this historical method of creating woven fabrics.
Watch the video tutorial:
Or scroll down for written instructions.
What you’ll need:
Notions and Tools
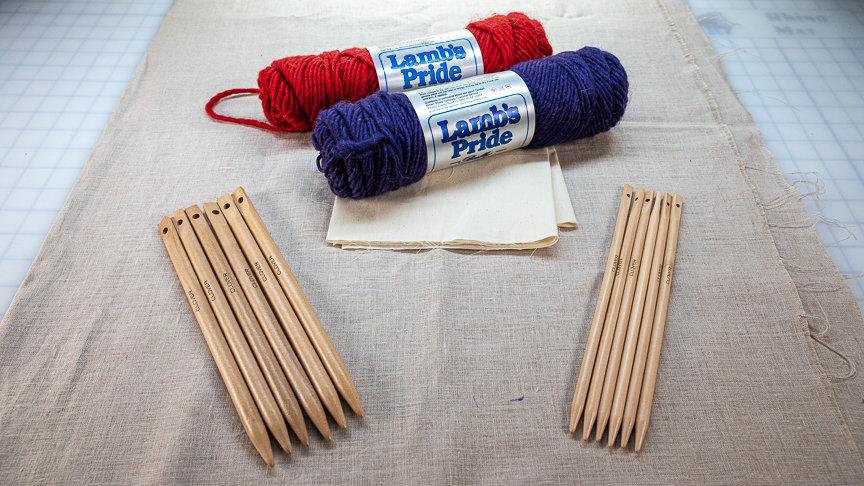
- Clover Weaving Sticks (Fine) – Art. No 8440
- Clover Weaving Sticks (Thick) – Art. No 8441
- Clover Wonder Clips – Art. No 3210
- Rotary Cutter – see Clover’s collection
- Scissors – see Clover’s collection
- Clover Gold Eye Milliners Needle – Art. No 236
- Hand Sewing Thread – We used Aurifil 50 wt cotton thread in this project
Materials
- 2 Skeins – Worsted weight yarn
- 1 piece of cotton fabric (large enough to cover the inside of your bag)
Specs
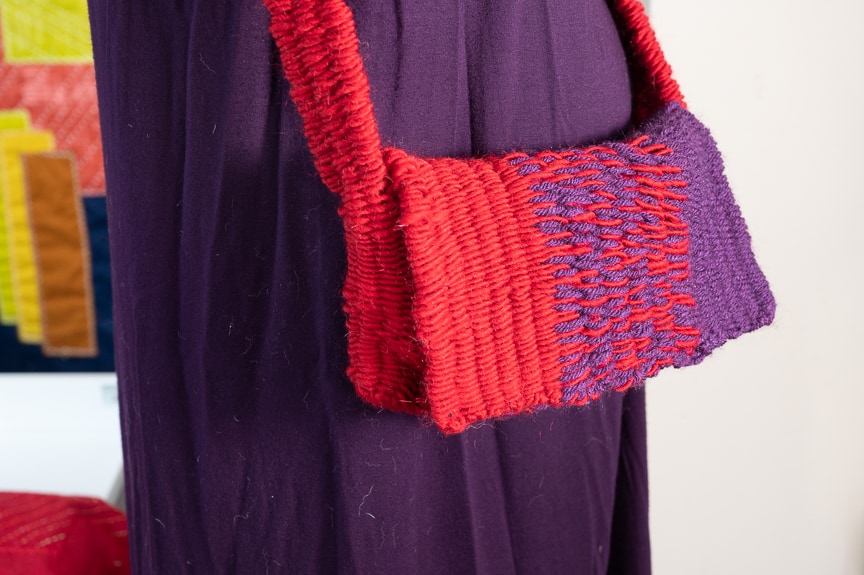
Bag Body
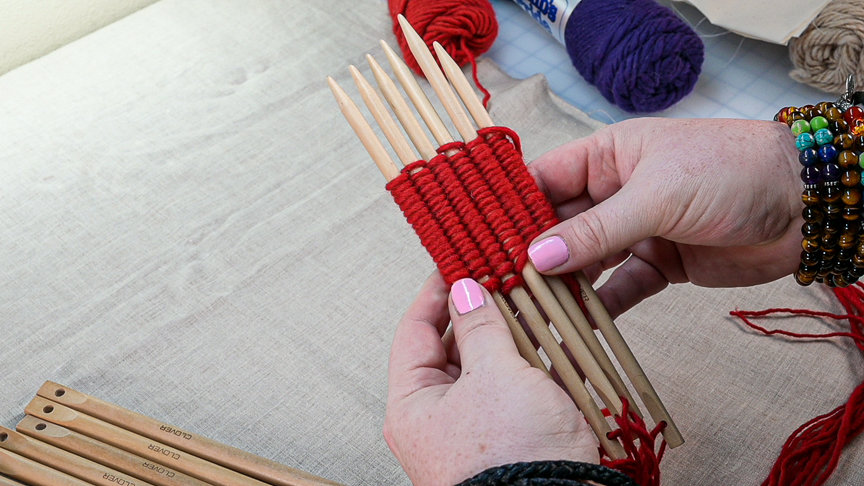
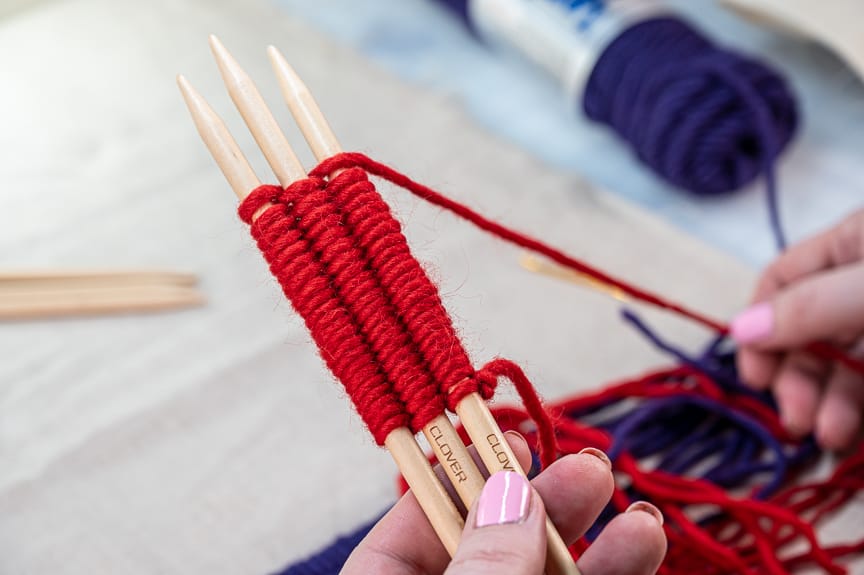
We used all 6 Thin Weaving Sticks to make 2 panels using one strand of wooly worsted weight yarn. Then, we made a 3rd panel using 2 strands of yarn held together on all 6 Thick Weaving Sticks.
Once the pieces were woven together our finished dimensions for the base bag was about 16″x 9.5″ (40.5cm x 24cm). You can make yours wider or deeper by altering the number of panels or the length of your strips. Make yours as tall and wide as you like!
Strap
The strap was woven using three Thin Weaving Sticks and one strand of worsted weight yarn. The length of the strap will vary based on your personal preference and how you like your cross-body strap to lay across your body. We made ours about 60″ (152cm) long.
Instructions
Step 1: Make the woven base pieces
- Follow the instructions included with the Weaving Sticks and make at least 3 panels at least 16″ (40.5cm) long.
Step 2: Make the strap
- Measure from your shoulder to your hip.
- Add 10
- Multiply that number by 2. That will be the length of your strap. Again, you can make your strap longer or shorter to fit your body.
- Use three Thin Weaving Sticks and one strand of yarn to make your strap.
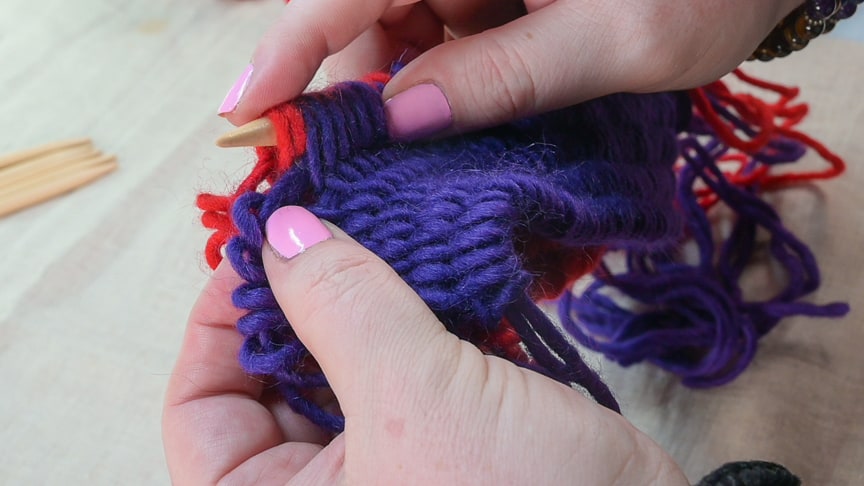
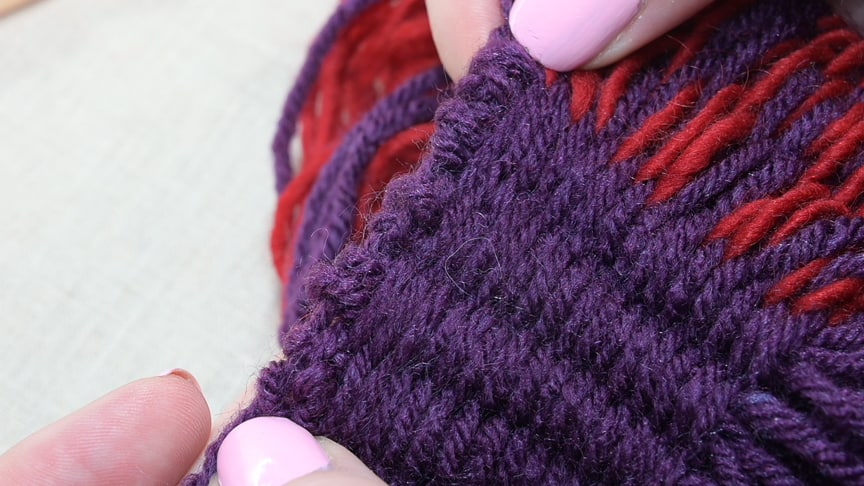
Step 3. Weave the base pieces together
- Measure out a single strand of yarn the length of your finished bag, plus 12″.
- Hold two sections of woven pieces together so you can see the edge loops.
- Using either the included tapestry needle or one Weaving Stick, pick up one loop from each piece and weave the entire length together.
- When done, hold the tail end of the yarn with one hand and pull the needle/Weaving Stick gently out of the opposite end. You have successfully woven two sections together.
- Repeat this joining technique for the remaining bag pieces.
- To perfectly finish your pieces and square them up a bit, use a steamer to block them. This gives the yarn or fabric a more permanent “set” so your bag is easier to work with when lining.
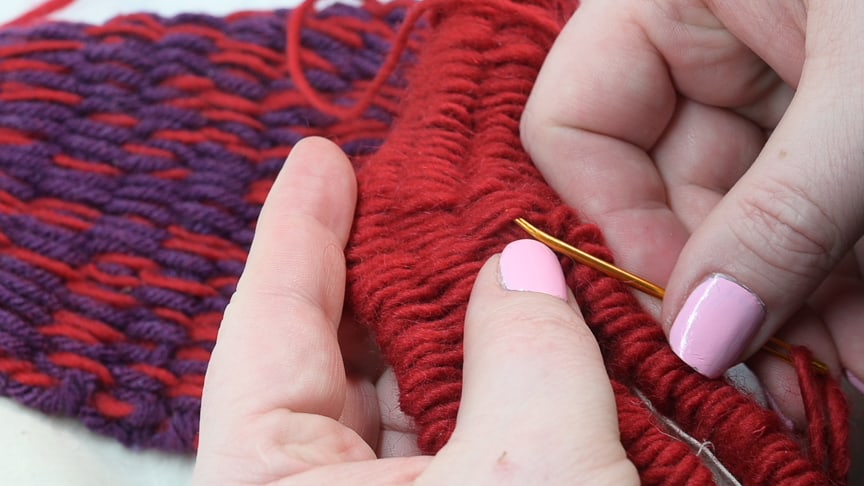
Step 4: Weave in the ends
- If you want tassels or fringe on the edge of your bag, tie in a knot with three strands of yarn—two of the yarn ends that are associated (meaning they travel down the same channel of fabric) and one strand next to them.
- Continue until all the strands are tied
OR
- Thread up two associated yarn ends (meaning they travel down the same channel of fabric) on the included tapestry needle.
- Insert the needle from Front to Back under the two end loops of the fabric. Pull through and snug up the ends until just taught.
- Insert the needle down the channel, running the yarn at least 4″ (10cm). Pull the excess out through the woven strands and cut with scissors.
- Repeat until all ends are woven in.
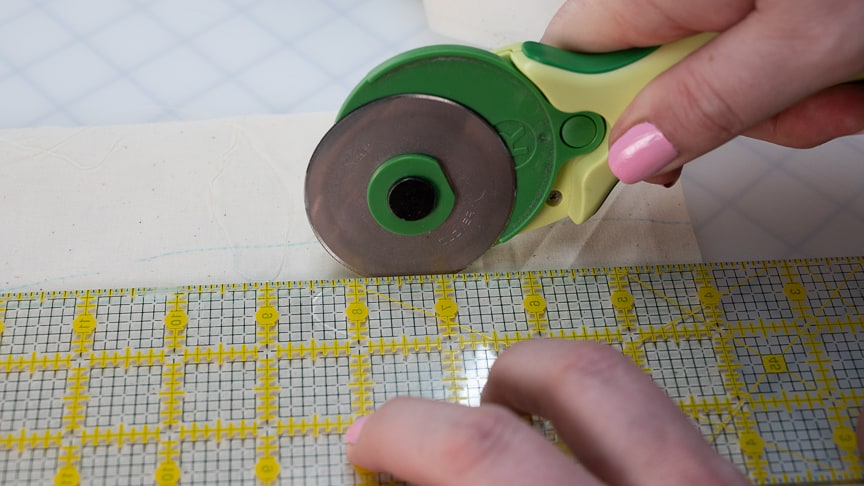
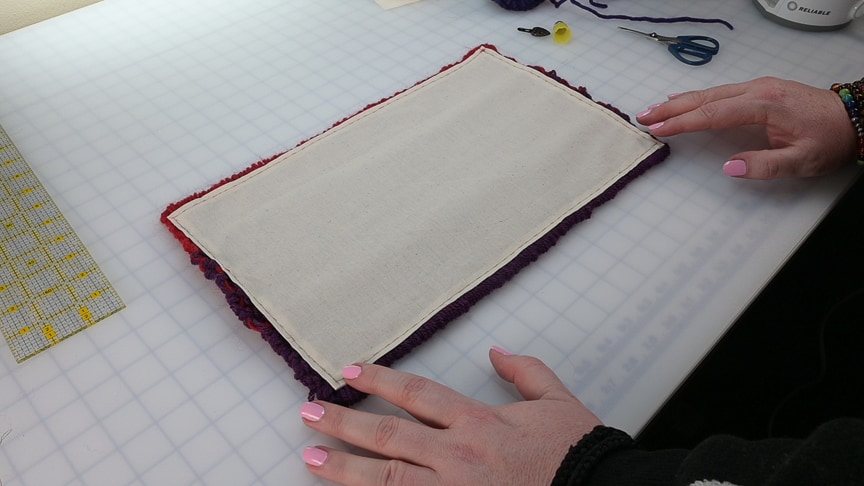
Step 5: Measure and cut your lining
- Lay your bag on top of your lining fabric and draw around the edge to make a rough outline of your finished hand woven.
- Use a straight edge to square up the rough lines.
- Cut the lining out.
- Fold edge under 1/4” (0.5cm) and iron flat.
NOTE: For added strength, you can use a sewing machine or back stitch to secure the folded edge of your lining fabric. This is completely optional and you can just use a washable school glue stick to secure the folded edges in preparation for sewing.
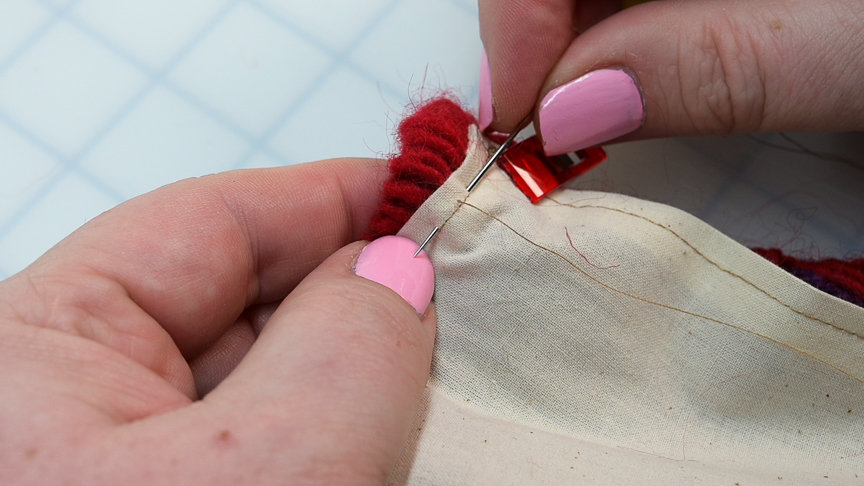
Step 5: Sew In the lining
- Place the bag body Right side down.
- Place the lining fabric on the bag body Right side up, centered on the bag body.
- Use Wonder Clips to hold the lining fabric in place.
- Hand stitch around the edge to secure the lining. We used a backstitch to hold the lining in place.
NOTE: Be careful to only sew through the lining fabric and one side of the bag body. Do not let your stitches go through the front of the bag body.
Step 6: Attach the handle
- Fold the bag into, roughly thirds. This will show you the final shape of the bag and the flap covering the opening. This is subjective, depending on how much of a flap you want on the top of your bag… make adjustments as you like.
- Thread up the included tapestry needle with a length of yarn a little more than 2x the depth of the folded bag.
- While pinching the bottom fold, find the bottom two loops of the fold in the bag and the two loops on either side of the end of the strap. Insert your needle first through one loop of the strap; continue through the two loops of the fold in the bag; finally, pass your needle through the loop on the other side of the strap.
- Loop your needle around these loops a couple of times to hold the bottom of the strap secure.
- Weave the side of the bag and one side of the strap together just like you did when you wove the panels together.
- When you get to the top of the bag body, weave through the top 2 loops of the bag and one loop of the strap 2 to 3 times, for strength and security.
IMPORTANT! Remember to NOT weave the flap of the bag to the strap.
- Repeat for the remaining sections of the strap.
DONE!
You are ready to go out and show off your hand made creation. Or maybe make another in a different color…
Watch the video tutorial:
Find the Shibaguyz on Facebook | Twitter | Instagram | Pinterest
Stay connected with Clover on Facebook | Twitter | Instagram | Pinterest | YouTube | Ravelry
[mc4wp_form id=”11289″]