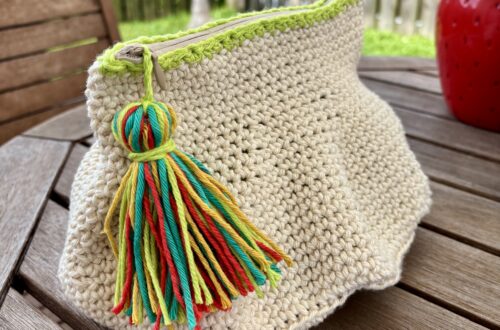
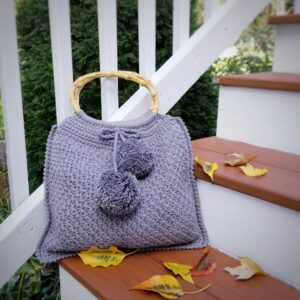
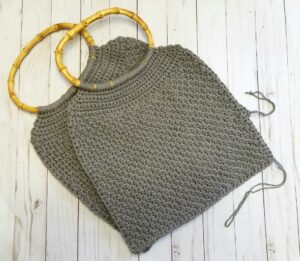
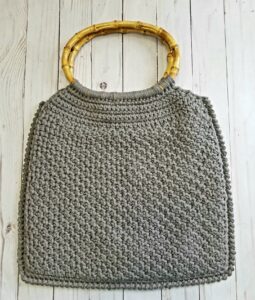
Honeycomb Tunisian Handbag – Tunisian Crochet Pattern
Hi, lovelies!
How are you all doing? My name is Elisa and I’m the maker/designer behind Strings and Cuddles! I’m a self-taught crocheter and knitter, thanks to YouTube and of course, to all who make those awesome video tutorials!
My love for yarns started when I moved to the USA in 2014. Being a stay-at-home wife/mom, crafting became my happy place, my therapy. It helped me cope up with homesickness and it helped me discover and cultivate my crafting skills. And now, I’m designing. I never thought that I’d be doing these things.
This year has been amazing! I am truly blessed to have met so many makers and designers in the crochet and knitting world. They inspired me and pushed me to go and accomplish my goals. Doors have been opened and I’m so grateful for all the things that are happening right now.
This is my first time here and hopefully won’t be the last one! I’m so thrilled that Clover has given me this time to share my new design using their very own Bamboo Interchangeable Tunisian Crochet Hook! This design uses basic crochet and honeycomb Tunisian stitches.
So without further ado, let’s dive into the pattern!
HONEYCOMB TUNISIAN HANDBAG
Skill Level:
Intermediate
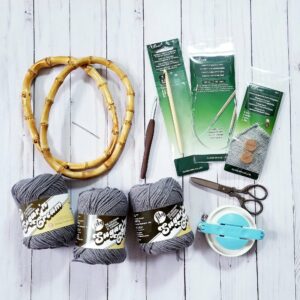
Materials:
- 6 Skeins of Lily Sugar ‘n Cream (Overcast) | 2.5 oz / 70.9 g / 120 yards / 109 m or any Worsted Weight Cotton Yarn
- Purse-n-alize-it Bamboo Handbag Handles Oval Shape | One Pair – 8.5 x 5.5 inches
- Amour Crochet Hook Size J | 6.00 mm (Art. No 1049/J)
- Bamboo Interchangeable Tunisian Crochet Hook Size K | 6.5 MM (Art. No 3697)
- Interchangeable Cord Stoppers (Art. No 3651)
- Interchangeable Cord | 16 inches (Art. No 3645)
- Pom-Pom Maker Large (Art. No 3126)
- Tapestry Needle (Art. No 3121)
- Tape Measure
- Scissors (Art. No 493/CW)
Gauge:
12 sts x 11 rows = 4 inches
Finished Size:
14.5 (wide) x 13 (tall) inches, not including the handle
Stitches and Abbreviations | US Terminology
- Ch – Chain
- SC – Single Crochet
- Sl – Slip
- St(s) – Stitch(es)
- Sk – Skip
- Rep – Repeat
- RSC – Reverse Single Crochet (also known as the Crab Stitch)
- YO – Yarn Over
- TSS – Tunisian Simple Stitch
- TPS – Tunisian Purl Stitch
- RetP – Return Pass – yarn over and pull through one loop on the hook (ch 1 made), *yarn over, pull through next two loops on hook. Rep from * until only one loop remains on hook.
Notes:
- Read through the entire pattern before starting.
- This pattern uses 2 strands of yarn held together.
- Each “row” consists of both a forward and a return pass.
- Learn Tunisian Honeycomb Stitch here.
Pattern Instructions
Make 2
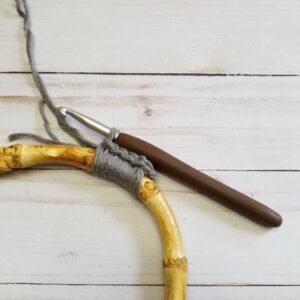
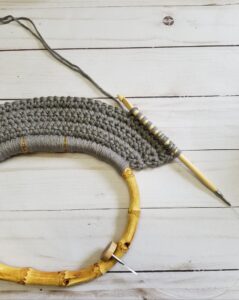
Take one of your bamboo handles, 2 strands of yarn (hold together), and your crochet hook. With your yarn, make a slip knot and insert your crochet hook into the loop. Now, take your bamboo handle and attach your yarn by slip stitching into the handle.

Row 1: Ch 1, SC 30 into the handle. Turn. (30)
Row 2: Ch 1, SC in the 1st st, 2 SC in the 2nd st. SC across up to 2 sts remaining, 2 SC in the next st and SC in the last st. Turn. (32)

Row 2 – 6: Repeat Row 2 (40)

Row 7: Ch 1, SC in each st across. Turn (40)
Now, change the crochet hook to the Tunisian hook.
Row 8 (Foundation): Skip 1st st, pull up a loop in the 2nd st and each st across (leave the loops on the hook), RetP.
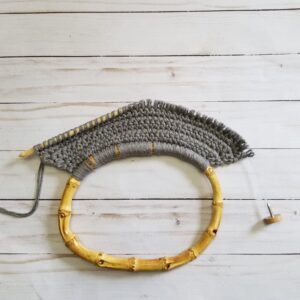
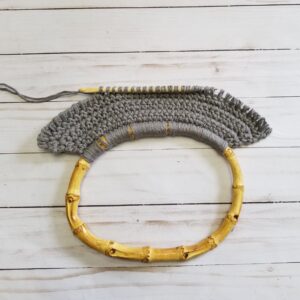
Row 9: Sk 1st vertical bar, (TSS in next st, TPS in next st) to last st, insert hook in last st under two outer vertical bars, yo, pull a loop through. RetP.
Row 10: Sk 1st vertical bar, (TPS in next st, TSS in next st) to last st, insert hook in last st under two outer vertical bars, yo, pull a loop through. RetP.

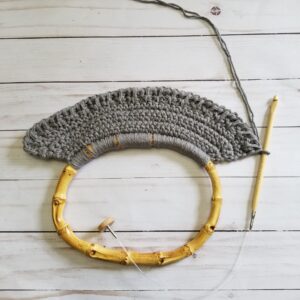
Repeat Row 9 and 10 until your piece measures approximately 12 inches (from the 1st row). Continue with the last row, the Tunisian cast-off.
Tunisian Cast Off
Sk 1st vertical bar, [insert hook in the next vertical bar (as if working TSS), sl st] to the last st, insert hook in last st under two outer vertical bars, yo, pull a loop through. Fasten off and weave in end.
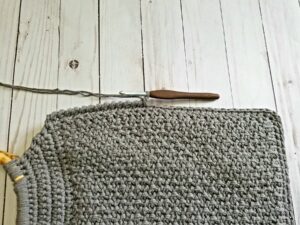
Assembly
With wrong sides facing each other, take your crochet hook and attach yarn in (the right side of your piece) Row 7. Ch 1, SC evenly to corner, 3 SC in the corner, SC evenly to the next corner, 3 SC in the corner, and continue SC evenly up to the 7th row from the top.

Adding the Border
Ch 1, RSC evenly across. Fasten off and weave in all ends.
Embellishment (optional)
Make two pompoms with your pompom maker. Set aside for later use.

With 2 strands held together, ch 50. Fasten off. Take your strings/chains and insert it in the center two sts on the front panel of your bag, tie it off and make a bow. Attach the pompoms at the beginning and end of your string.

You’re done! Enjoy your new handbag!
I would love to see what you create, please use these hashtags #stringsandcuddles, #stringsandcuddlesdesigns, #honeycombtunisianhandbag to share.
Please don’t hesitate to reach out for questions regarding this pattern.
*** *** ***
All images and patterns are copyright of STRINGS AND CUDDLES. You may sell any items that you make from this pattern. You may NOT use my images. Please DO NOT copy, redistribute or claim as your own. If selling items from this pattern, please give credit to STRINGS AND CUDDLES by linking to my shops or on social media @stringsandcuddles.
Connect with me Instagram | Pinterest | Facebook | Blog | Ravelry
Stay connected with Clover on Facebook | Twitter | Instagram | Pinterest | YouTube | Ravelry
[mc4wp_form id=”11289″]