Tomato Pin Cushion Crochet Pattern
Here’s something nostalgic for all of our fiber arts enthusiasts – a tomato pin cushion! In my childhood home, we kept ours in the sewing box (which was, of course, an empty blue Danish cookie tin). Turn this pin cushion into a cuddle-sized cushion with the pattern mods below. Enjoy this pattern! -Amy (curiouspapaya)
MATERIALS:
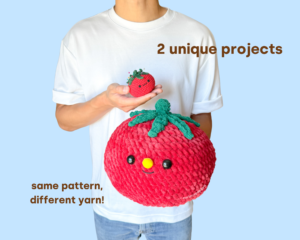
- Giant Tomato – 10 in. x 9 in. [~25 cm x 23 cm]
- #7 jumbo yarn – Sweet Snuggles
- 1 skein of Red – 8.5 oz [~241 g]
- Note: (prepare 2 skeins to be safe)
- #6 super bulky yarn – Premier Basix Chenille
- 1 skein of Emerald (green color) – 2 oz [~57 g]
- #4 medium worsted yarn – Hobbii Friends Cotton 8/8
- small amount of Black (124) to embroider the mouth
- Note: Please note that some #7 jumbo yarns are much thicker than the brand I used. A helpful tool to use if using different yarns from what I prescribed is yarnsub.com. Be sure to adjust your materials as needed if you decide to substitute products.
- Clover Amour Crochet Hook (9 mm)
- Clover Amour Crochet Hook (7 mm)
- Two 20 mm safety eyes
- 8 oz [~227 g] of Poly-Fil stuffing
- Optional: 1 cm x 1 cm yellow pom pom + hot glue for the nose
- #7 jumbo yarn – Sweet Snuggles
- Tomato Pin Cushion – 2.5 in. x 2 in. [~6 cm x ~5 cm]
- Clover Amour Crochet Hook (2.25 mm)
- #3 light worsted yarn – Hobbii Friends Cotton 8/8
- Tomato (40) (red color) – 0.71 oz [20 g]
- Emerald (105) (green color) – .35 oz [10 g]
- For my creation, I used felt facial features – “Smirk” in 4 mm by CroChic Designs. An alternative is to use embroidery thread and safety eyes of your choice!
- 1 oz [~32 g] of Poly-fil stuffing
- Optional: UHU glue for the leaves
- Materials needed for both sizes:
-
- Patchwork Scissors
- Stitch Markers
- Yarn Needle
- UHU glue
NOTES:
- Please do not copy/redistribute any part of this pattern as your own. This includes reposting/translating without permission. Feel free to sell your finished products in small quantities as long as you give credit to help support my work. Tag your creations with #curiouspapaya so I can feature you!
- This pattern is worked in continuous rounds (spiral).
- Difficulty: Intermediate-beginner
- This pattern is written in US terminology.
- Difficulty: Intermediate-beginner +
ABBREVIATIONS:
- blo: back loops only
- ch: chain
- dc: double crochet
- dec: (invisible) decrease
- flo: front loops only
- hdc: half double crochet
- sc: single crochet
- slst: slip stitch
- st(s): stitch(es)
- rnd(s): round(s)
- [#]: stitch count
- (…) x #: repeat instructions the number of times
PATTERN:
If you prefer the premium, printable PDF instead, you can find it HERE. Thank you for supporting my designs.
TOMATO:
*Note: When making the Giant Tomato, use the 9 mm hook for the tomato and the 7 mm hook for the leaves. For the Tomato Pin Cushion, use the 2.25 mm hook for both parts.
- Rnd 1: Make a magic circle and (sc) x8 [8]
- Rnd 2: (inc) x8 [16]
- Rnd 3: (sc, inc) x8 [24]
- Rnd 4: (sc, inc, sc) x8 [32]
- Rnd 5: (3 sc, inc) x8 [40]
- Rnd 6: sc all around [40]
- Rnd 7: (2 sc, inc, 2 sc) x8 [48]
- Rnd 8: sc all around [48]
- Rnd 9: (5 sc, inc) x8 [56]
- Rnds 10-15 (6 rnds total): sc all around [56]
- Rnd 16: (5 sc, dec) x8 [48]
- Rnd 17: (2 sc, dec, 2 sc) x8 [40]
- Rnd 18: (3 sc, dec) x8 [32]
- Rnd 19: (sc, dec, sc) x8 [24]
- Rnd 20: (sc, dec) x8 [16]
For the Giant Tomato, add the safety eyes between rnds 9-10, 7 sts apart. [img 1]
Center the yellow pom pom between the eyes and secure it on with hot glue.
Cut a long strand of black yarn and embroider a curved smile 2 sts wide, 1 rnd below the nose.
*Tip: Keeping the facial features close together creates a more “chibi” look. You can also use UHU fabric glue to secure the subtle curved mouth down
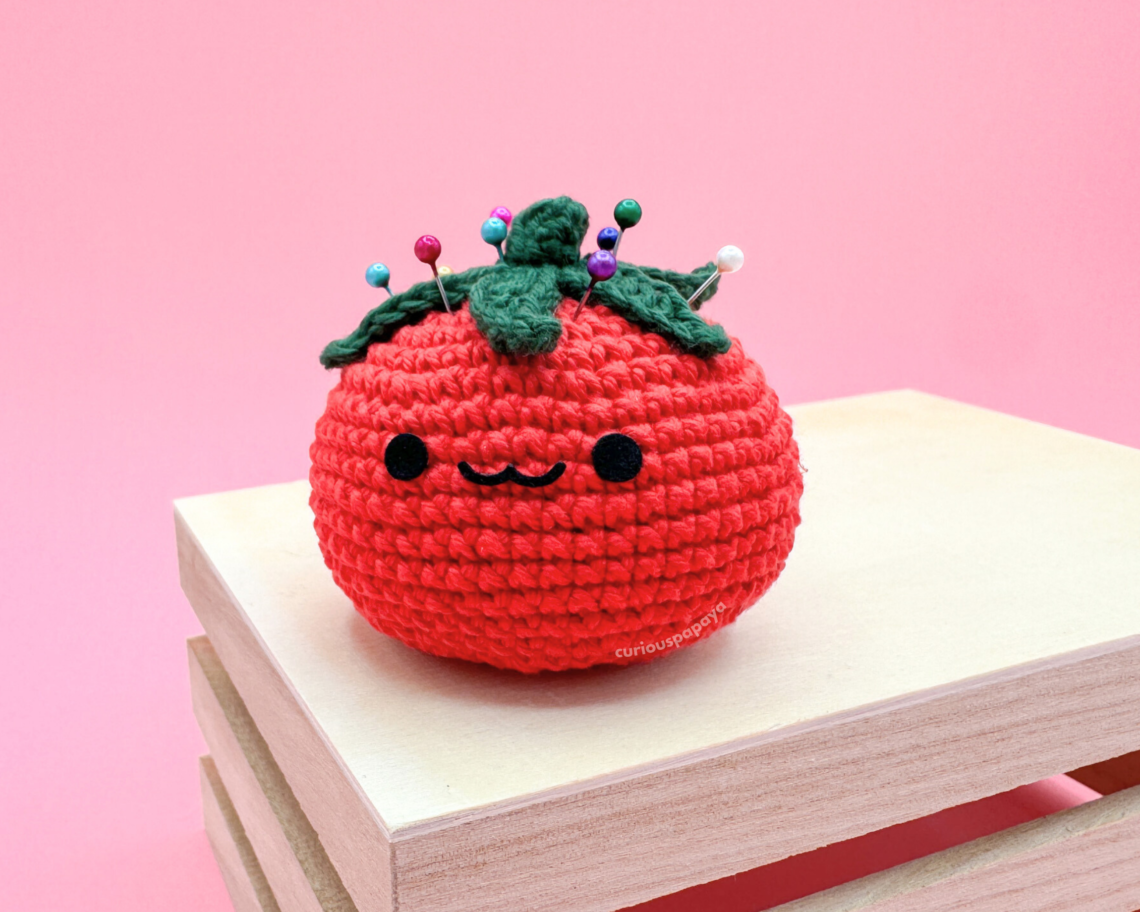
For the Tomato Pin Cushion, secure the felt facial features on spanning Rnds 9-10 using UHU glue. [img 2]
Stuff the piece well.
Rnd 21: (dec) x8 [8]

Fasten off and leave a tail for closing the piece. Go through the flo and pull the hole closed.
LEAVES:
Using the respective hook and Green yarn.
*Note: The stem will be constructed first, followed by the leaves all in one piece.
- Rnd 1: Make a magic circle and (sc) x5, slst into the center of the circle (not into the first st) [6]
*Tip: The slst will alleviate the “jog” from working in a spiral for the tomato stem. The same technique is used in Rnd 3 below.
- Rnd 2: (blo) – sc all around [6]
- Rnd 3: 5 sc, slst into the last st [6]
Continue onto the leaves:
- Step 1: *(flo) – slst, ch 8, working into the second ch from the hook, slst into the next 2 ch, hdc into the next 2 sts, dc into the next 3 sts*
- Step 2: Repeat the steps from * to * 5 times for a total of 6 leaves.
- Step 3: Fasten off and leave a long tail for sewing. (For the Tomato Pin Cushion, if you are securing it down with glue, cut a short yarn tail instead). [img 3-4]

ASSEMBLY:
Giant Tomato:
- Step 1: Center one of the leaves with the face. Use sewing pins to position the leaves onto the top of the tomato, spreading out the leaves symmetrically. [img 5-6]
- Step 2: Using your yarn needle, sew along the center of each leaf, avoiding the tips (to allow them to flare). [img 5]
*Note: Be careful and don’t pull your tension too tightly or the leaves will cinch!
Tomato Pin Cushion:
If sewing, follow the steps above.
If securing with UHU glue, follow step 1 above and then the rest of the steps below.
- Step 2: Apply the glue in thin zig-zags onto the leaves, avoiding the tips. [img 7]
- Step 3: Use sewing pins to allow the leaves to dry flat against the tomato.
- Step 4: Add sewing pins as desired for a cute and functional pin cushion.

You’re finished!
You’re finished! We’d love to see your creations over on Instagram. Tag your creations with #cloversquad and #curiouspapaya to share your makes.
If you want to keep up with me, Amy, on social media for other fun projects, follow me on: Instagram
If you want to keep up with all things Clover, follow us on: Facebook | Twitter | Instagram | Pinterest | YouTube | Ravelry