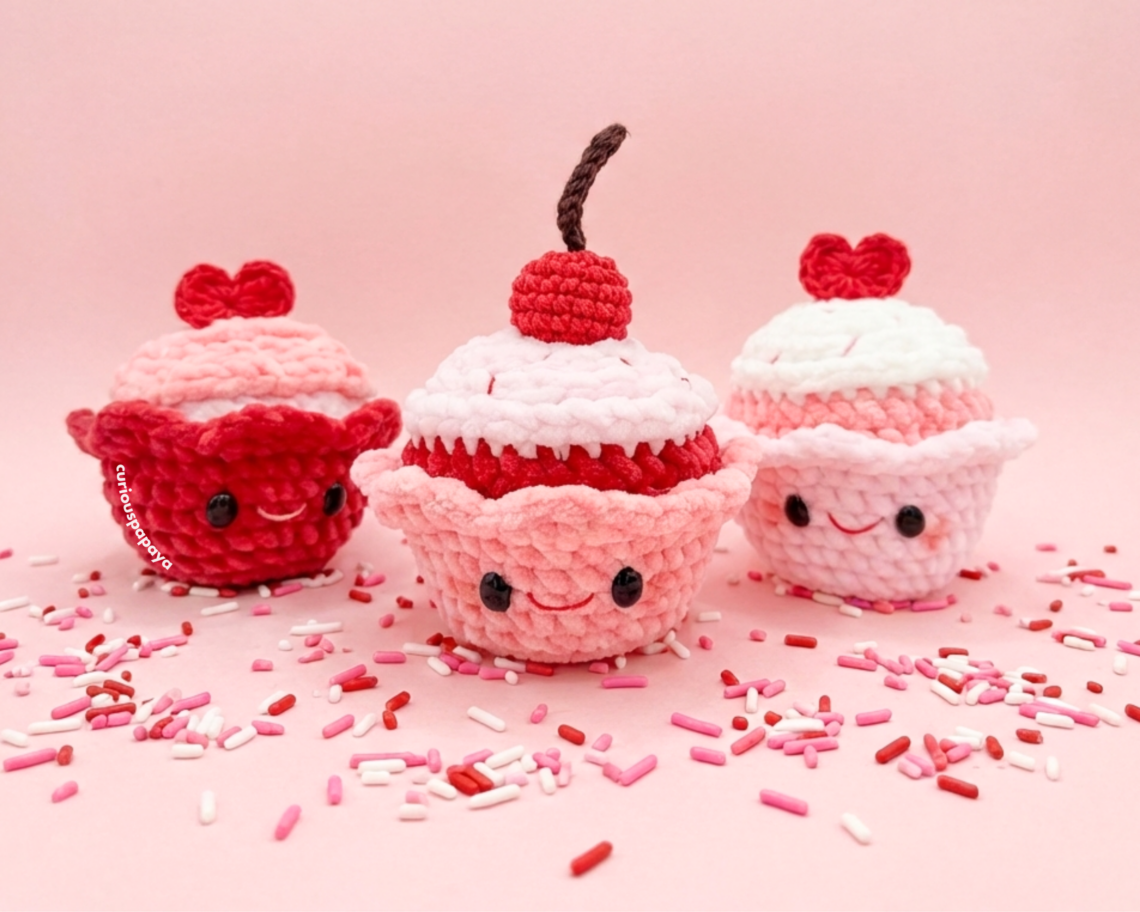
Low-Sew Valentine’s Day Cupcake *crochet pattern*
A sweet treat for your sweetheart – who could resist? These adorable cupcakes are no-sew (minus the toppings) and are quick to whip up!! 🙂
– Amy (@curiouspapaya)
MATERIALS:
- Clover Amour Hook (4.5 mm)
- Clover Amour Hook (2.75 mm)
- Clover Patchwork Scissors
- Clover Yarn Needle
- Clover Stitch Markers
- two 10mm x 8mm oval safety eyes
- fiber fill stuffing
- UHU glue
- mesh screen (to provide structure to the base)
- cotton swab and blush
- #6 super bulky chenille yarn (you can choose whatever color combo you’d like!)
- light pink
- pink
- white
- red
- #3 light worsted cotton yarn
- red
- brown
- embroidery thread
- pink
- red
NOTES:
- The base pattern is all no-sew!
- Modify the colors as you wish 🙂
- Please do not copy/redistribute any part of this pattern as your own. This includes reposting/translating without permission. Feel free to sell your finished products in small quantities as long as you give credit to help support my work. Tag your creations with @curiouspapaya so I can feature you!
- This pattern is written in US terminology.
- The whole pattern is worked in a continuous spiral from the bottom to the top.
- I use the “yarn under, yarn over” method of crocheting when using chunky chenille yarn and “yarn under, yarn under” method when using cotton yarn. This creates an X-shaped stitch. Yarning under also creates tighter tension. You may crochet however you would like but note that the gauge may be affected.
- Rather than using the Magic Ring, use the “Ch 2” method when working with chenille yarn. This will prevent the yarn from snagging.
- Difficulty: intermediate-beginner+
- Measurements: 3.5 in. x 4 in. [~9 cm x 10 cm] if using the prescribed materials
- Time: ~45 mins
ABBREVIATIONS:
- blo: back loops only
- ch: chain
- dc: double crochet
- dec: (invisible) decrease, unless instructed otherwise
- flo: front loops only
- hdc: half double crochet
- inc: increase
- rs: right side
- sc: single crochet
- slst: slip stitch
- st(s): stitch(es)
- tr: treble stitch
- ws: wrong side
- [#]: stitch count
- (…) x#: repeat instructions the number of times
Size up your cupcake with a thicker yarn and its corresponding hook size for a cuddle-sized cupcake! Below is an example of mine:

CUPCAKE PATTERN:
Note: The cupcake is worked from bottom up and is no-sew! The toppings are the only thing that need to be sewn on.
If you prefer the premium, printable PDF instead, you can find it HERE. Thank you for supporting my designs!
Starting with color 1 and a 4.5 mm Clover Amour hook:
- Round 1: ch 2, work into the second ch from the hook, (sc) x8 [8]
- Round 2: (inc) x8 [16]
- Round 3: (sc, inc) x7, 2 sc, slst into the same st [24]
- Tip: Making a slst will create less of a height difference in the rounds.
- Round 4: (blo) – sc all around [24]
- Round 5: (3 sc, inc) x6 [30]
- Place a Clover Stitch Marker in the current loop and set your hook aside.
- Measure the base of the liner and cut a circle out of the mesh screen. Secure it onto the inside of the cupcake with UHU glue.

- Round 6: sc all around [30]
- Round 7: (4 sc, inc) x6 [36]
- Round 8: sc all around [36]
- Round 9: (flo) – slst, (sc, hdc, 2 dc in the same st, hdc, slst) x7 [43]
- Note: There should be 7 scalloped edges.
- Fasten off and leave a short tail for weaving in.
- Insert the safety eyes between rounds 6-7, 5 sts apart.
- Join color 2 into the remaining loops of round 9 as the image indicates.

- Round 10: (blo) – sc all around [36]
- Round 11: (4 sc, dec) x6 [30]
- Change to color 3 yarn and cut the color 2 yarn.
- Round 12: sc all around [30]
- Alternatively, for a crisper color change, work round 12 with these modified instructions:
- Round 12a: (blo) – loosely slst all around [30]
- Round 12b: (blo) – sc all around [30]
- Note: For the remaining rounds, work regular decreases instead of invisible decreases since we are working in the back loops only.
- Round 13: (blo) – (3 sc, dec) x6 [24]
- Stuff well.
- Round 14: (2 sc, dec) x6 [18]
- Round 15: (blo) – (sc, dec) x6 [12]
- Round 16: (blo) – (dec) x6 [6]
- Fasten off and leave a tail for sewing. Stuff one last time.
- Use the Clover Darning Needle and weave the yarn tail through the blo (notice the change). Pull the hole closed and bury the yarn tail.

- Join new color 3 yarn into the remaining loops of rnd 13 and LOOSELY slst all around into all of the remaining loops.

-
- Tip: If you find that your frosting is puckering in, your tension is too tight. Carefully undo your work and give it a try again.
- Use the Clover Darning Needle and weave in the remaining yarn tails.


TOPPINGS PATTERN:
HEART:
Use Red cotton yarn and a 2.75 mm Clover Amour Hook:
- Leave a tail for sewing before creating the magic circle.
- Round 1: make a magic circle, ch 2, 3 tr, 3 dc, tr, 3 dc, 3 tr, ch 2, slst into the center of the magic circle. Pull the magic circle closed.
- Fasten off and use the Clover Darning Needle and weave in the yarn tail. Then, weave the starting yarn tail to the bottom point of the heart for sewing.

CHERRY STEM:
Use Dark Brown cotton yarn and a 2.75 mm Clover Amour Hook:
- Make a slipknot and ch 7. Working into the second ch from the hook, make 6 slst.
- Fasten off and leave a tail for sewing.
CHERRY:
Use Red cotton yarn and a 2.75 mm Clover Amour Hook:
- Round 1: make a magic circle and (sc) x6 [6]
- Round 2: (inc) x6 [12]
- Round 3: (sc, inc) x6 [18]
- Place a Clover Stitch Marker in your current stitch and set your hook aside.
- Weave the yarn tails of the cherry stem from the rs to the ws of the cherry.
- Tie the two yarn tails to secure the stem in place.

- Rounds 4-5 (2 rounds total): sc all around [18]
- Note: Use invisible decreases for this part of the pattern.
- Round 6: (sc, dec) x6 [12]
- Stuff.
- Round 7: (dec) x6 [6]
- Fasten off and leave a tail for sewing. Use the Clover Darning Needle and weave through the flo. Pull the hole closed.

FACIAL FEATURES:

MOUTH:
- Step 1: Cut 6 in. [~15 cm] of pink or red embroidery thread and lightly coat it in UHU glue. Let it dry for about 1 minute.
- Tip: This will prevent the threads from separating and will create a crisper look.
- Step 2: Use the Clover Darning Needle and weave into the side of the cupcake liner and out between the same rnds the eyes are in. Be sure to center the mouth with one of the scalloped edges.
- Step 3: Embroider a mouth 2 sts wide.
- Step 4: Weave back out where you entered in from and secure a subtle curved mouth down with a dab of UHU glue.
- Step 5: Secure the thread tails into a knot and weave the rest in.
BLUSH:
- Use a cotton swab and carefully build up color on the cheeks.
FINISHING TOUCHES:
SPRINKLES:
- Cut a long strand of red, white, or pink embroidery thread. Create diagonal sprinkles on top of the frosting. Be careful not to tug too tightly or the sprinkles will not be visible.
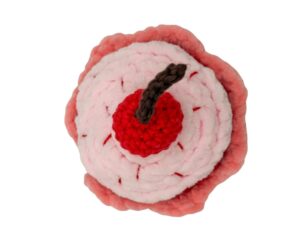

TOPPINGS:
- Sew the toppings onto the center of the frosting.
You’re finished! Wishing you all a happy Valentine’s Day. Tag your creations with @cloversquad and @curiouspapaya to share your makes 🙂
If you want to keep up with me, Amy, on social media for other fun projects, follow me on: Instagram
If you want to keep up with all things Clover, follow us on: Facebook | Twitter | Instagram | Pinterest | YouTube | Ravelry