
Hi Everyone! I’m Ashley, the designer and maker behind The Loopy Lamb. I’m so excited to be invited back to the Clover blog to share a free crochet pattern to make my Lara Ladybug This project is beginner-friendly and is a fun, quick project to get us in the mood for spring (it’s on its way – I promise!).
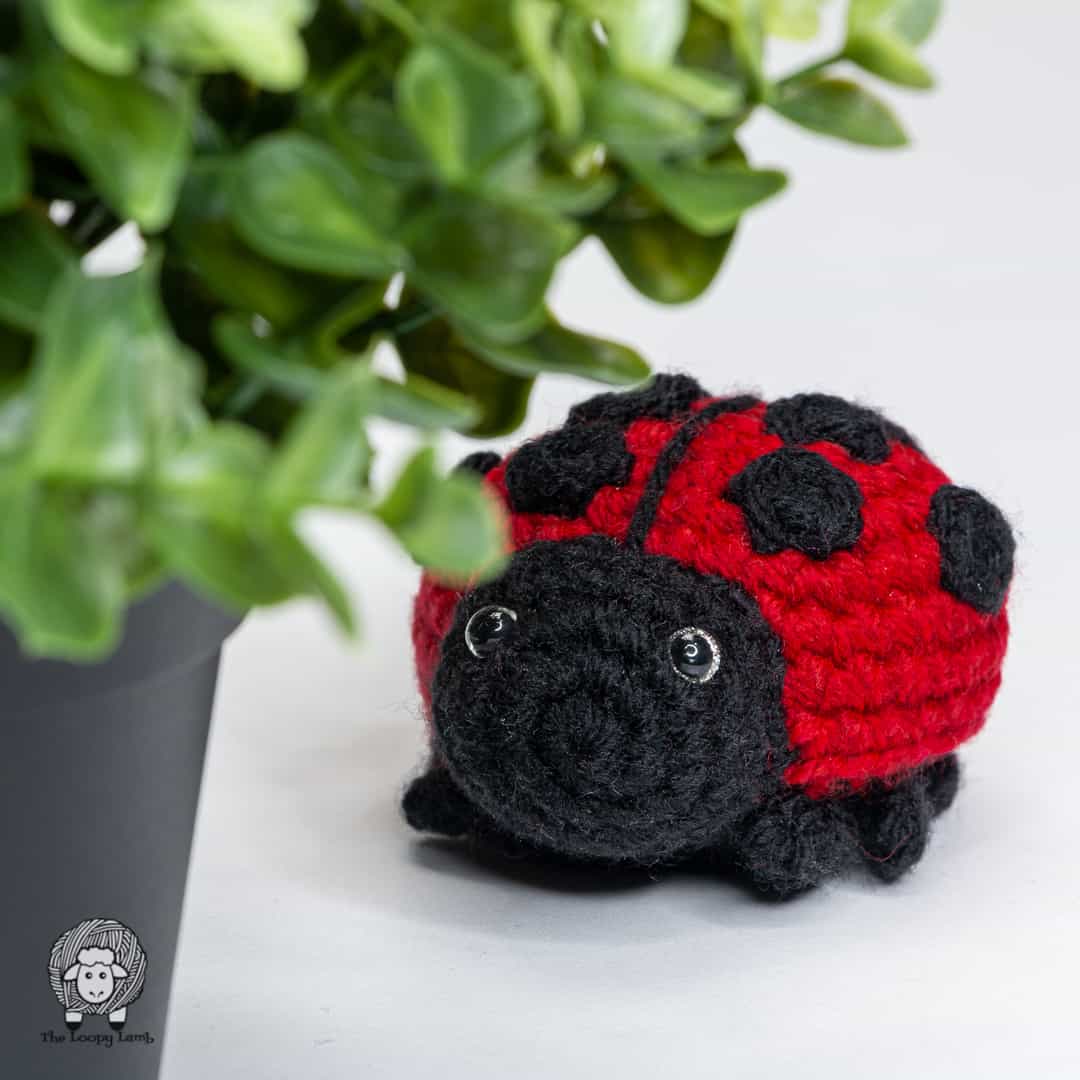

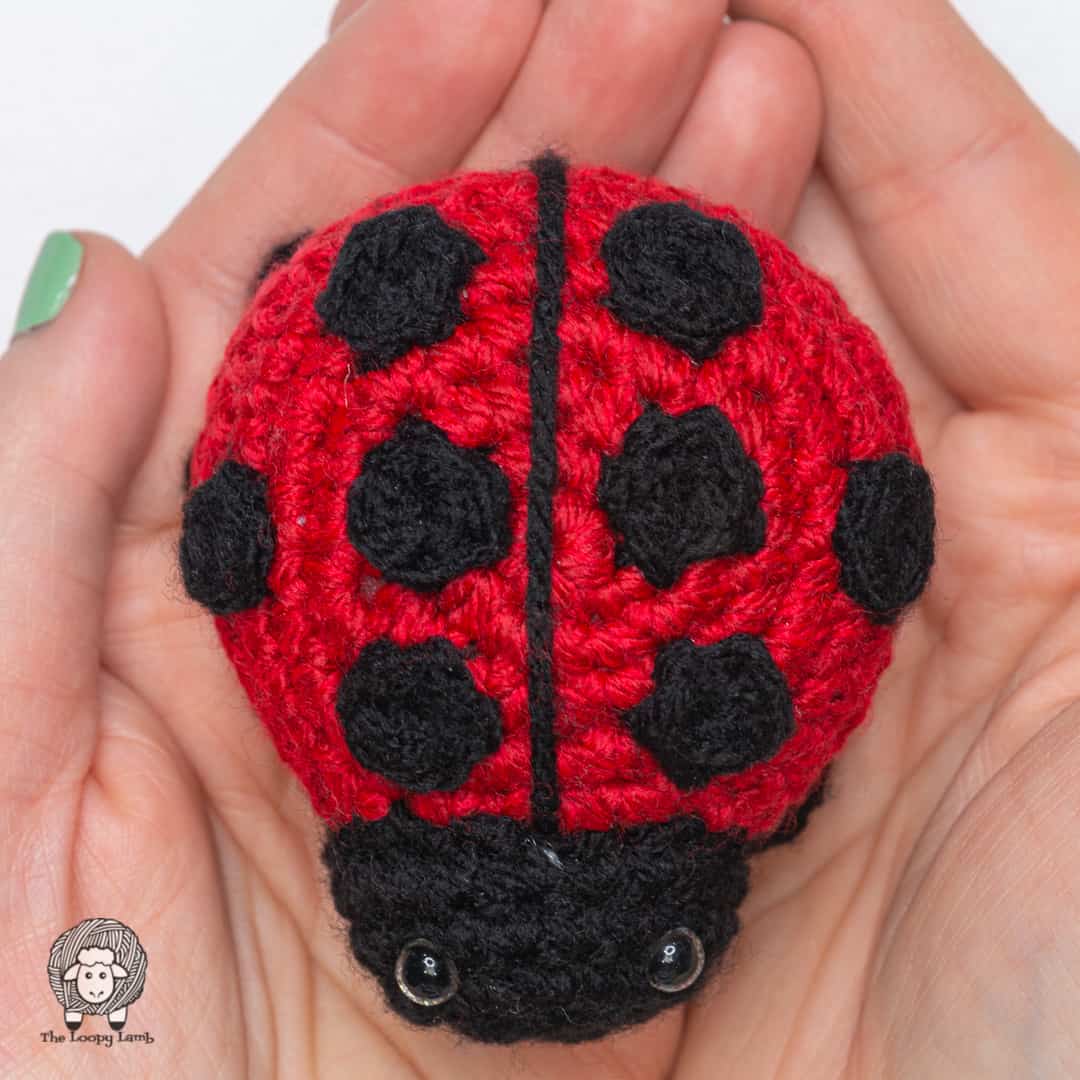
The body of the ladybug is crocheted in a single piece and then we’ll proceed to crochet the head, legs and spots. Although the pattern recommends that you make 8 spots for your ladybug, feel free to make as many as you’d like and to sew them on in a new configuration to make your ladybug unique.
This project using the amigurumi crochet technique to create a 3-D ladybug. For this project, you’ll need to know how to do basic stitches like single crochet, the magic circle, single crochet increase/decrease and how to do an invisible decrease. I also use a special technique for this project called the invisible join which helps to minimize the look of colour changes in amigurumi projects. I have a step-by-step photo and video tutorial for this technique HERE if you’re not already familiar with how to do this technique or if you’re needing additional help.
You can purchase a PDF, printable copy of the written pattern for the Lara Ladybug pattern HERE in my Ravelry shop or HERE in my Etsy shop. The PDF version of the pattern includes the written pattern and the photo tutorial for the ladybug’s legs.
Skill Level:
- Easy
Terminology:
- U.S. Terminology
Supplies:
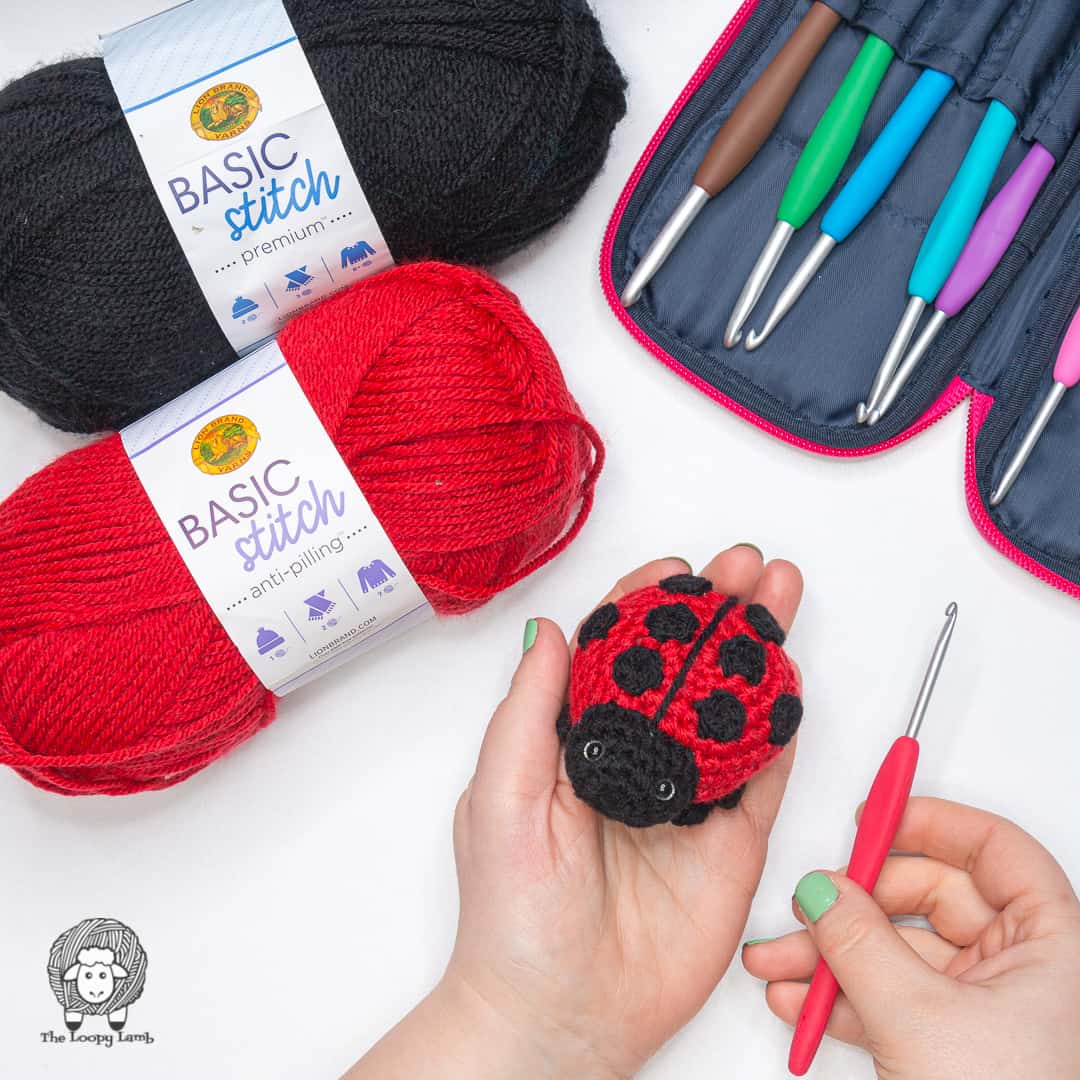
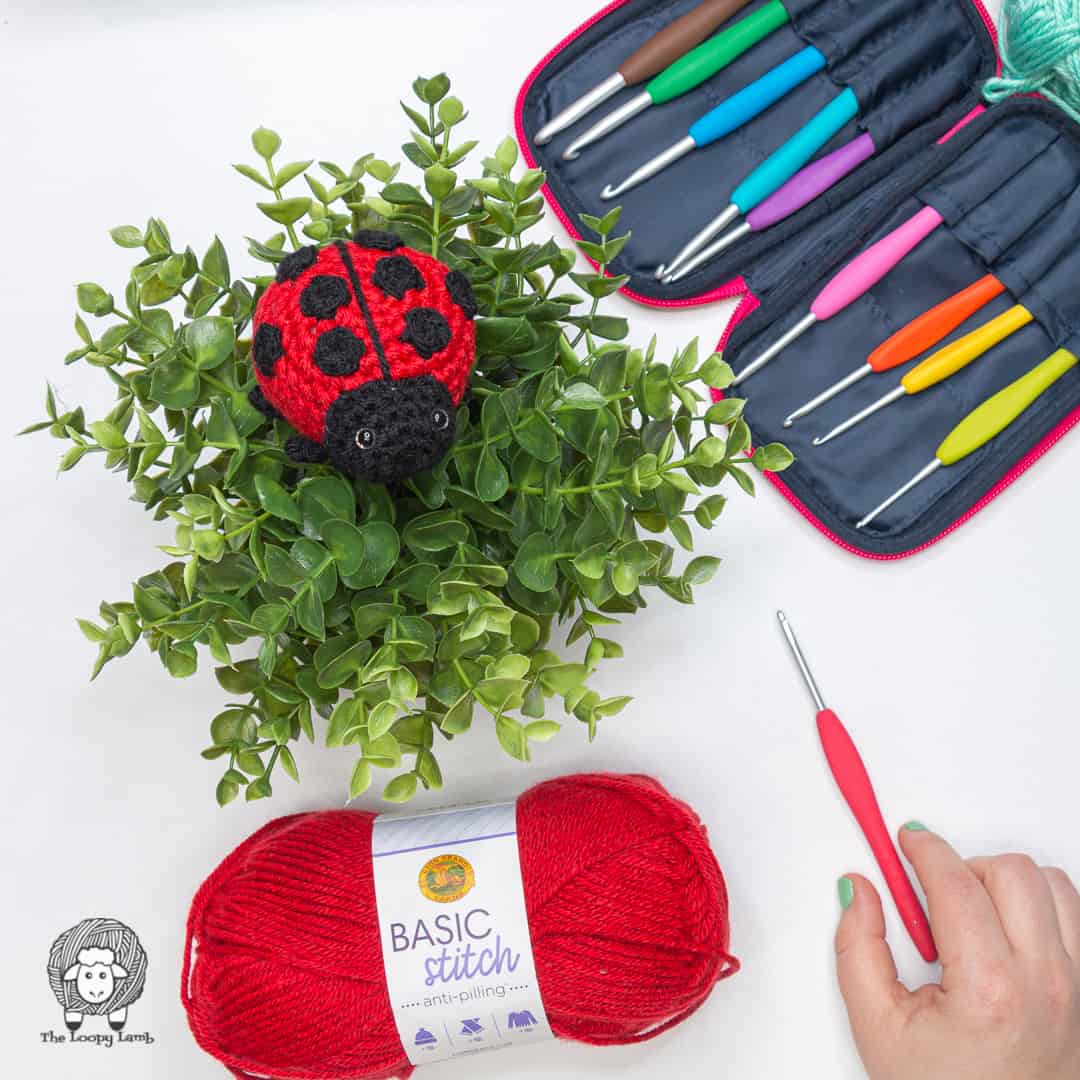
- 3.5 mm (E) Clover Amour Crochet Hook
- Lion Brand Basic Stitch (100% Acrylic, Worsted Weight (4) medium, 185yds/170m, 100g/3.5oz), 1 Ball of each of the following colours:
- Colour A – Black (approx. 21 yds)
- Colour B – Red Heather (approx. 16 yds)
- 2 – 6 mm Safety Eyes – I used Silver Glitter Safety Eyes from Chateau Bornais Crochet on Etsy
- Polyester Stuffing
- Clover Mini Patchwork Scissors
- Clover Chibi Bent Tip Tapestry Needle
- Clover Quick Locking Stitch Marker
Abbreviations:
- CH = Chain
- FLO = Front Loop Only
- FO = Finish Off
- MC = Magic Circle
- SC = Single Crochet
- SCDEC = Single Crochet Decrease
- SCINC = Single Crochet Increase/2 Single Crochets in the Same Stitch
- SL ST = Slip Stitch
- BLO = Back Loop Only
- ST(S) = Stitches
- YO = Yarn Over
Finished Size:
- Approx. 3” long from head to bum, once assembled.
Gauge:
- Rounds 1 – 4 of the body = 1.5” inches across at widest point
NOTES:
- Instructions within the brackets () are to be repeated the number of times specified next to the brackets.
- This pattern is worked in continuous rounds (unless stated otherwise). Do not join at the end of the round, unless indicated. A stitch marker is used to keep track of the beginning of the round.
- For a cleaner SCDEC, do your SCDEC under the front loops only of each stitch rather than under both loops. This is often referred to as an invisible decrease. Find my tutorial HERE.
- Gauge is not vital to the project but it may affect the amount of yarn needed for the project and the size of your toy.
Special Techniques and Stitches:
- Invisible Finish/Join: FO leaving a long tail. Thread the tail onto a tapestry needle. Place the tapestry needle through the top of the 2nd ST from front to back and pull through. Place tip of needle into top of the last ST of the round, under the back loop of the stitch, and pull through to the back of the work. Weave in the end. Find a tutorial on my blog HERE which includes a photo and video tutorial.
Body
Round 1: Using Colour B, make a MC and SC 6 into the MC. (6)
Round 2: (SCINC) x 6. (12)
Round 3: (SC, SCINC) x 6. (18)
Round 4: SC, SCINC, (SC 2, SCINC) x 5, SC. (24)
Gauge Check: Piece should measure approx. 1.5” across widest point at end of Round 4.
Round 5: (SC 3, SCINC) x 6. (30)
Round 6: SC 2, SCINC, (SC 4, SCINC) x 5, SC 2. (36)
Rounds 7 – 9: SC around. (36)
FO using invisible join. Join Colour A in BLO of first ST of Round 9.
Round 10: SC 2, SCDEC, (SC 4, SCDEC) x 5, SC 2. (30) – Start stuffing. Continue to add more stuffing as you work.
Round 11: (SC 3, SCDEC) x 6. (24)
Round 12: SC, SCDEC, (SC 2, SCDEC) x 5, SC. (18)
Round 13: (SC, SCDEC) x 6. (12)
Round 14: (SCDEC) x 6. (6)
FO leaving a tail to close the hole. Weave tail through the FLO of the last round and cinch the hole shut. Weave in ends.
Head
Round 1: Using Colour A, make a MC and SC 6 into the MC. (6)
Round 2: (SCINC) x 6. (12)
Round 3: (SC, SCINC) x 6. (18) – Insert safety eyes in Round 3 with 4 sts between them.
Rounds 4 – 5: SC around. (18)
FO using invisible join and leave a long tail for sewing. Stuff head and sew onto the side of the body, adding stuffing as you sew. Use a length of Colour A to embroider a line down the center of the back of the Body, using the photo as reference.

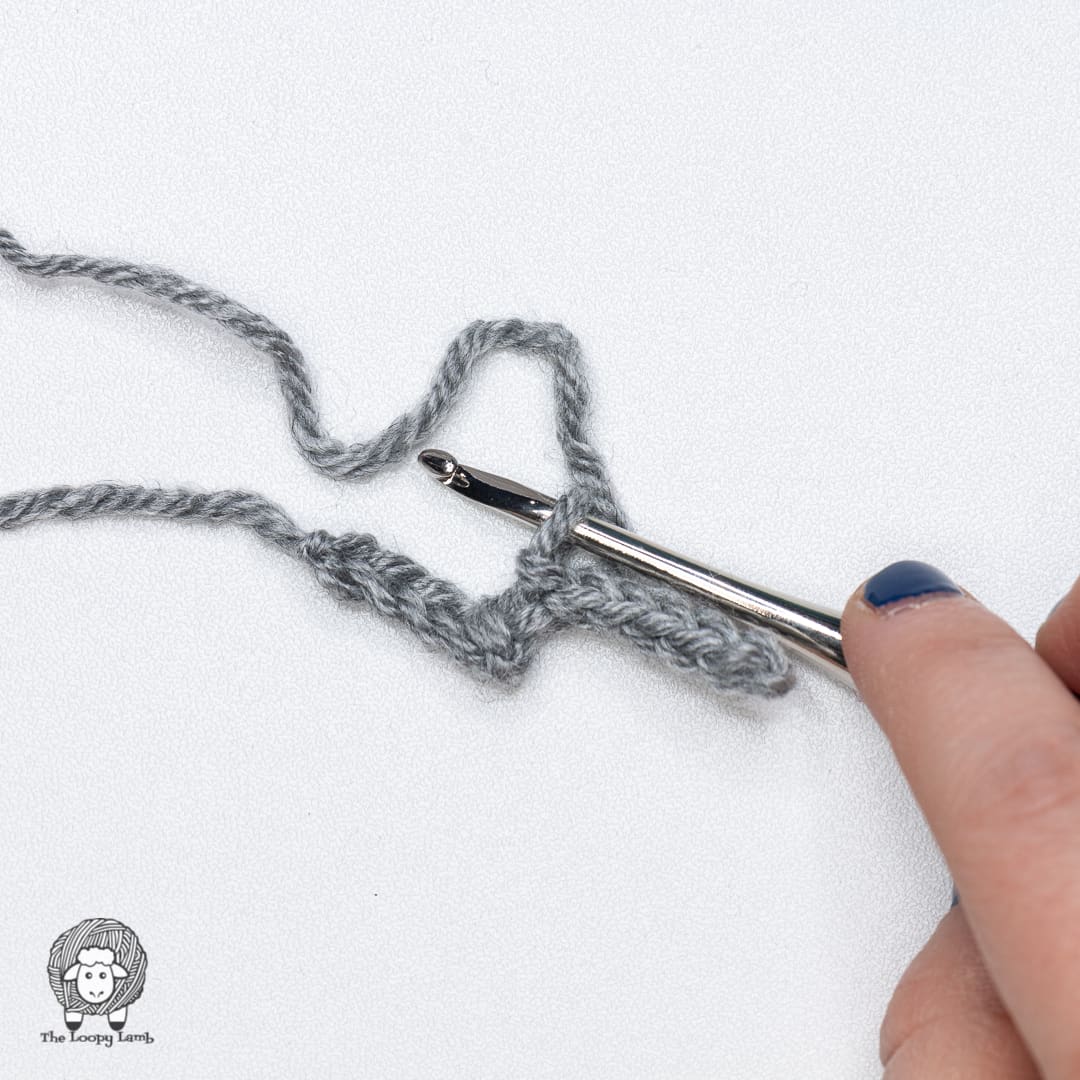
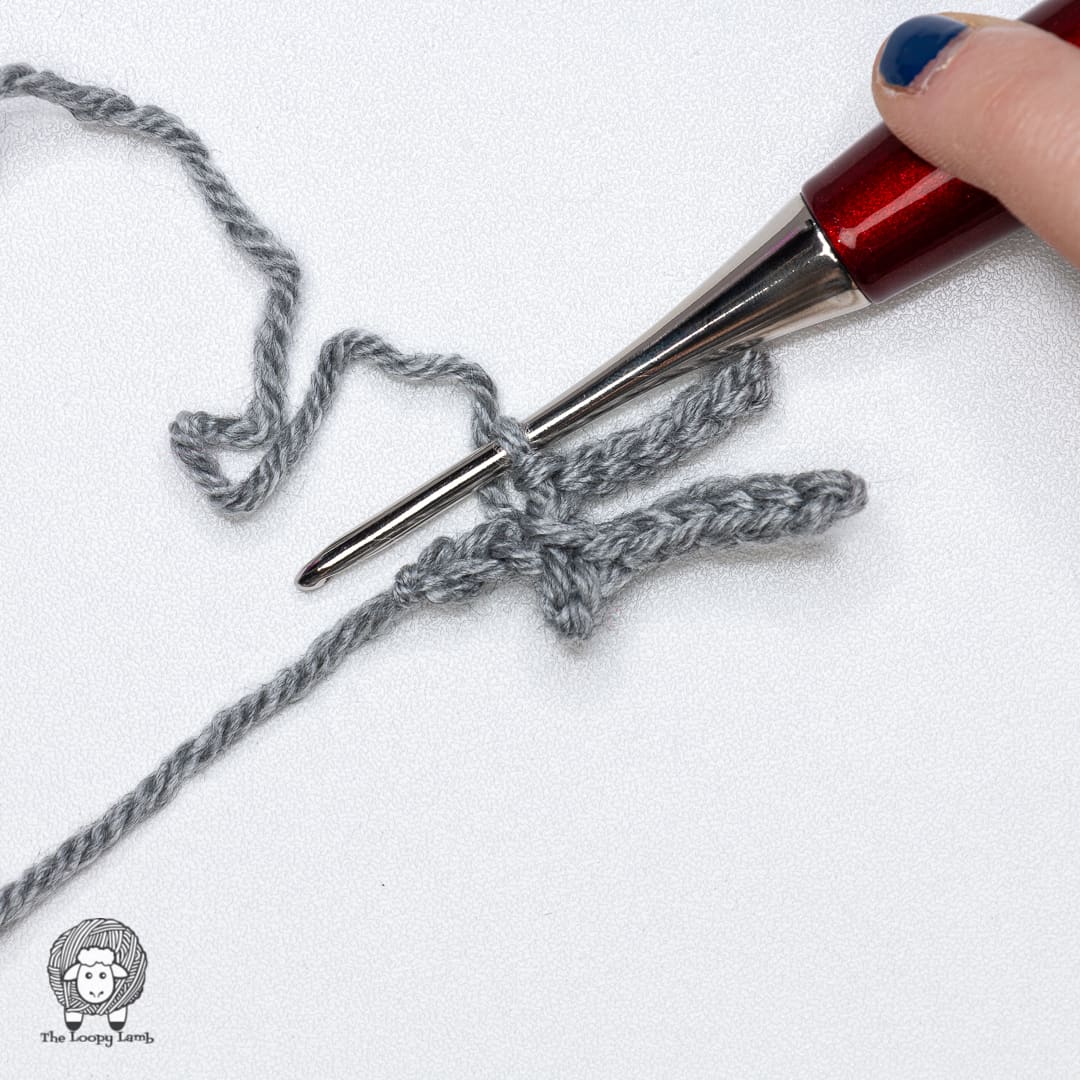
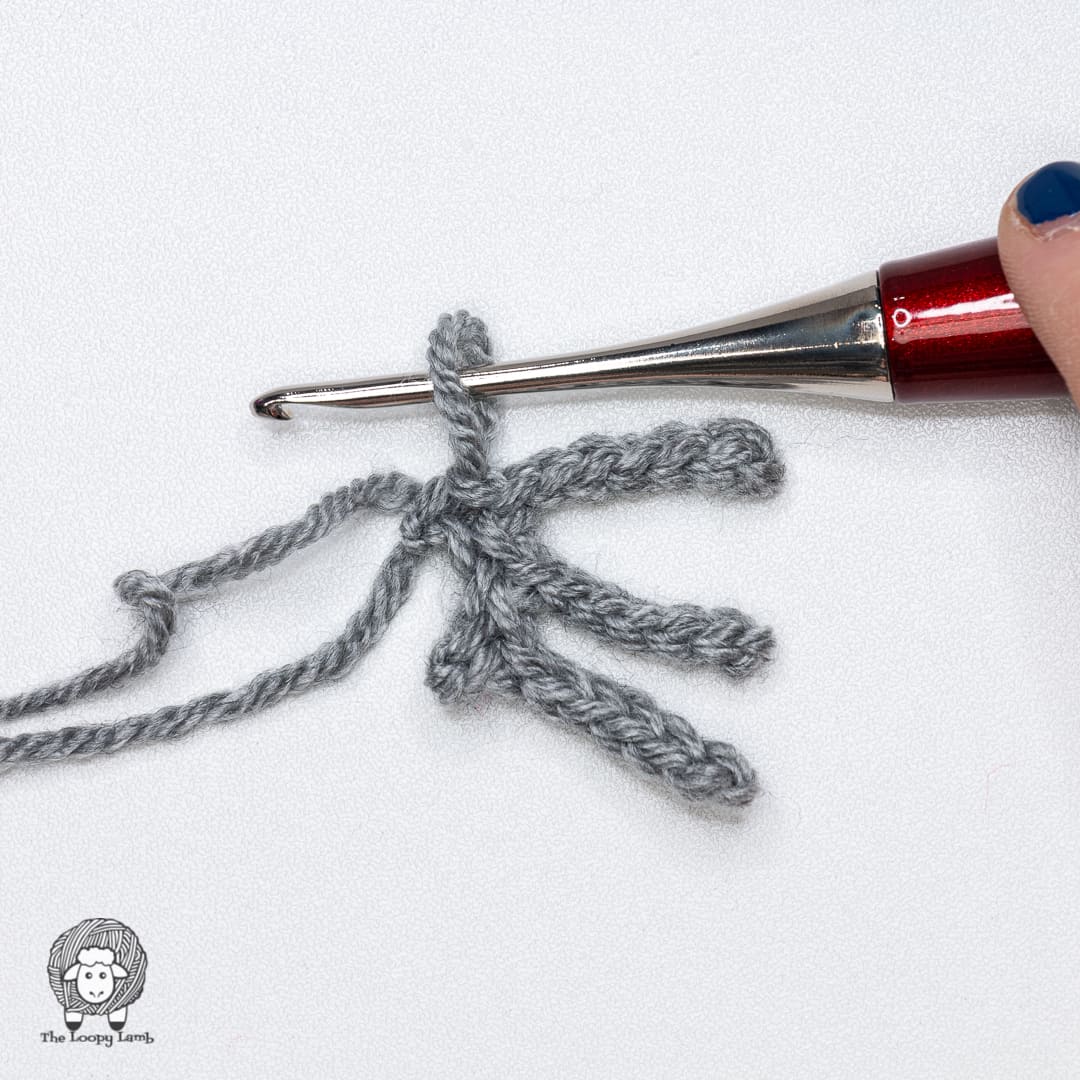
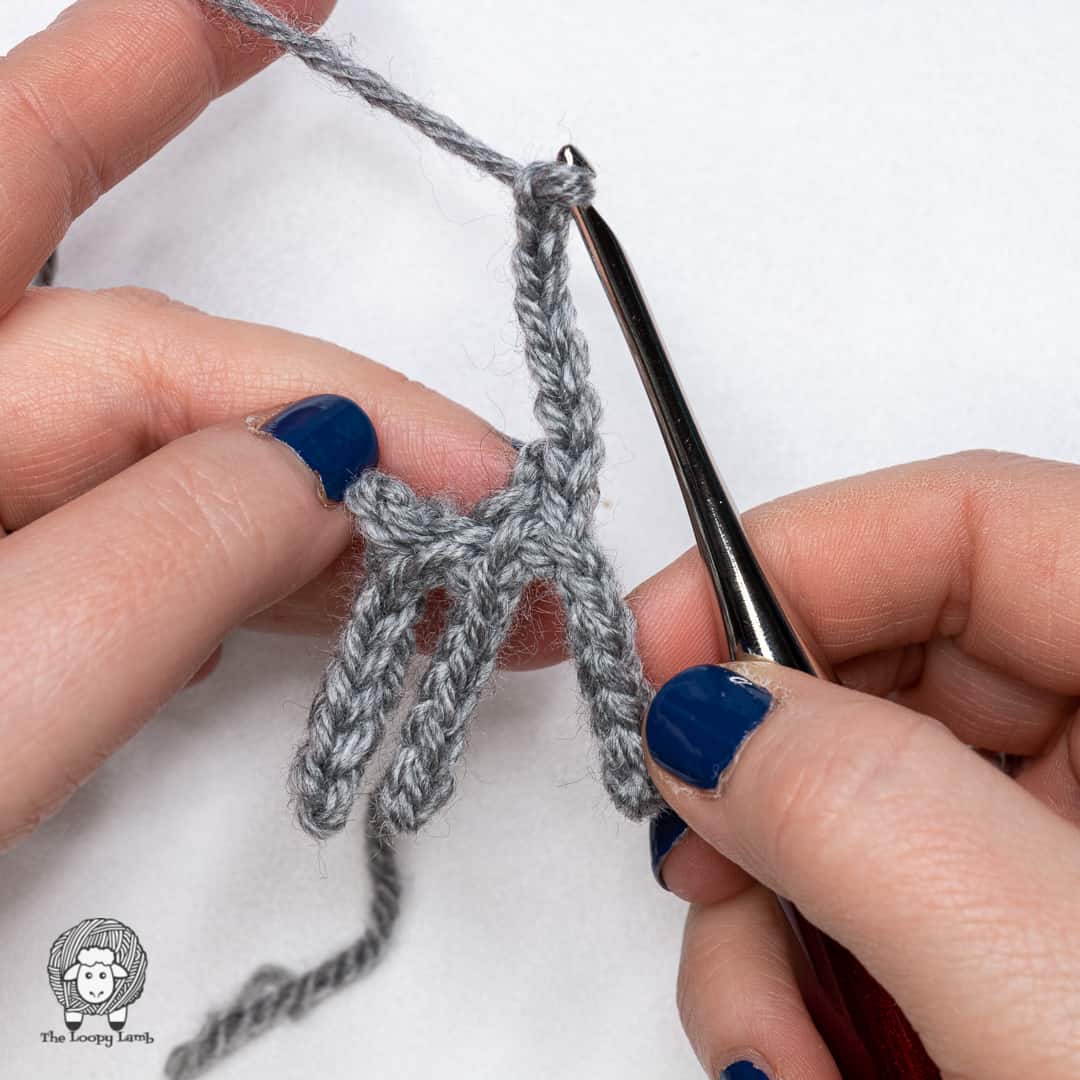
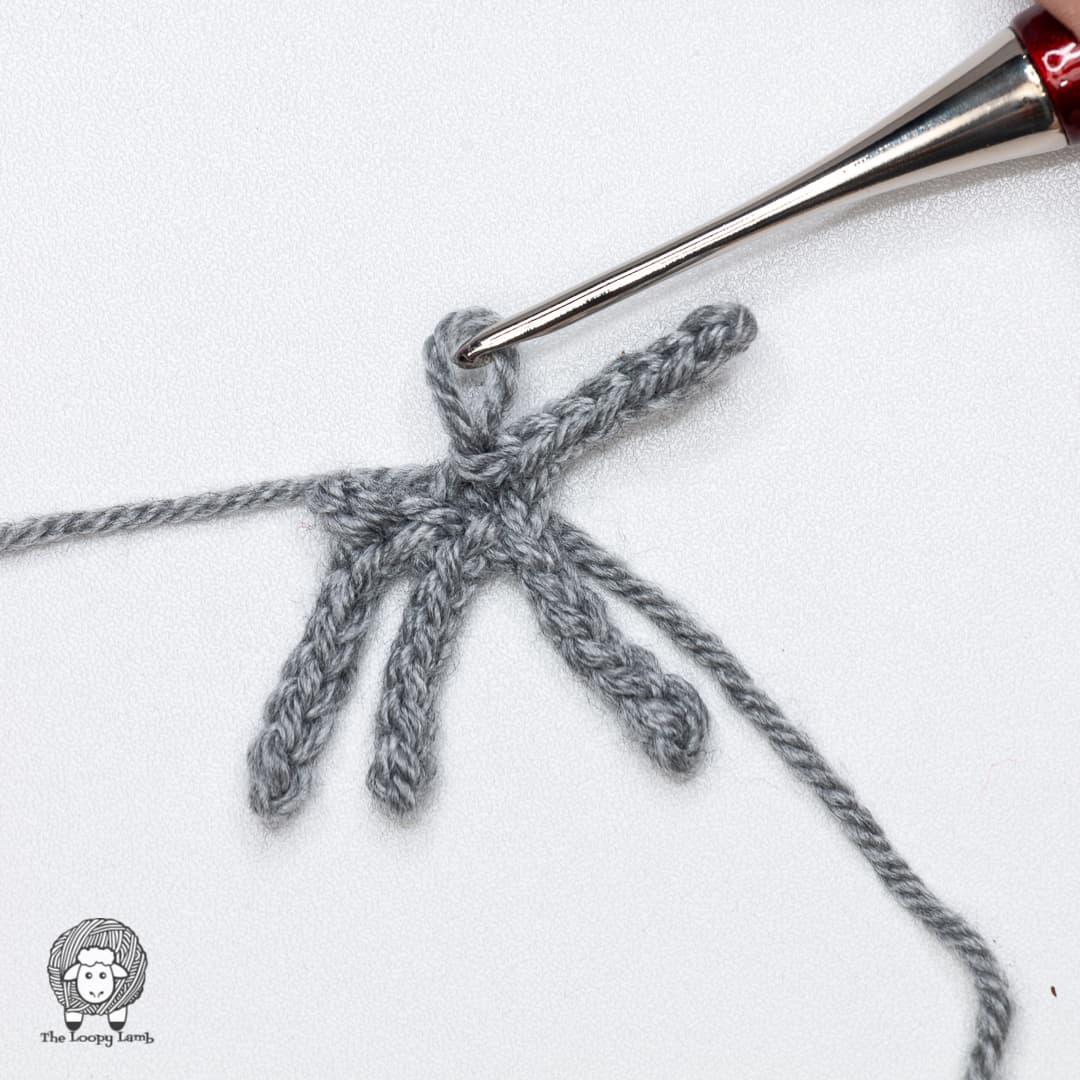
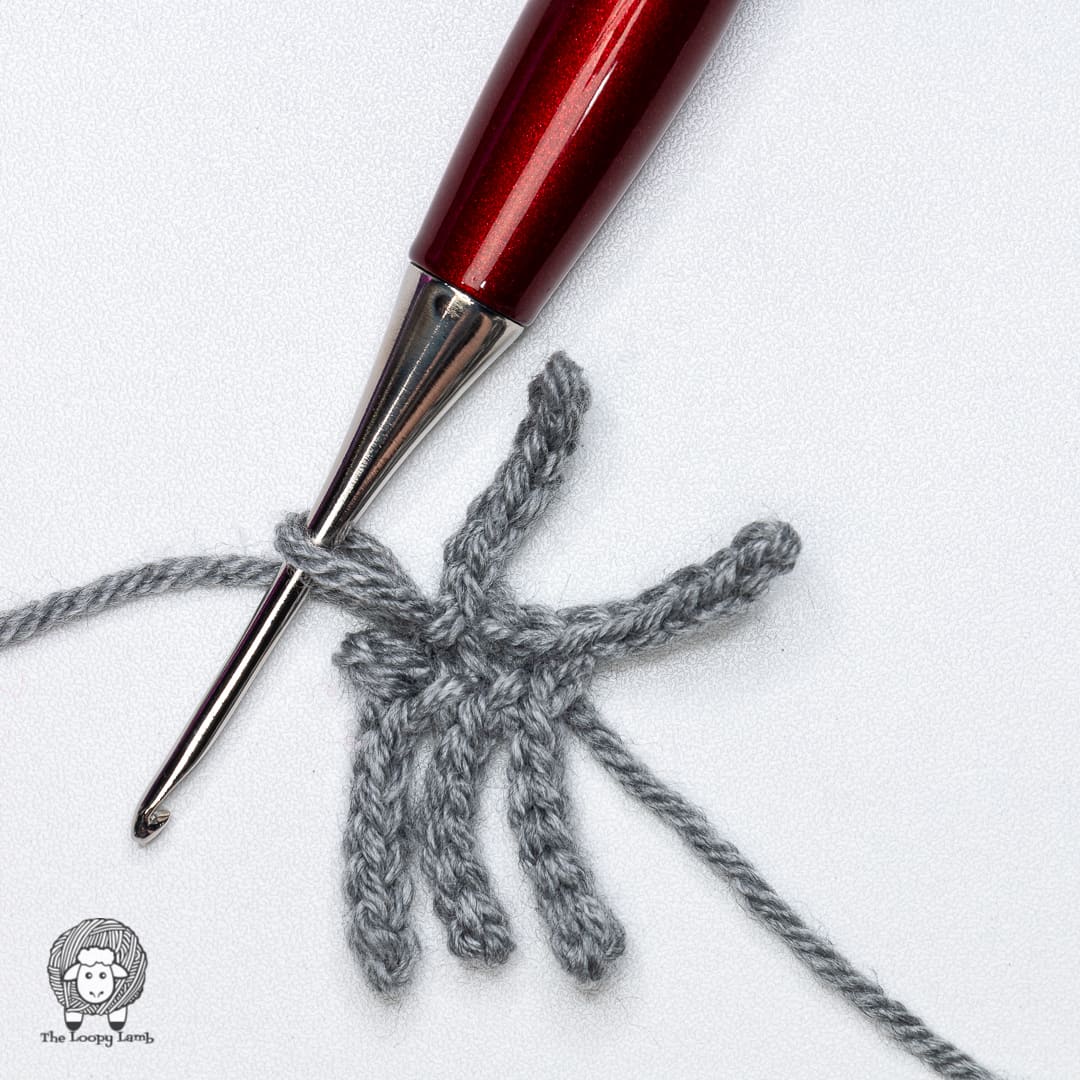
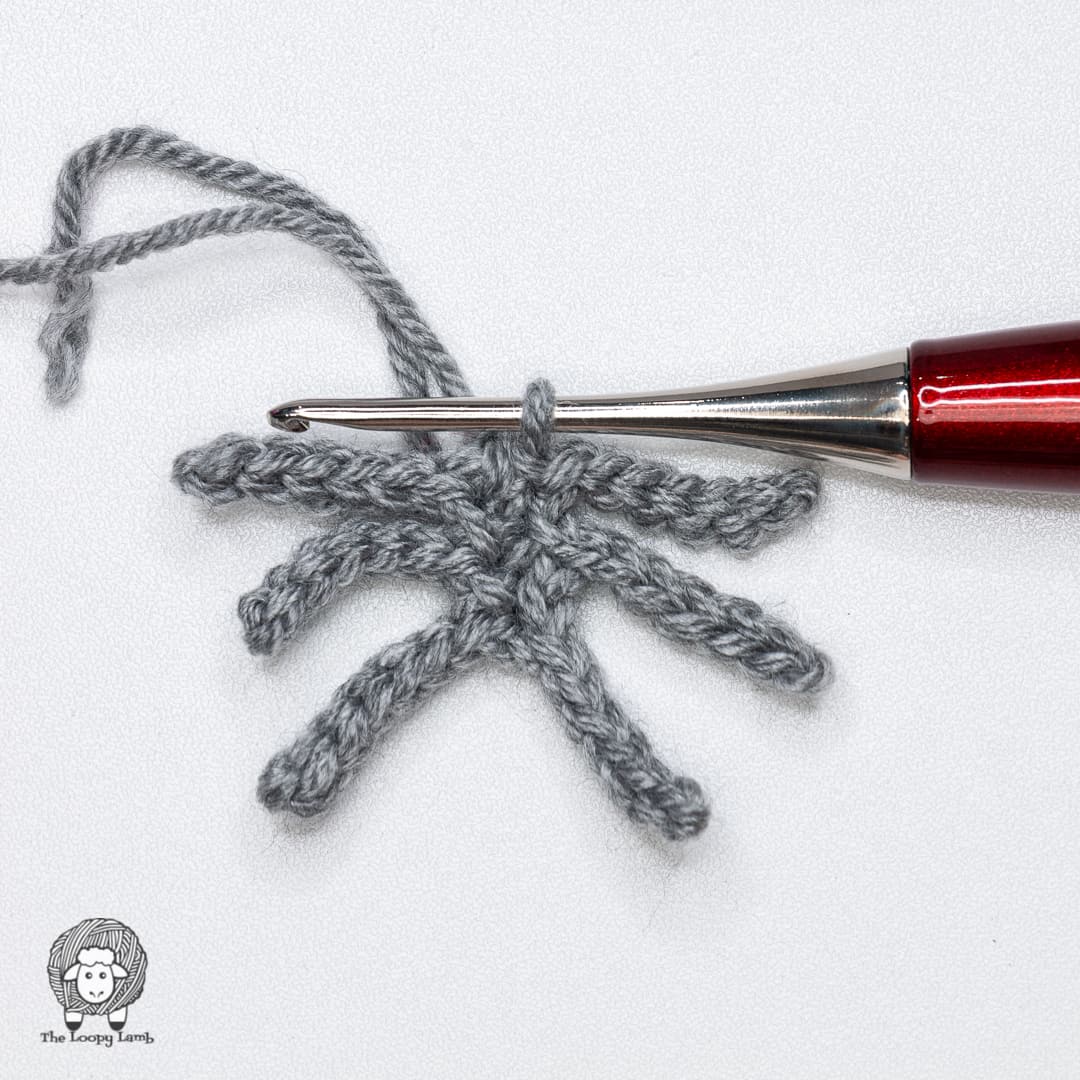
Legs (Make 1)
Using Colour A, CH 5.
Round 1: SL ST in the 2nd CH from the hook, *CH 7, SL ST in the 2nd CH from the hook and in of the next 5 CHs, SL ST into next CH of initial CH-5*, repeat from * to * 2 times, turn work so you are working on the other side of the chain. Repeat from * to * 3 more times. (See Step-by-Step Photos below for assistance).
FO and leave a long tail for sewing. If legs are curling, lightly steam block legs flat. Sew legs onto bottom of the body.

Spots (Make 8)
Round 1: Using Colour A, make a MC and SC 6 into the MC. (6)
FO using invisible join and leave a long tail for sewing. Sew spots onto body, using photo as reference.
Disclaimer:
Feel free to sell the item created by this pattern but please provide pattern credit back to me when posting online, and please provide a link to my blog: http://www.theloopylamb.com. Please do not resell, distribute, duplicate, or share this pattern in any printed or digital form, or claim this pattern as your own original design. Please do not use my photos when selling your finished items.
I’d love to see your finished items! Please share your finished makes by tagging the pattern on Ravelry, sharing it to our Facebook page or Instagram. Don’t forget to follow me on Facebook, Instagram and Pinterest
Facebook: www.facebook.com/TheLoopyLamb
Instagram: www.instagram.com/TheLoopyLamb
YouTube: The Loopy Lamb YouTube Channel
Pinterest: www.pinterest.com/theloopylamb
Newsletter: Sign up for my newsletter!
I hope that you enjoyed making your crochet lady bug! I’d love to see your finished projects! Please share your finished makes by tagging the pattern on Ravelry, tagging me or using #theloopylamb on Facebook and Instagram. Don’t forget to follow me on Facebook, Instagram and Pinterest
Find me on social media and check out my free crochet patterns on my Blog | YouTube | Instagram | Facebook | Pinterest