


Hello everyone! I’m Alex, the crochet designer behind With Alex and I’m so happy to be back on the Clover blog to share my newest tunisian crochet design, the Snow Happy Scarf! It’s super warm, super big, super cozy and I hope you super love it!

The Snow Happy Scarf is a unisex design perfect for anyone that loves snow and it’s sure to bring a smile to any snow lover receiving this as a gift. I love the blues that I used for this sample but I think it would also look amazing in pink and gray and or other colors as well!

This cozy scarf looks knit, but it’s actually just tunisian crochet! The tunisian knit stitch is used to mimic the look of stockinette knitted fabric. This gives that coveted look of knitting without actually knitting!


The Snow Happy Scarf is super cozy and the snowflakes are beautiful, yet simple to add. Perfect for all of the snow lovers out there! Made with Mary Maxim Ultra Mellowspun DK yarn, this scarf is the absolute definition of squishy. It’s so soft and luxurious that you will not want to part with it if you are making this as a gift, just a warning!


I wanted to design a huge, beautiful scarf with a big huge beautiful snowflake on each end and I had so much fun designing this scarf! I used my wonderful Clover Interchangeable Tunisian Hook set, and after picking the correct hook size, it was easy to find a cord that was the perfect length.
The Snow Happy Scarf looks like a super complicated color work pattern but it is actually very simple, easy and fun! First, the scarf is crocheted and then the snowflake is added afterward! This brought back so many memories of cross stitching when I was younger, but instead of stitching an “x” a “V” is stitched and it’s very relaxing and fun. A photo tutorial and video tutorial for duplicate stitching are included in my pattern below.

Another wonderful thing about this design is that there are not many ends to weave in at the end! The scarf is folded in half and seamed up the side so that most, if not all of the ends are hidden inside of the scarf. This makes finishing the scarf, super easy and it also makes the scarf extra warm and cozy.


This pattern is worked flat, with only one stitch and only a couple of actual color changes for the white stripes and changing from dark blue to medium blue. This makes the Snow Happy Scarf a fun and easy crochet project that can be worked on while listening or watching your favorite show or audio book. I have even worked on this project while talking to my sister on the phone too!

Scroll down for the material list and the free pattern to get started!


Snow Happy Scarf Pattern
Difficulty
Easy
Size
9″ wide and 90″ long (not counting fringe)
The scarf does stretch when being worn. Model is 5’8″ tall
Materials
- Clover Interchangeable Tunisian Crochet Hook Size J (6.0 mm) – Art. No 3696
- Clover Interchangeable Cord 16? – Art. No 3645
- Clover Interchangeable Cord Stopper – Art. No 3651
- Clover Darning Needle Set – Art. No 339
- Clover Patchwork Scissors (Small) – Art. No 493/CW
- Measuring tape
- Darning needle
- Mary Maxim Ultra Mellowspun DK Yarn or other suitable dk weight yarn
- 5 balls in medium blue, 6 balls in dark blue, 1 ball in white (50g/174yds and 70% acrylic. 30% nylon)
- 4 balls of medium blue for the scarf and 1 ball for the fringe, 5 balls of dark blue for the scarf and 1 for the fringe, 1 ball of white yarn for the stripes, snowflakes and the fringe)
Gauge
15 sts and 15 rows = 4 inches (in tks)
Abbreviations
- ch: chain
- yo: yarn over
- st(s): stitch(es)
- tks: tunisian knit stitch
Video Tutorials
Notes
- This pattern is worked flat with the right side of the work facing.
- At the beginning of each row, the first stitch is on the hook and counts as a Tunisian knit stitch.
- Do not turn your work at the beginning of each row. Each row is worked from right to left (forward pass) and then from left to right (return pass).
- When working the rows of white, carry the blue yarn up and leave a white tail end long enough for seaming at the end.
How To Work Into The Last Stitch Of The Row:

How To Duplicate Stitch
- Start by cutting a piece of white yarn that is between 2 and 3 feet long. Anything longer will be harder to work with.
- Do not pull hard on the yarn as you stitch.
- Stitching from right to left and from bottom to top is easiest.
Step 1. Insert the hook from the back of the work to the front of the work, into the bottom of the V of the stitch that you would like to start. (image 1 & 2)
Step 2. Pull the yarn through the stitch. (image 3)
Leave the tail end long enough to knot off.


Step 3. Insert the hook behind the V above the stitch that you would like to make. (image 1)
Step 4. Pull the yarn through the stitch at an upward angle. (image 2)

Step 5: Insert the hook back into the bottom of the V of the stitch that you are making. (image 1)
Step 6: Pull the yarn through the stitch. (image 2)
And continue on.

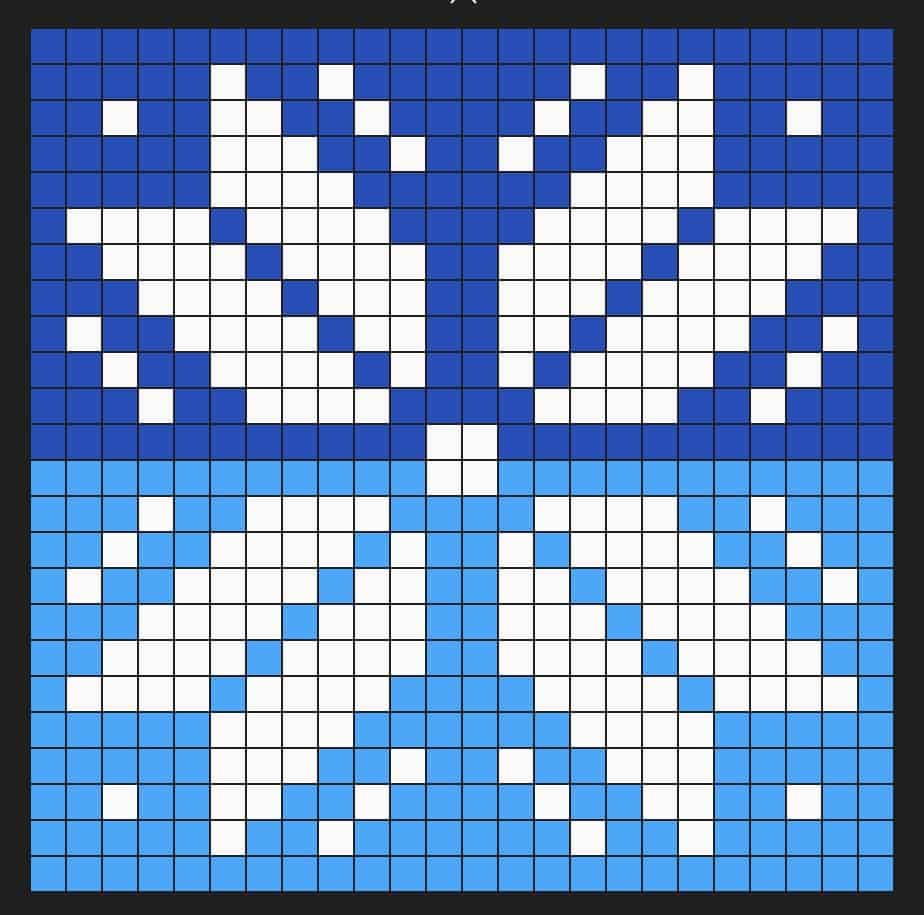
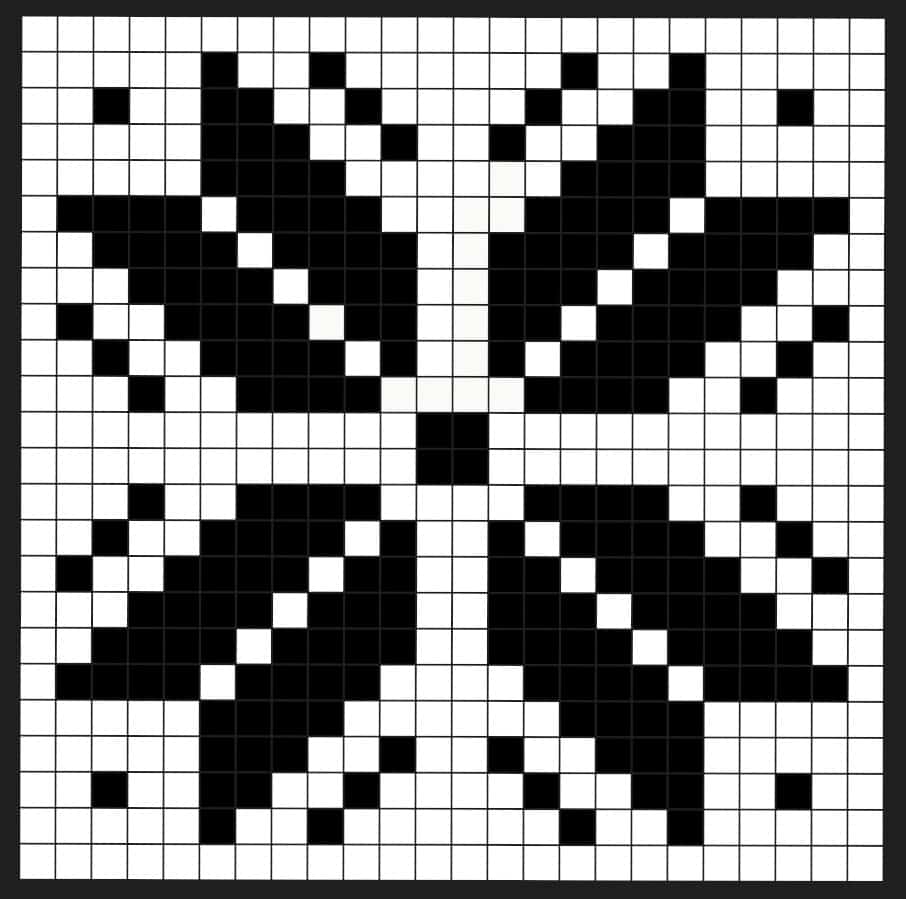
Snowflake Grid


The Pattern
With medium blue yarn:
R1: Forward Pass: ch 71, working in the back hump of each ch and starting in the 2nd ch from the hook, pick up a loop in each ch across. =71
Return Pass: yo and pull through 1 loop on the hook, *yo and pull through 2 loops on the hook. Repeat from the * across until 1 loop remains on the hook.
Should measure approximately 20” wide.
R2: Forward Pass: tks in each st across. =71
Return Pass: yo and pull through 1 loop on the hook, *yo and pull through 2 loops on the hook. Repeat from the * across until 1 loop remains on the hook.
R3-R14: Repeat R2
R15: Forward Pass: tks in each st across. =71
Return Pass: Return Pass: yo and pull through 1 loop on the hook, *yo and pull through 2 loops on the hook. Repeat from the * across until 2 loops remain on the hook, yo with white and pull through the last 2 loops on the hook.
Continue with white yarn:
R16: Forward Pass: Repeat R2
R17: Forward Pass: tks in each st across. =71
Return Pass: yo and pull through 1 loop on the hook, *yo and pull through 2 loops on the hook. Repeat from the * across until 2 loops remain on the hook, yo with medium blue and pull through the last 2 loops on the hook.
Continue with medium blue yarn:
R18-R64: Repeat R2
R65: Forward Pass: tks in each st across. =71
Return Pass: Return Pass: yo and pull through 1 loop on the hook, *yo and pull through 2 loops on the hook. Repeat from the * across until 2 loops remain on the hook, yo with dark blue and pull through the last 2 loops on the hook.
Continue with dark blue yarn:
R66-R250: Repeat R2
R251: Forward Pass: tks in each st across. =71
Return Pass: Return Pass: yo and pull through 1 loop on the hook, *yo and pull through 2 loops on the hook. Repeat from the * across until 2 loops remain on the hook, yo with medium blue and pull through the last 2 loops on the hook.
R252-R298: Repeat R2
R299: Forward Pass: tks in each st across. =71
Return Pass: Return Pass: yo and pull through 1 loop on the hook, *yo and pull through 2 loops on the hook. Repeat from the * across until 2 loops remain on the hook, yo with white and pull through the last 2 loops on the hook.
Continue with white yarn:
R300: Forward Pass: Repeat R2
R301: Forward Pass: tks in each st across. =71
Return Pass: Return Pass: yo and pull through 1 loop on the hook, *yo and pull through 2 loops on the hook. Repeat from the * across until 2 loops remain on the hook, yo with medium blue and pull through the last 2 loops on the hook.
Continue with medium blue yarn:
R302-R316: Repeat R2
Do not cut the yarn.
Bind Off:
Insert the hook into the next stitch (just like for a tunisian knit stitch), yarn over and pull through both loops on the hook to create a slip stitch. Repeat across. Do not cut the yarn.
Snowflake:
Stitch the snowflake on the scarf with white yarn, using the duplicate stitch technique and the snowflake grid. (See note section.)
Seaming:
Fold the scarf in half and slip stitch down the side to connect the two sides. Change colors when necessary.
Fringe:
Add fringe. My fringe is 6 inches long after steaming and trimming.
The End!
I would love to see your Snow Happy Scarves! Tag @_with_alex and use #crochetingwithalex on Instagram so I can see and share your projects.
Find With Alex on her Blog | Instagram | Facebook | YouTube | Pinterest | Ravelry
Stay connected with Clover on Facebook | Twitter | Instagram | Pinterest | YouTube | Ravelry