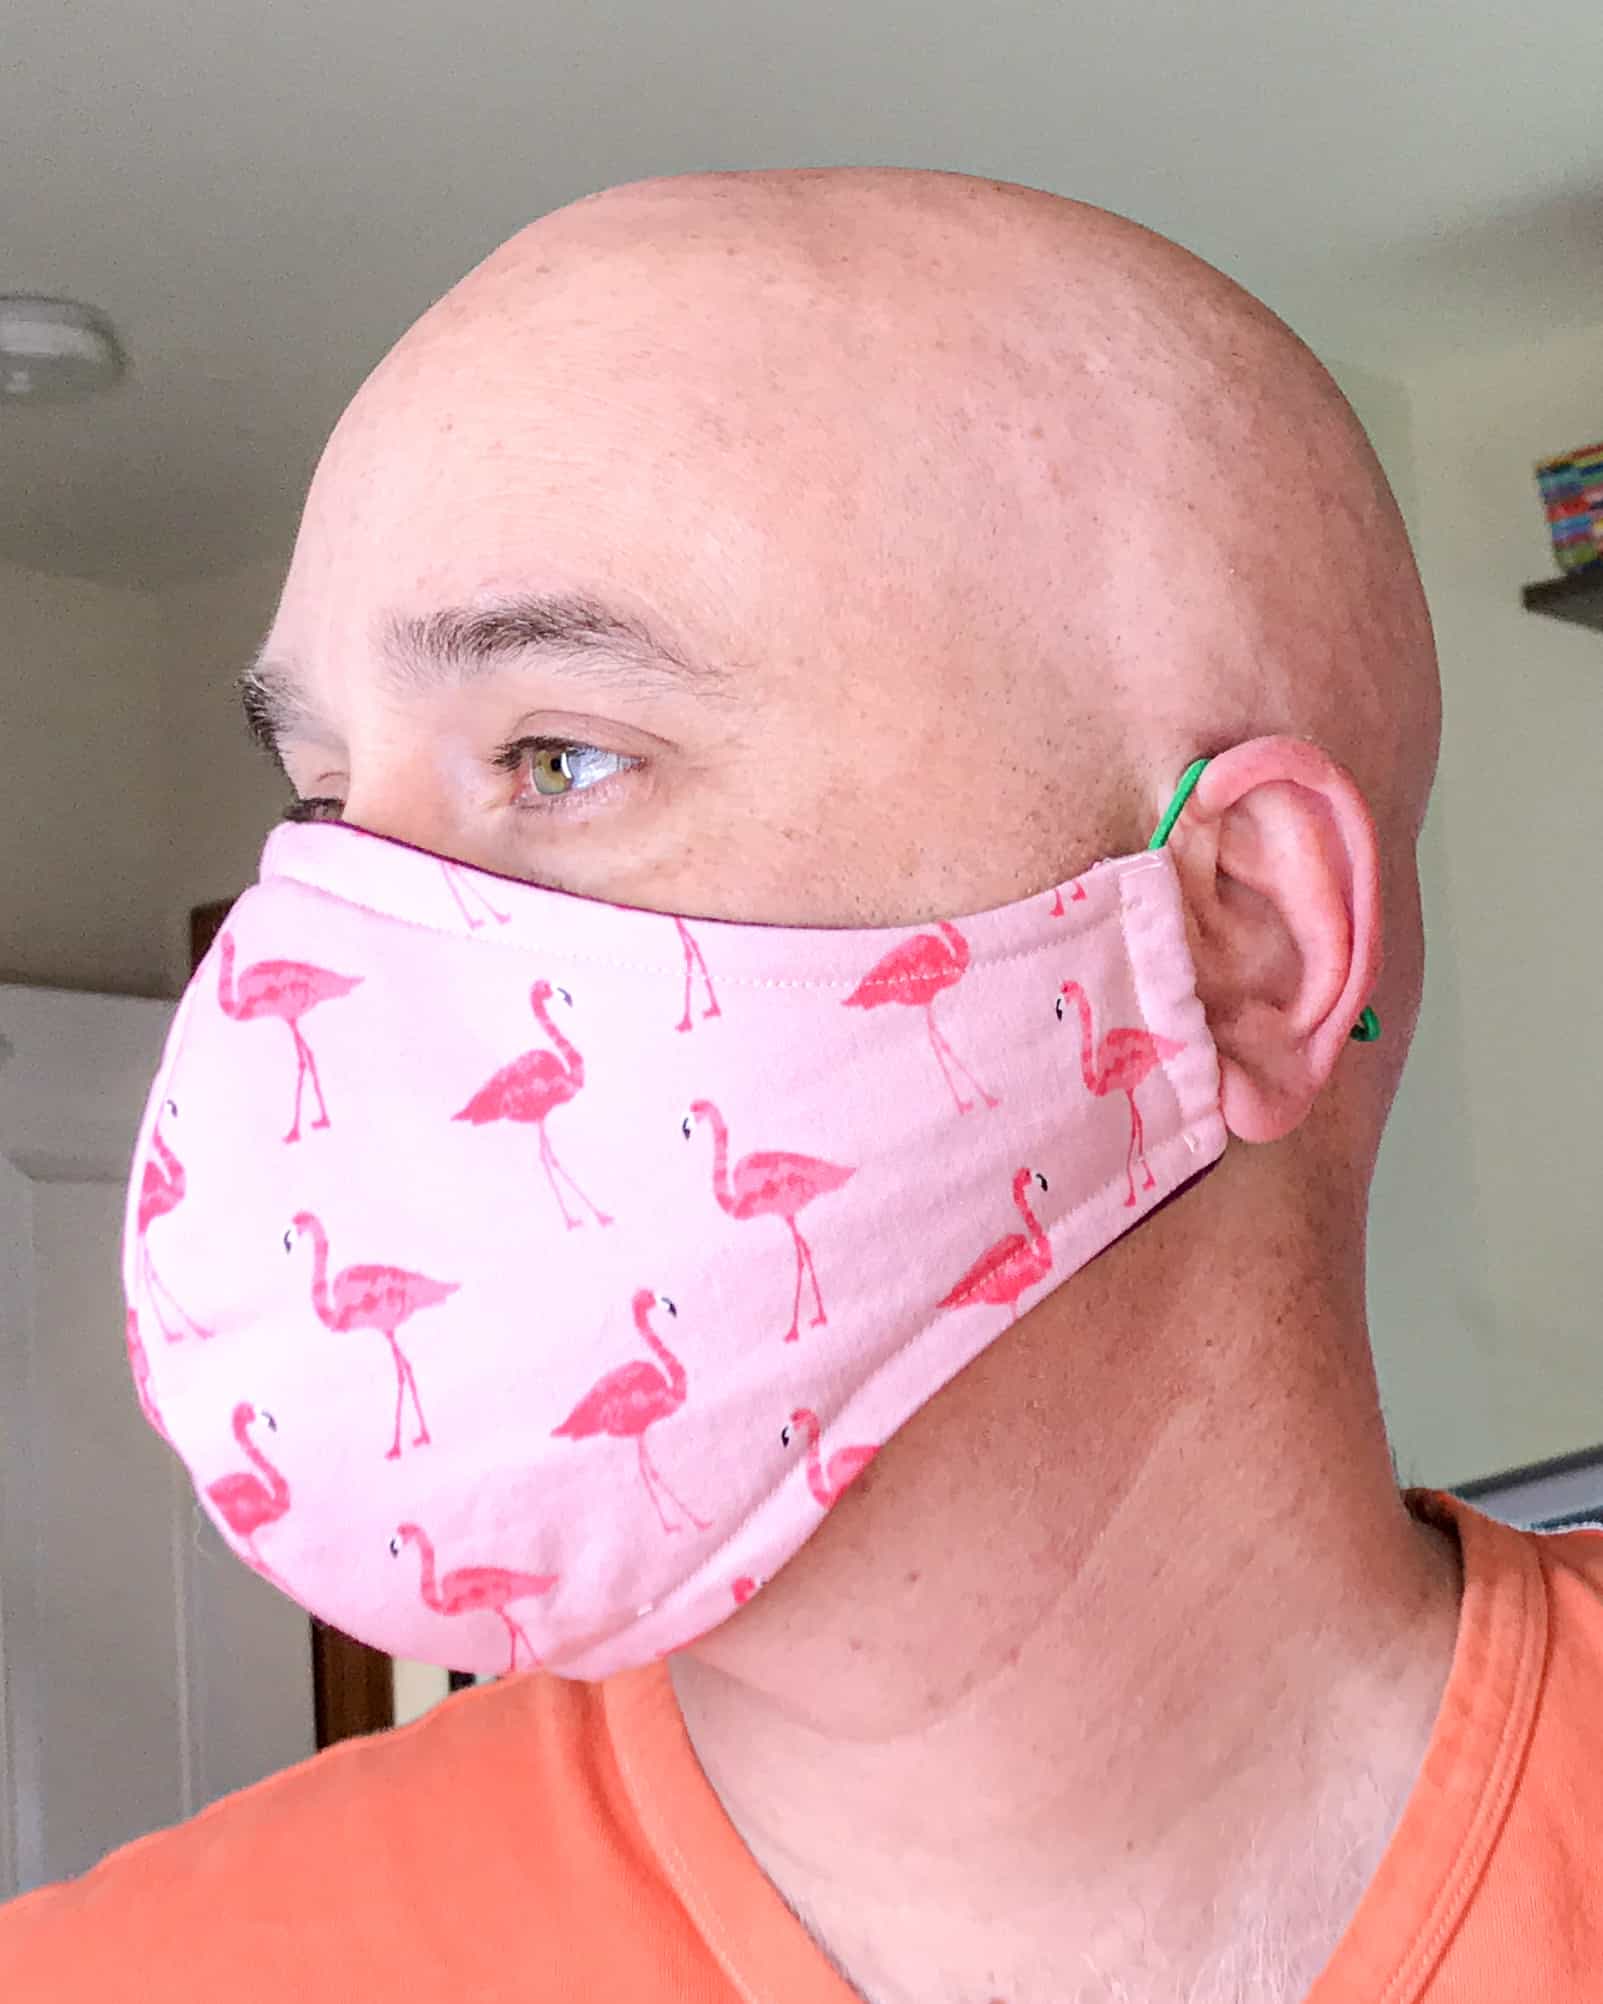
#WearingIsCaring Face Mask
It should come as no surprise to anyone that the world is in the grip of a pandemic the likes of which we have not seen in over a century. It’s easy for us to fall prey to trepidation during these times, but there is one thing medical professionals and scientists agree upon; to better protect ourselves and others: Wear a mask. Both the CDC and WHO agree that people should wear cloth face coverings in public settings and when around people who don’t live in your household, especially when other social distancing measures are difficult to maintain.
According to the World Health Organization “A minimum of three layers is required for non-medical masks, depending on the fabric used”. We opted for a 4-layer mask because, when the news of a pandemic first began, we did a search for “CDC protective masks” and “WHO protective masks.” The latter led us to a scanned document that was a field manual for military personnel and volunteers working in infectious disease zones.
The instructions were for how to make an effective protective mask using four layers of military grade jersey t-shirts. More research led to the fact that these t-shirts were made of a heavier fabric than the t-shirts most of us wear. The fabric was denser providing more protection when worn four layers thick.
Okay then… with an alarming lack of other guidance from health officials, guidelines for improvised masks worn by military personnel and WHO volunteers was good enough for us. We made our first masks using a free template we found online and changed it for using four layers of fabric. Four months later, we are still practicing social distancing and wearing masks when we do have to go out in public for essentials and our protective face mask design has changed to be more comfortable and to fit the face better.
As a result, the #WearingIsCaring Mask has one visible seam and is reversible… just because you are wearing a mask, that doesn’t mean it can’t be snazzy! Right?

The #WearingIsCaring Mask pattern includes 2 sizes for larger and smaller faces. Choose which size you think will fit you best and make that size. Then wear your mask when you must traverse out for essentials to a public setting, knowing you are taking steps to protect yourself, your loved ones, and the folx you come into contact with.
Watch the video tutorial:
Or scroll down for written instructions.
What you’ll need:
Notions and Tools
- Chacopy Tracing Paper (Art. No 434)
- Point 2 Point Turner (Art. No 7803)
- Tracing Wheel (Blunt Edges) (Art. No 481/W)
- Patchwork Scissors (Art. No 493/L)
- Wonder Clips (Art. No 3155)
- Special appearance by our BERNINA 790 Plus and Aurifil 50wt cotton thread.
Fabric
Outer Fabric: 2 colors: 1/4 Yard (0.25m) each
Note: For this project, the solid fabric we used is Cherrywood Hand Dyed Fabric. It is a dense-woven cotton, pre-shrunk, and has no Right/Wrong side. The density of this fabric and the almost felted treatment that makes it a unique fabric makes it perfect as the outer layers of our #WearingIsCaring Mask. We LOVE it. You choose the fabric you like the best.
Lining: 1/2 yard light cotton canvas or cotton muslin.
Other
- Elastic Hair Bands (2)
Instructions
Step 1. Print the pattern
Print the pattern at 100% (8.5×11”).

Step 2. Trace & Cut the Outside pieces
- Lay both pieces of your Outside fabric on top of each other, Right sides facing up.
- Lay a piece of Chacopy Tracing Paper colored side down on top of the fabric.
- Lay your template on top of the tracing paper and tape/pin down or use pattern weights to keep it from moving.
- Using a Tracing Wheel or the Hera marker end of a Point-2-Point Turner trace your chosen size.
- Remove the template and tracing paper and cut out the mask pieces.
- Repeat so you have a total of 4 Outside pieces, two in each chosen color.

Note: If your fabric has different Right and Wrong sides, the second piece will need to be traced from the Back side of the template, so the finished pieces are mirror images.
Step 3. Trace & Cut the Inside Lining pieces
- Fold the Inside Lining fabric twice so you have 4 layers.
- Lay a piece of Chacopy Tracing Paper colored side down on top of the fabric.
- Lay your template on top of the tracing paper and tape/pin down or use pattern weights to keep it from moving.
- Using a Tracing Wheel or the Hera marker end of a Point-2-Point Turner trace your chosen size.
- Remove the template and tracing paper and cut out the mask pieces.
Step 4. Assemble the Mask Pieces
- Lay all Outside pieces Right Side down.
- Lay an Inside Lining piece on top of each Outside piece
- Match two of the same colored Outside pieces up Right Sides facing. (The finished sandwich of fabric will be Lining, Outside, Outside, Lining.)
- Use Wonder Clips to hold together the curved side opposite the short flat side. This will end up being the front of your mask.
- Repeat for the second color pieces.

Step 5. Sew, Trim, and Turn (Twice)
- Sew a 1/2” seam along the clipped edge.
- Trim seam to roughly 1/4” – 1/8”.
- Repeat for the second color.
- Open both masks, turning 1 color (does not matter which one) Right side out. Iron the seams if needed.
- With Right sides facing, insert one color into the second being sure to match Top sides to Top sides.
- Wonder Clip along both long edges being sure to match up the sewn seams.
- Sew a 1/2” seam along the clipped edge.
- Trim seam to somewhere between 1/4” and 1/8”.
- Turn Right side out.
Step 6. Add the Elastic bands
- Choose which color you want to be your main mask color.
- Open the mask and make marks 1/2” and 1” from each unsewn side.
- Place your elastic around the first end and fold once to the 1/2” mark.
- Fold again to the 1” mark being the fold goes over the elastic.
- Wonder Clip closed to hold.
- Repeat for second side.
Step 7. Sew
- Sew the folded edge down.
- Top stitch 1/8” inside the edge of the entire mask to prevent shifting of the mask layers.
You have now made your own two-sided #WearingIsCaring Mask. WOOHOO! Wear it whenever you go out to keep yourself and others safe during this pandemic.
We suggest you make a few for yourself and other members of your household as masks should be only worn by one individual and not shared. It’s best to have a second one available while you wash the first.
The Shibaguyz do not claim to be trained medical personnel. Your homemade face masks are not a replacement for medical grade Personal Protective Equipment, and in circumstances where medical grade Personal Protective Equipment is recommended, you should consult and follow the instructions of a health care professional. The decision to make and how you use this mask is solely your own. Cloth face coverings should NOT be worn by children under the age of 2 or anyone who has trouble breathing, is unconscious, incapacitated, or otherwise unable to remove the mask without assistance.
Please remember that use of face masks is intended to assist, not replace, other recommended measures to stop the community spread of COVID-19, such as social distancing, washing your hands and refraining from touching your face. Follow the latest advice of the CDC, the WHO, and your own health care professionals as to how best to keep yourself safe.
STAY SAFE, WEAR A MASK, & STITCH ON!
Watch the video tutorial:
Find the Shibaguyz on Facebook | Twitter | Instagram | Pinterest
Stay connected with Clover on Facebook | Twitter | Instagram | Pinterest | YouTube | Ravelry
[mc4wp_form id=”11289″]