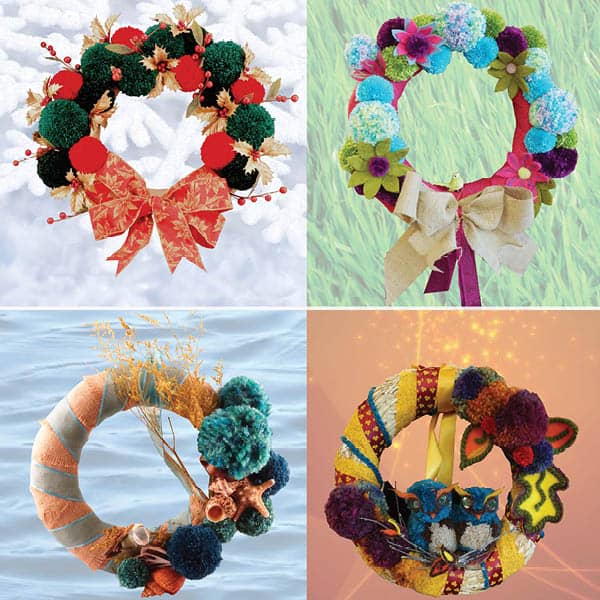
You can make your own wreaths during the holiday season by following these easy steps.
Supplies
Clover Pom-Pom Maker (Shown above)
Styrofoam Wreath
Art No. 240 Fork pins (Shown above)
Scissors
Medium-Bulky Yarn
4” Wide Ribbon
Embellishments of your choosing
Making Seasonal Wreath:
Step 1:
Wrap your wreath in ribbon, covering the entire surface (you may pin or glue ribbon to surface).
*Think out of the box for this step! Experiment with texture for example try Burlap.
Step 2:
Construct pom-poms using Clover’s Pom-Pom Makers as instructed below. Amount of pom-poms depend on design and size of pom-poms used for wreath. An average of 5-10 large pom-poms are needed for a larger size wreath as shown in the Winter wreath.
*Use different sizes of pom-poms for a more organic look.
Step 3:
Layout pom-poms before gluing/pinning. Once this is done carefully glue or pin all pom-poms to wreath.
Step 4:
For beginners we suggest making a bow for wreath. This will allow you to embellish wreath without having to make too many pom-poms. (As shown in Spring Wreath)
Step 5:
Get creative! Embellish with buttons, seashells and more… Mix crafts such as felted flowers or even a pom-pom owl!
(shown in Autumn Wreath)
How to make a pom-pom:
Step 1:
Align arches and firmly wind yarn or finely shredded wool from one end to the other evenly.
Step 2:
Close arches and cut the yarn beginning at the gap between the arches.
Cierra los brazos y corta el hilo empezando por el espacio entre los brazos.
Step 3:
Place a sewing thread or yarn to tie pom-pom in place. Tie firmly and make a double knot.
Step 4:
Separate both arches and remove pom-pom. Use scissors to cut loose ends and to shape the pom-pom.
Clover Tip:
For beginners we suggest using a plain Styrofoam wreath in order to pin all your embellishments. The smooth surface will make application easier.
Show us your finished products on Facebook | Twitter | Instagram | Pinterest.
